Comprehensive Q Manager Guide for Source-Connect Pro/Pro X 3.9
This section provides a complete overview on using Source-Connect from version 3.2 and up with Restore and Replace. Q Manager version 2 provides easier and faster Restore and Replace operations, plus several additional back-up options.
The online Q Manager Help guide is also available directly from on the Q Manager setup panel and will take you to the comprehensive Q Manager guide online. You can refer to this guide whenever needed for quick help.
If you have any questions on working with the Q Manager and Auto-Restore and AutoReplace please contact Support.
What is the Q Manager?
With traditional long-distance recording, whether with Source-Connect, ISDN or any networkbased transmission, the send signal is subject to various issues which may cause dropped packets and therefore ‘glitches’ in your recorded audio. Previously the only method to ensure a fully complete recording was to ensure your connection partner was also recording locally, so you could transfer this audio after your session and manually replace it in your edit. Source-Connect with Q is the only available automated method to ensure that your recordings are perfect every time, with our Auto-Restore and Auto-Restore functionalities.
What are Auto-Restore and Auto-Replace?
Auto-Restore
First, an overview of how audio is transferred and recorded over packet-based transmission lines. 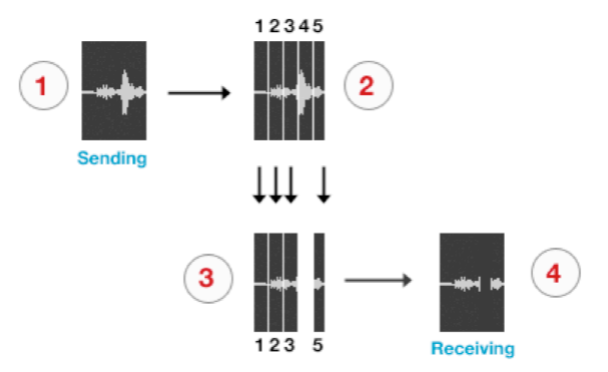
- The audio signal is sent through Source-Connect, and is split into packets.
- These packets are sent sequentially to your connected partner over the internet.
- If a network error occurs, a packet may not arrive in time.
- If this occurs you will hear a minor glitch in the received audio signal.
- The audio file is scanned when recording completes.
- If any missing packets are detected they are requested from your connected partner, who has stored them during the connection.
- Your file is restored and is now available for flawless playback.
Source-Connect has built-in error correction modes to try and resolve these dropped packet issues in real time, however under certain circumstances a packet may not be retrieved in time to recover the signal before it is recorded.
Auto-Restore resolves this problem by working in the background in non-realtime and restoring your recorded audio files.
Auto-Replace
Auto-Replace works in a similar way, except the packets which are requested from your connected partner are of the original PCM data which was sent into the Source-Connect plug-in, and instead of only requesting those packets which did not arrive in time, all packets are requested. A complete replacement of the decoded AAC audio is then made with the full resolution PCM audio. An important distinction between Replace and Restore, is that Replace operations will take longer to transfer due to PCM being uncompressed data. Generally we would recommend you activate the Replace process once your session is complete.
Ultra-QuickStart Guide
This section is provided for the most common case uses.
- Launch Source-Connect Pro and connect using 44.1khz or 48khz, with bitrate of 64kbps mono or higher.
- The Q manager will login automatically. Check that your FTP service is active. If you get an FTP error see the FTP error section of this manual or contact Support.
- Set your audio files folder / session folder in the Q Manager Setup panel. This is the folder where you will record your actual files to.
- Make sure you have Restore and Replace checked in the Source-Connect settings panel.
- Connect with Source-Connect to your connection partner and check that you have a Q icon on the Receive status, next to the blinking Receive light.
- Record a test file – it should show up immediately in your Q Requests. If it says Restored, select and choose Replace Now from options menu.
If it progresses and comes back saying Replaced, you’re good to go!
Lifecycle of a recording in the Q Manager
This section is a step-by-step guide to using Source-Connect Pro for Auto-Restore and Auto-Replace. It shows how the Q Manager works by describing the ‘lifecycle’ of a file recorded in Pro Tools and the subsequent restore and final replace process.
1. Enable Restore and Replace in your Source-Connect Pro settings
To request Restore data you must have the ‘Q restore’ checkbox checked in the Source-Connect Pro Settings panel. To request Replace data you must have the ‘Q Replace’ checkbox checked. You can use either or if you need, or disable both if you are just monitoring the connection. 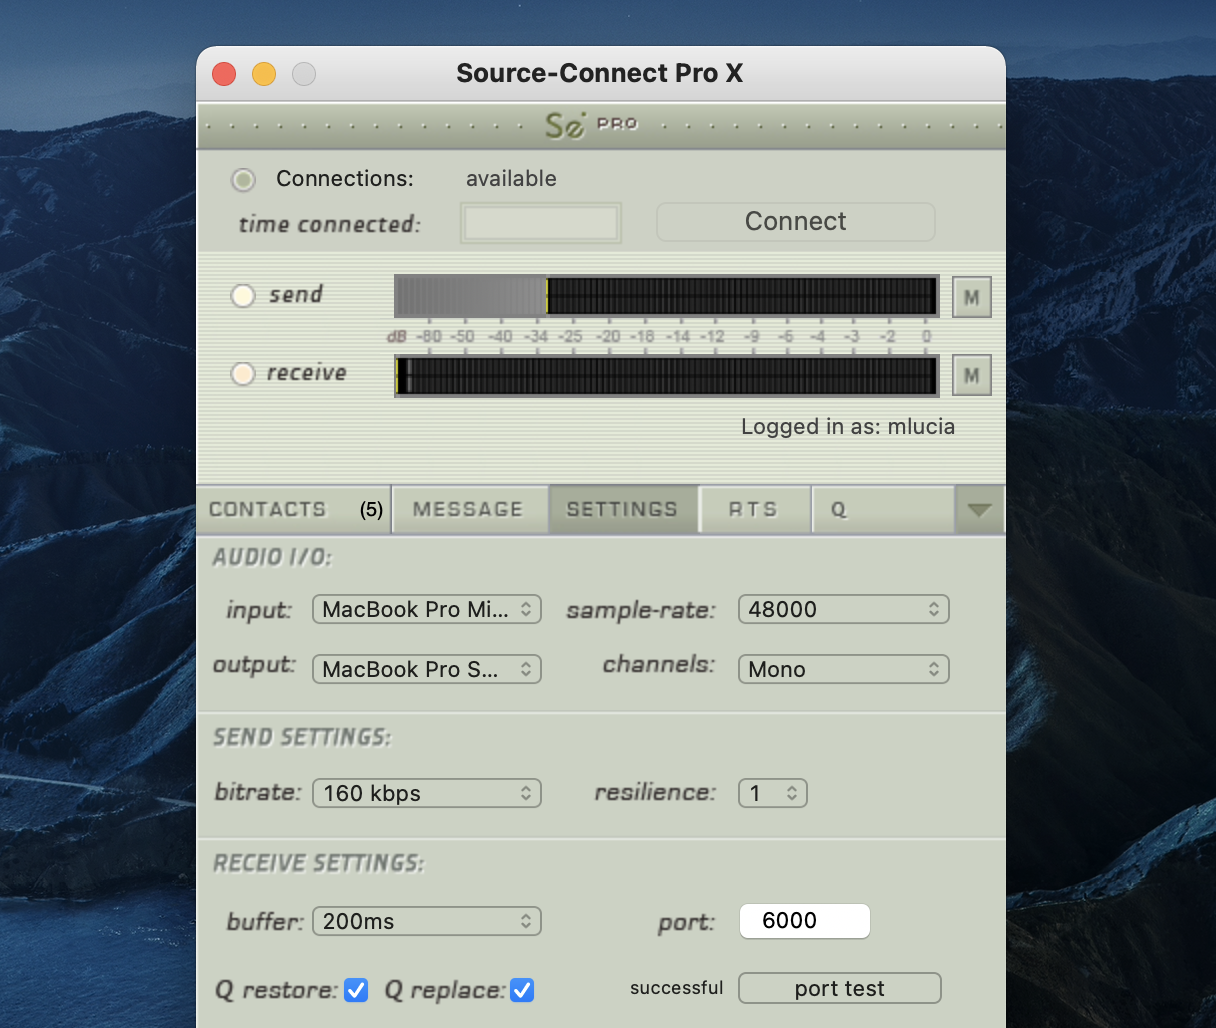
2. Request a Source-Connect session
When you request a Source-Connect session with Restore or Replace checked, your connection partner will be show a dialog indicating that you wish to receive Restore or Replace data. 
3. Ready to record
If your partner accepts you have now established a Source-Connect session with Restore and Replace enabled. You should now see a Q icon to the left of the Receiving meter, indicating that you can receive Restore and Replace data. If your connection partner also has Source-Connect Pro and has the Restore/Replace boxes checked you will see a Q by your Sending meter also. 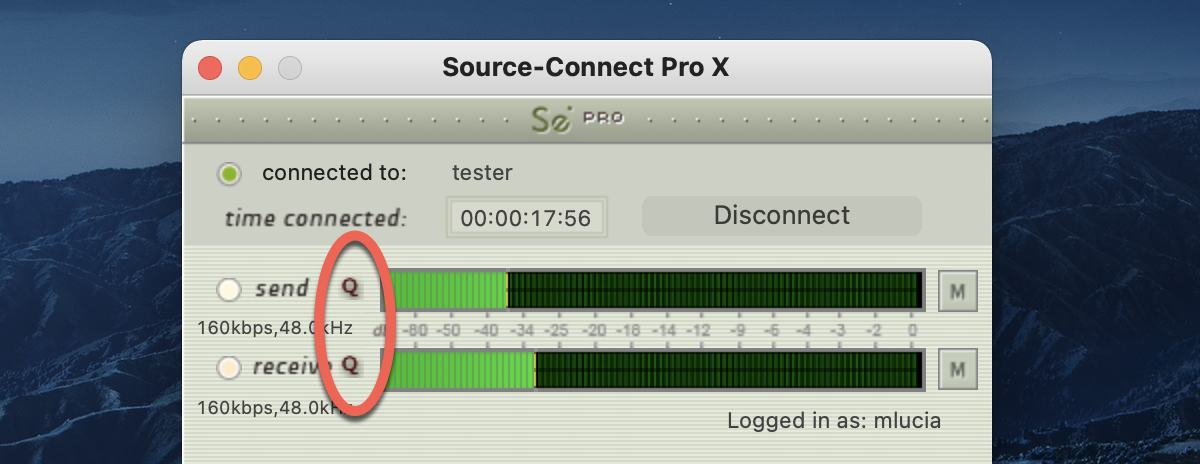
4. Recording an audio file
In this example we are sending a sine-tone signal via the Signal Generator plug-in to be recorded, and for the purposes of demonstration we are causing a significant number of dropped packets. You can see on the waveform in the timeline when the recording is significantly degraded: 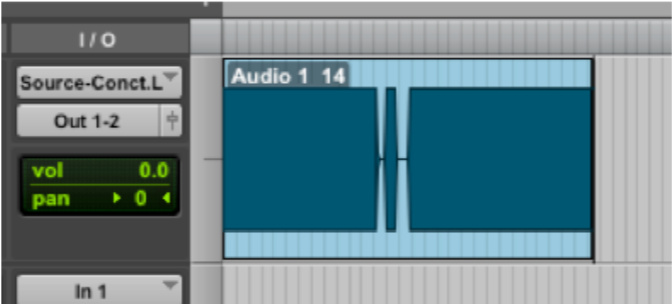
IMPORTANT: As noted previously in this document it is necessary to ensure that your recorded signal is passed directly to your record track, with no volume changes or other plug-in processes in between Source-Connect and the record track. This ensures that the Q Manager will able to fully restore and replace your recordings.
5. Restoring the audio file in the background
Once you stop recording the Q Manager will start the restore process. You can continue recording multiple files as the restore process does not interrupt your session in any way. If you have the ‘Send status notifications to Source-Connect IM’ option enabled in the Advanced settings of the Q Manager, you will see the result of the process in your Source-Connect Instant Message window as files are processed: 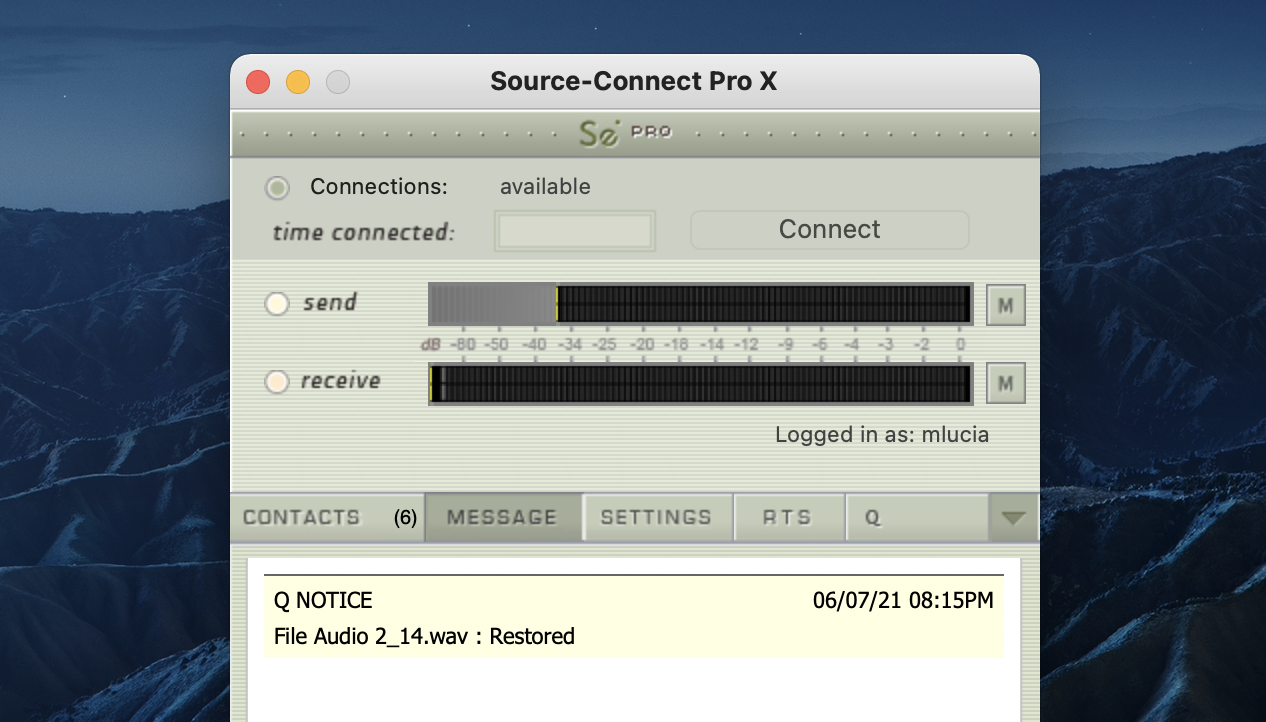
6. Taking a look at the restored file
Since we have recorded a sine-tone signal, it is simple to see visually how the restore process works. Select the filename in the Pro Tools bin and choose ‘Recalculate waveform overviews’. We can now compare the files before and after the restore process visually:
Before and after the restore process: 
We can now see (and hear on playback) that we have a completely restored audio file with perfect playback.
7. Replacing the file with full resolution PCM data
It is not necessary to restore your audio files if you only need the replace process. However, if your files are currently being restored you’ll need to wait until this process completes before activating the replace process. To activate the replace process there are two options: manually per file or all available files at once.
Replace now
To process files individually, highlight that file in the Q Requests panel and select ‘Replace now’: 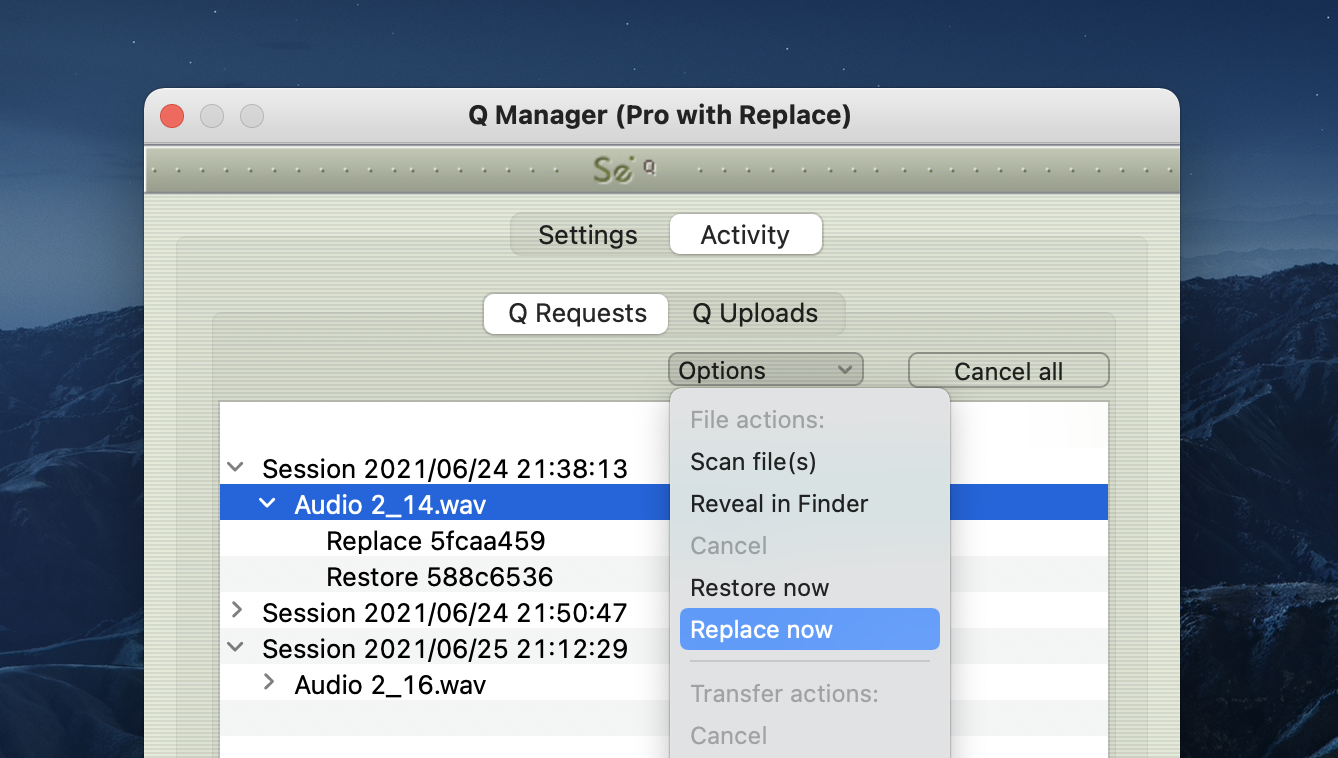
Start Replace process
To process all available files in the Q Requests menu, select the ‘Start Replace process’ from the Q Menubar dropdown menu: 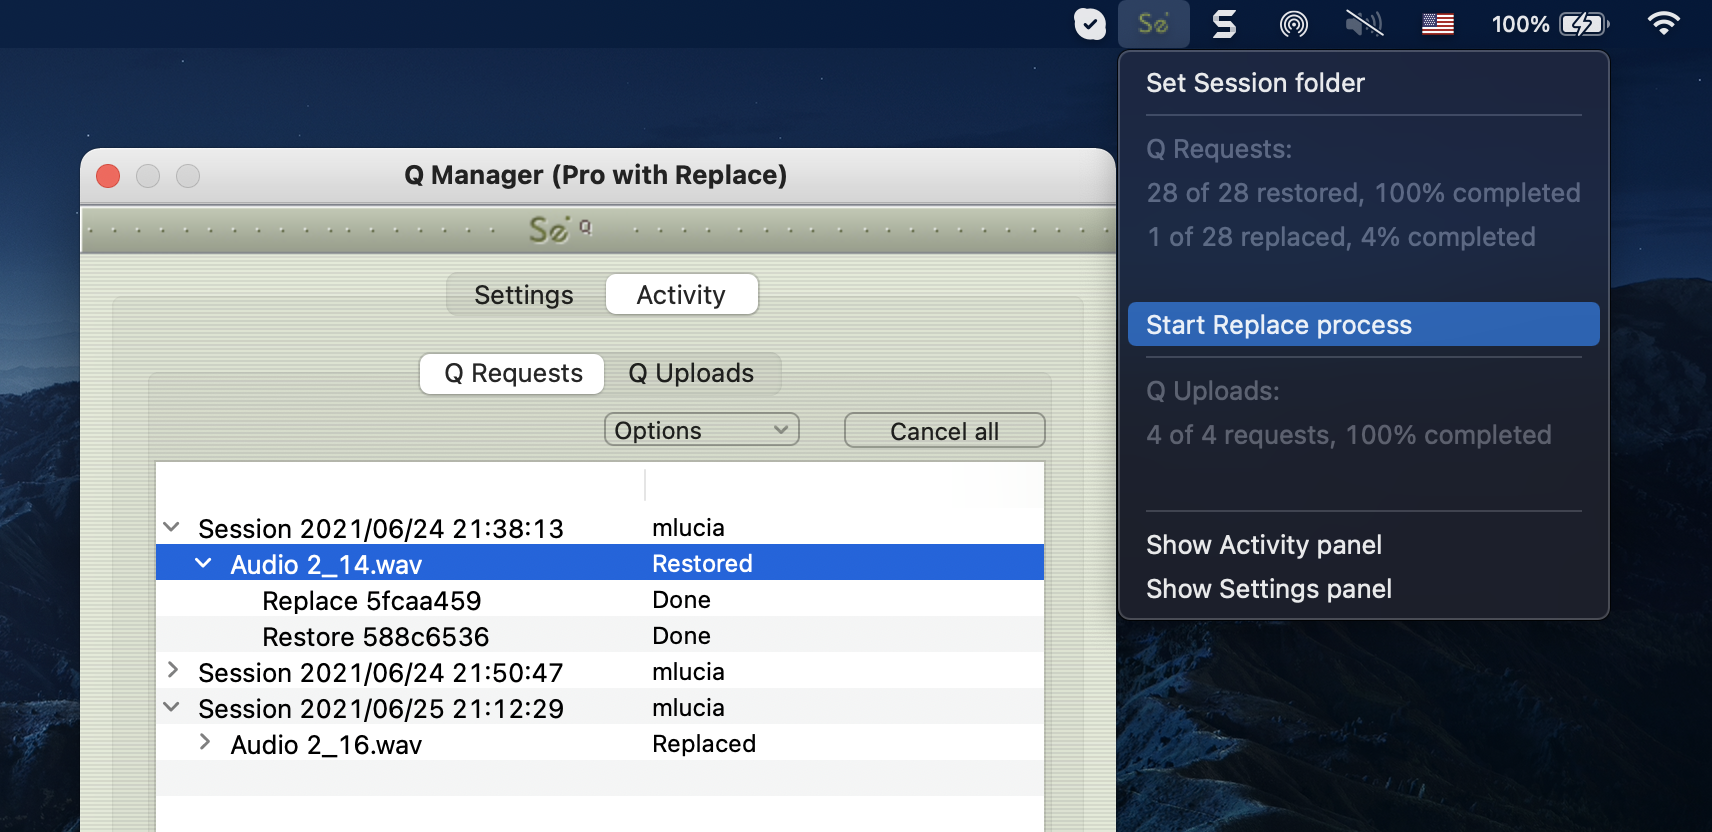
You will see an Instant Message (if IM notifications are enabled) to let you know that the Replace process has completed and the status of the file in the Q Requests panel will be ‘Replaced’. Depending on the size of your files and the available bandwidth between you and your connection partner, this process will take some time, and longer than the restore process. Click on the arrow next to the filename to show the current progress. If the file is very large you will see a percentage of the progress. 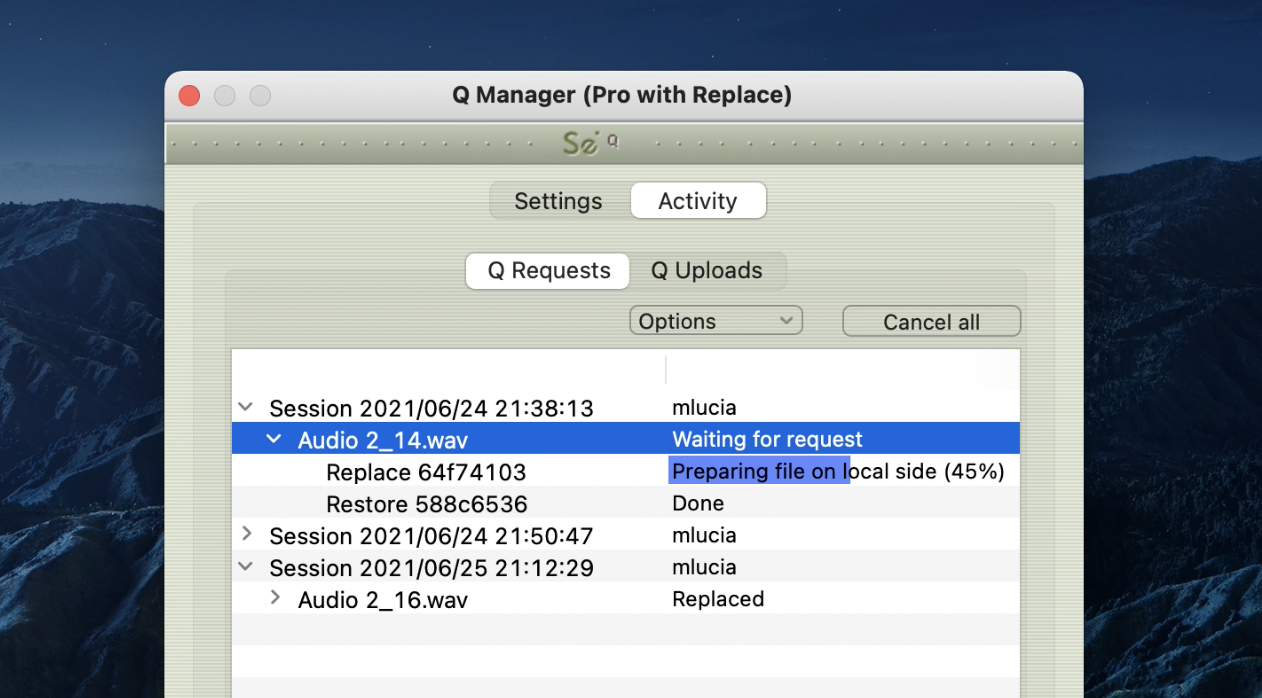
Once the process is complete you now have the full resolution PCM files in your edit window of your DAW. 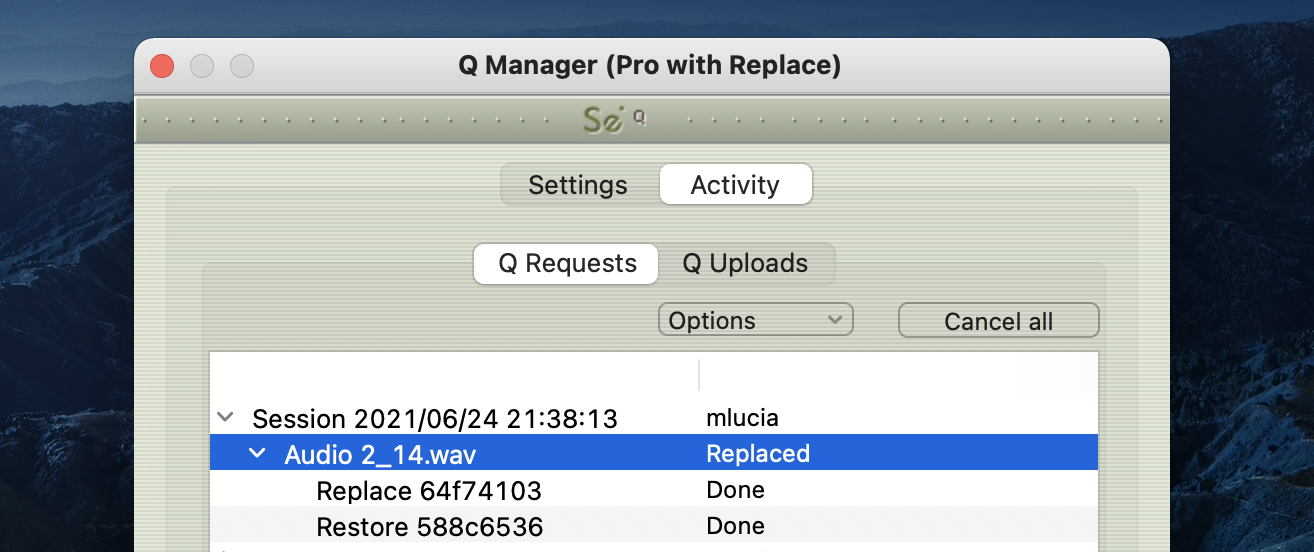
8. Detecting whether your audio files are ready for Restore and Replace
It is possible that because of your audio I/O routing, the Q signal is not being detected in your recorded Source-Connect audio - even though you have the Q icon displayed. Often this is because the I/O you are sending audio through is also used with other input sources. To verify whether this is the case, or if you have set the wrong Audio Files folder in the Q Manager you can try manually scanning a file. If the file status comes back 'Q not present' it means that it was either not recorded from Source-Connect, or the aux you used was not a clean aux. We recommend creating a brand new aux channel in the I/O settings of Pro Tools and testing your record again.
To manually scan a file choose Scan file(s) from the Requests options menu, then select a file that has been recorded via the Source-Connect connection. 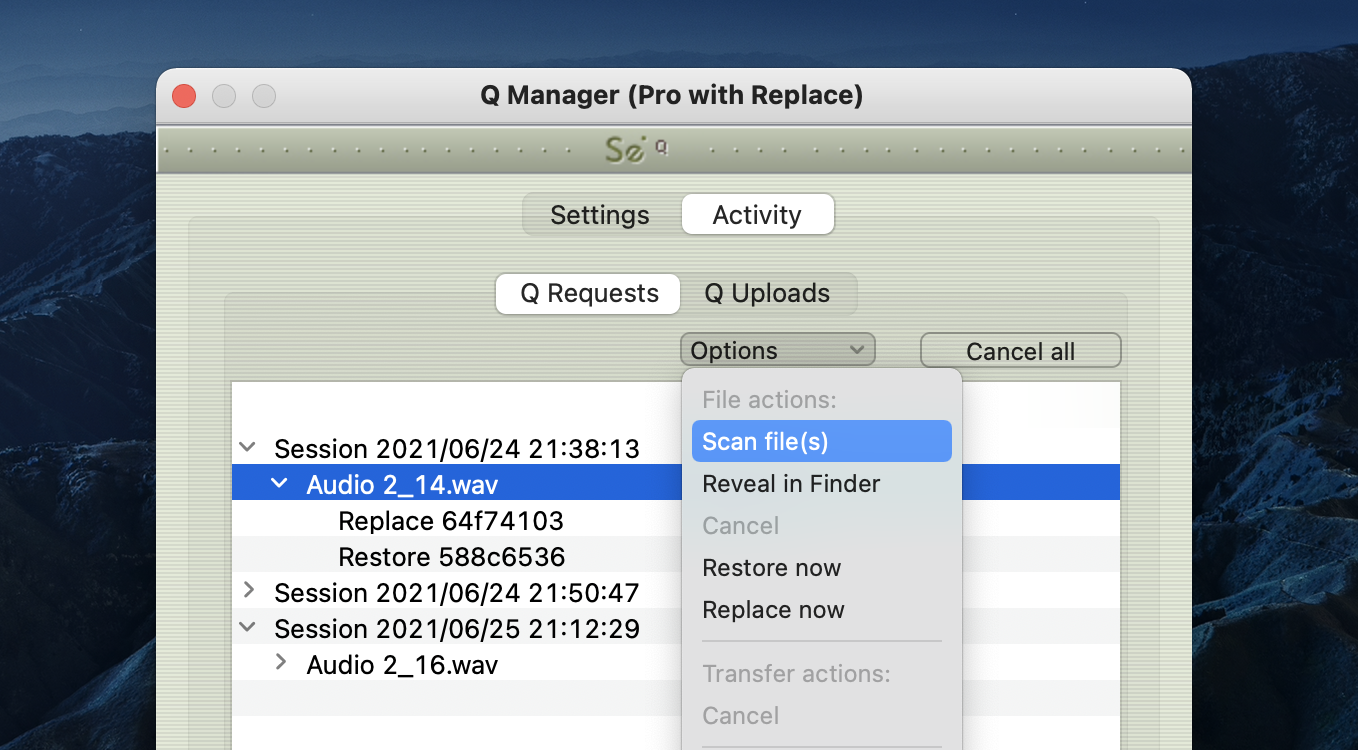
Launch and configure the Q Manager for recording
When you launch Source-Connect, the Q Manager will also launch. By default, the Q Manager will login with the Source-Connect username and password that is entered in Source-Connect. If you logout and login to Source-Connect with another account, the Q Manager will also be logged in to that new account.
Setting your Session Record directory
Generally, the only step you will need to take is to set your Session folder directory. This is the actual folder where you record your audio files, e.g. the ‘Audio Files’ folder in Pro Tools and Logic. 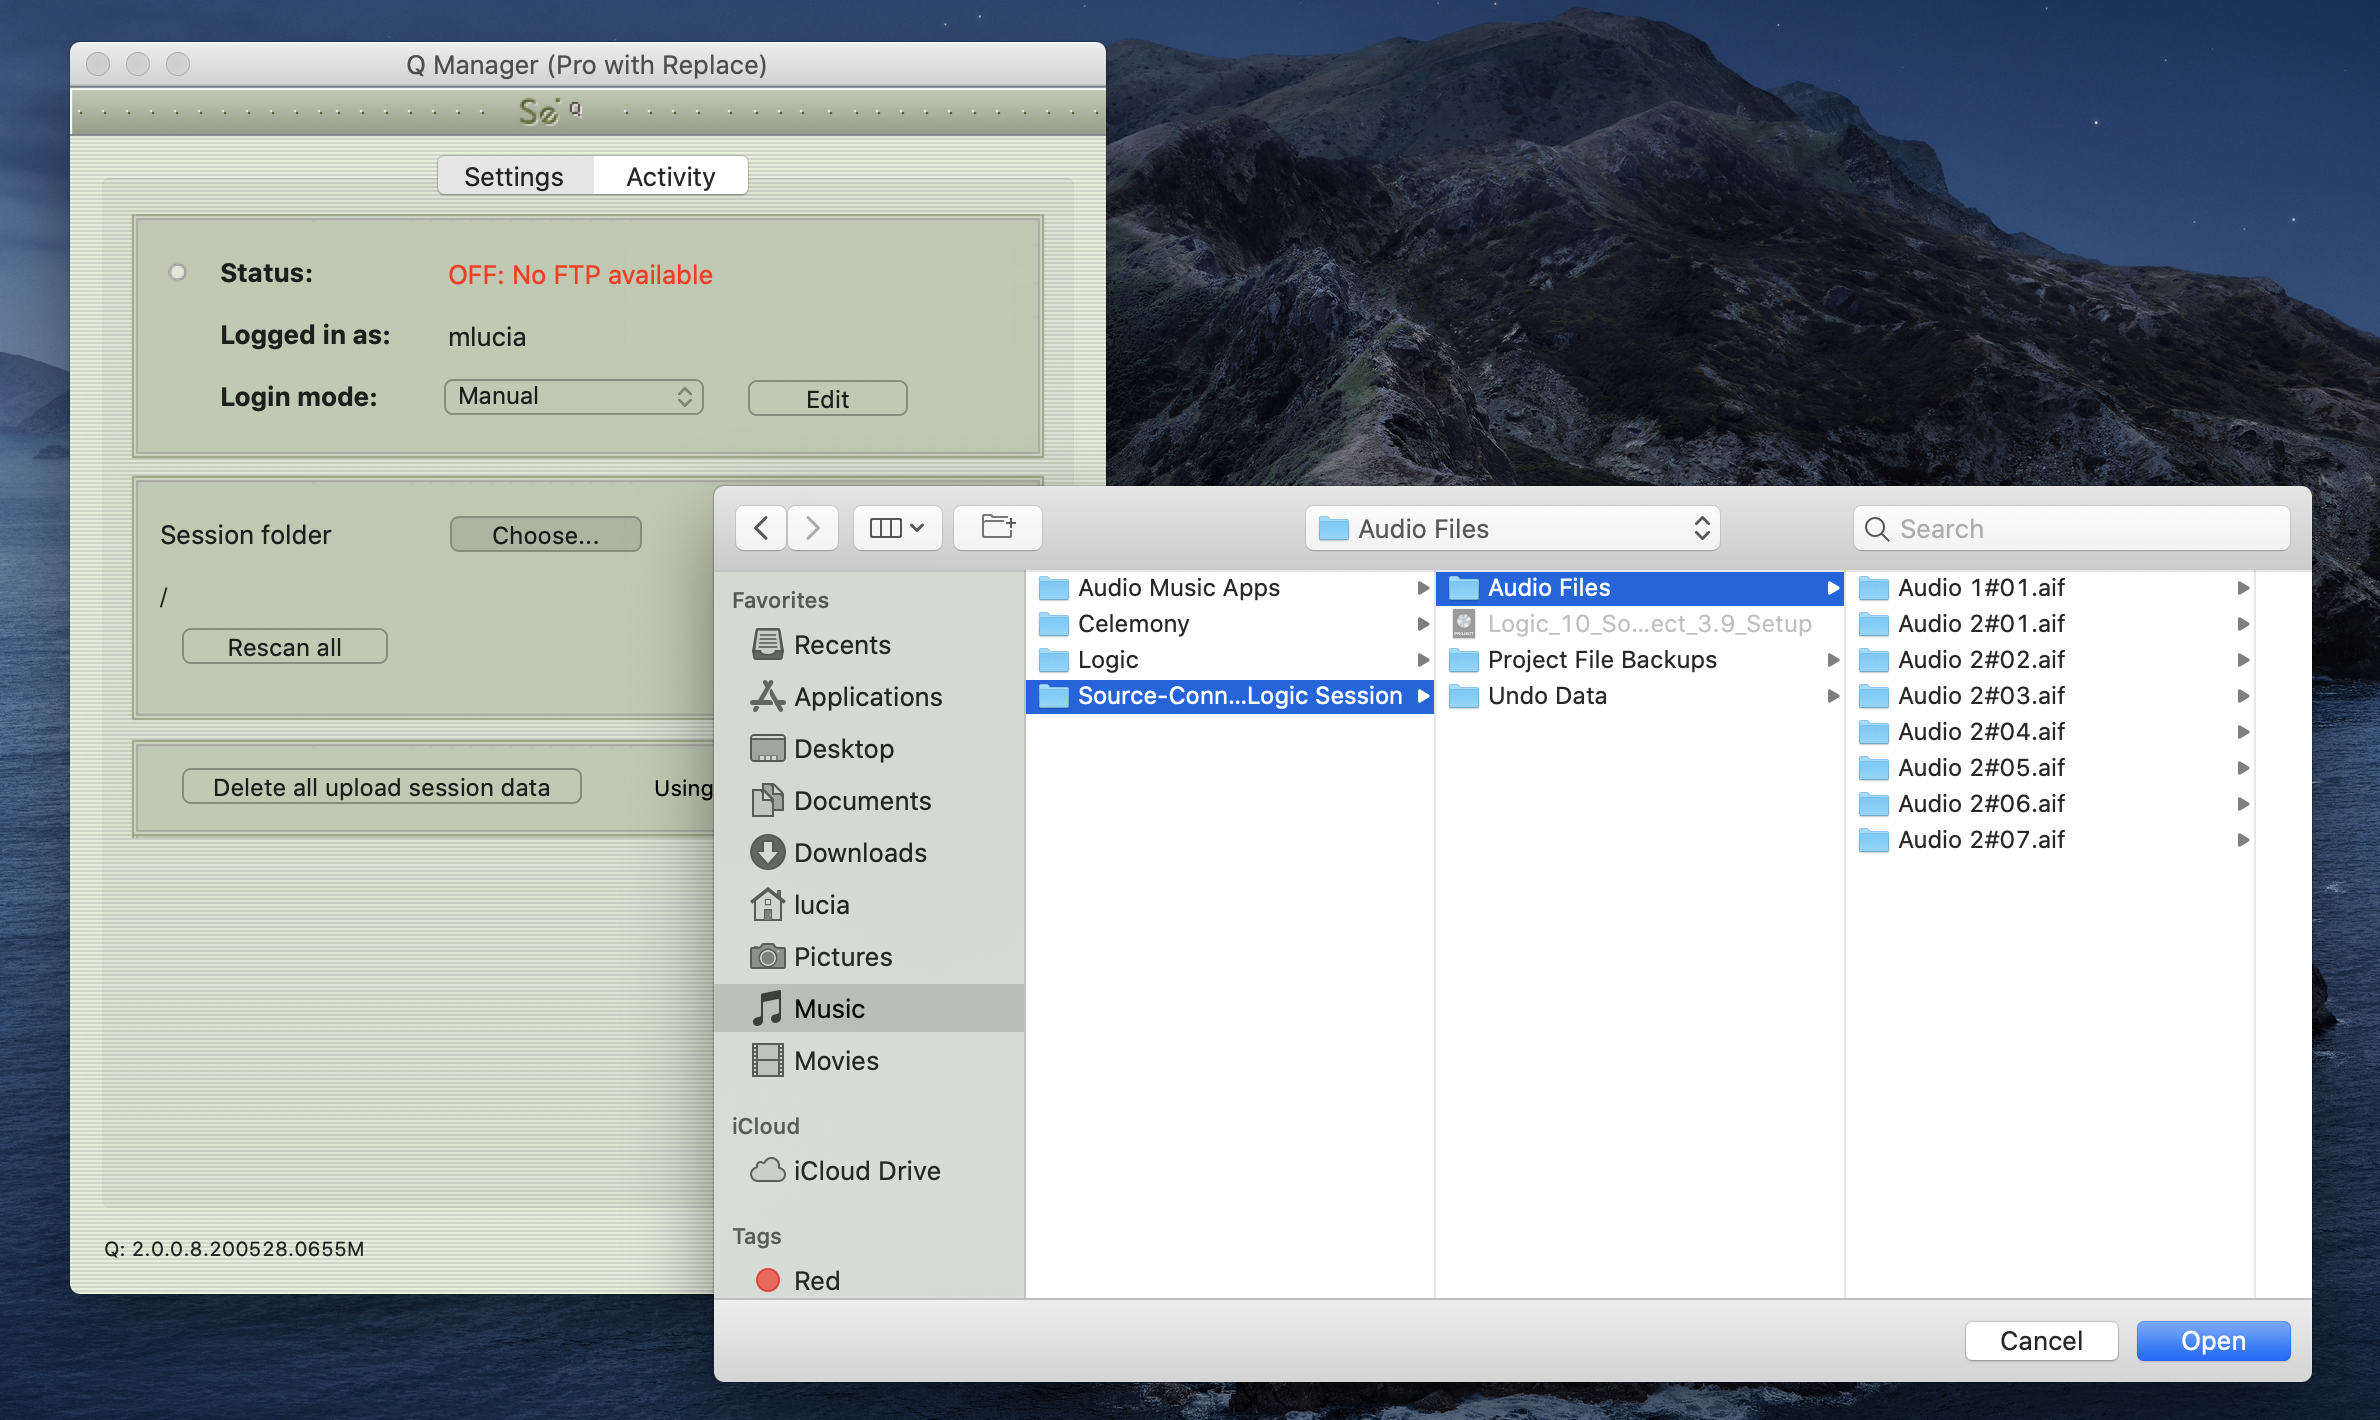
Login Mode in Q Manager
The Q Manager is designed to automatically login to your Source-Connect account you are currently working with for ease of use. However under some situations you may need to modify your Login settings.
Login Mode: Auto
Under Auto Mode, the Q Manager will login to the Source-Connect currently used. If you logout of Source-Connect and login to another account, the Q Manager will also login to this new account. When using Auto mode, take care you are not using an account that may also be used in another computer, if you have multiple rooms. It is important that the same Q Manager account is logged in to the same computer that the original Source-Connect session was recorded on, due to the local data storage. 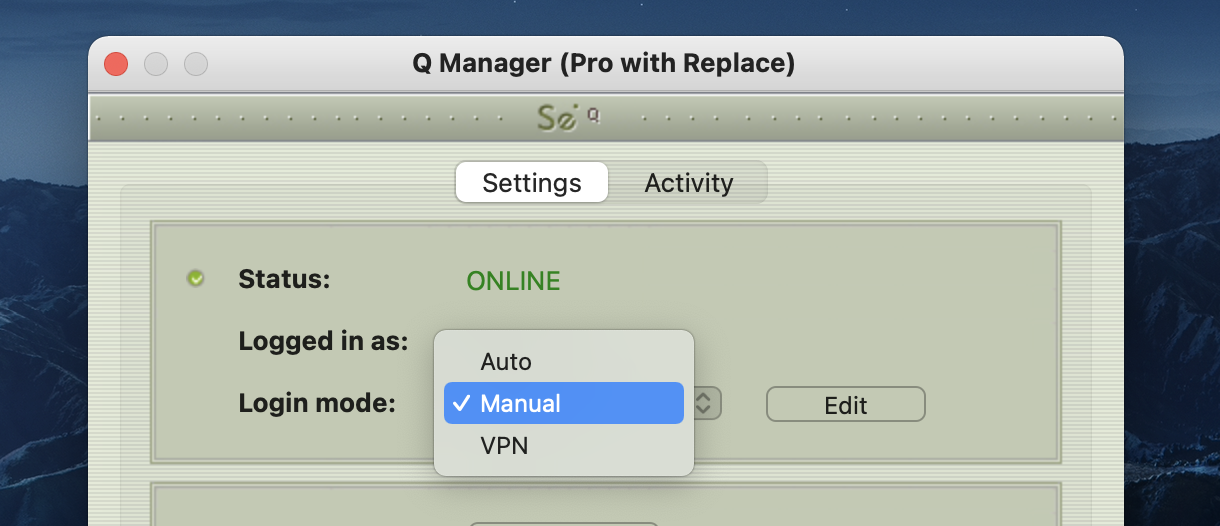
Login Mode: Manual
You can set a permanent account to be used by the Q Manager. When launched it will only login to this account and not switch when Source-Connect may use a different account. This is useful, for example, in a large studio where you don’t have a fixed account per computer. You can use as many Q Manager accounts as you have multi-connect accounts (See your Profile on the Source-Connect website or ask Support). 
The Q Manager will try to login to your Source-Connect when you click the Save button.
Login Mode : VPN
Mode When using VPN Mode in Source-Connect, you must have the Q Manager in VPN Mode also, as it uses a different protocol to communicate with your remote Source-Connect connection partner. If you are in Auto Login Mode, the Q Manager will automatically switch to VPN Mode if you are in VPN Mode in Source-Connect. If you are set to Manual mode, you will need to manually switch to VPN Mode.
FTP Settings in Q Manager
The Q Manager only transfers audio and Q data via the FTP protocol. This requires that you have an active FTP account to request Q data from your connection partner. The FTP account you use should not be a highly secure account: in order to transmit data to each other this account information will be communicated to the other side. While SourceConnect and the Q Manager do this silently, it may be possible for the other side to ‘listen’ and detect your FTP login information.
Because the Q Manager communicates your FTP login, only the side requesting data will transmit the FTP login information to be used. It is not important that the other side has a valid FTP account. The same is for Source-Connect Standard – because Standard cannot request Restore or Replace data it does not have any FTP login information stored to use. So, if you are the side requesting Restore and Replace, your FTP account will be used for those data transfers.
Setting your FTP account
You can set your FTP account manually via the Q Manager login settings. 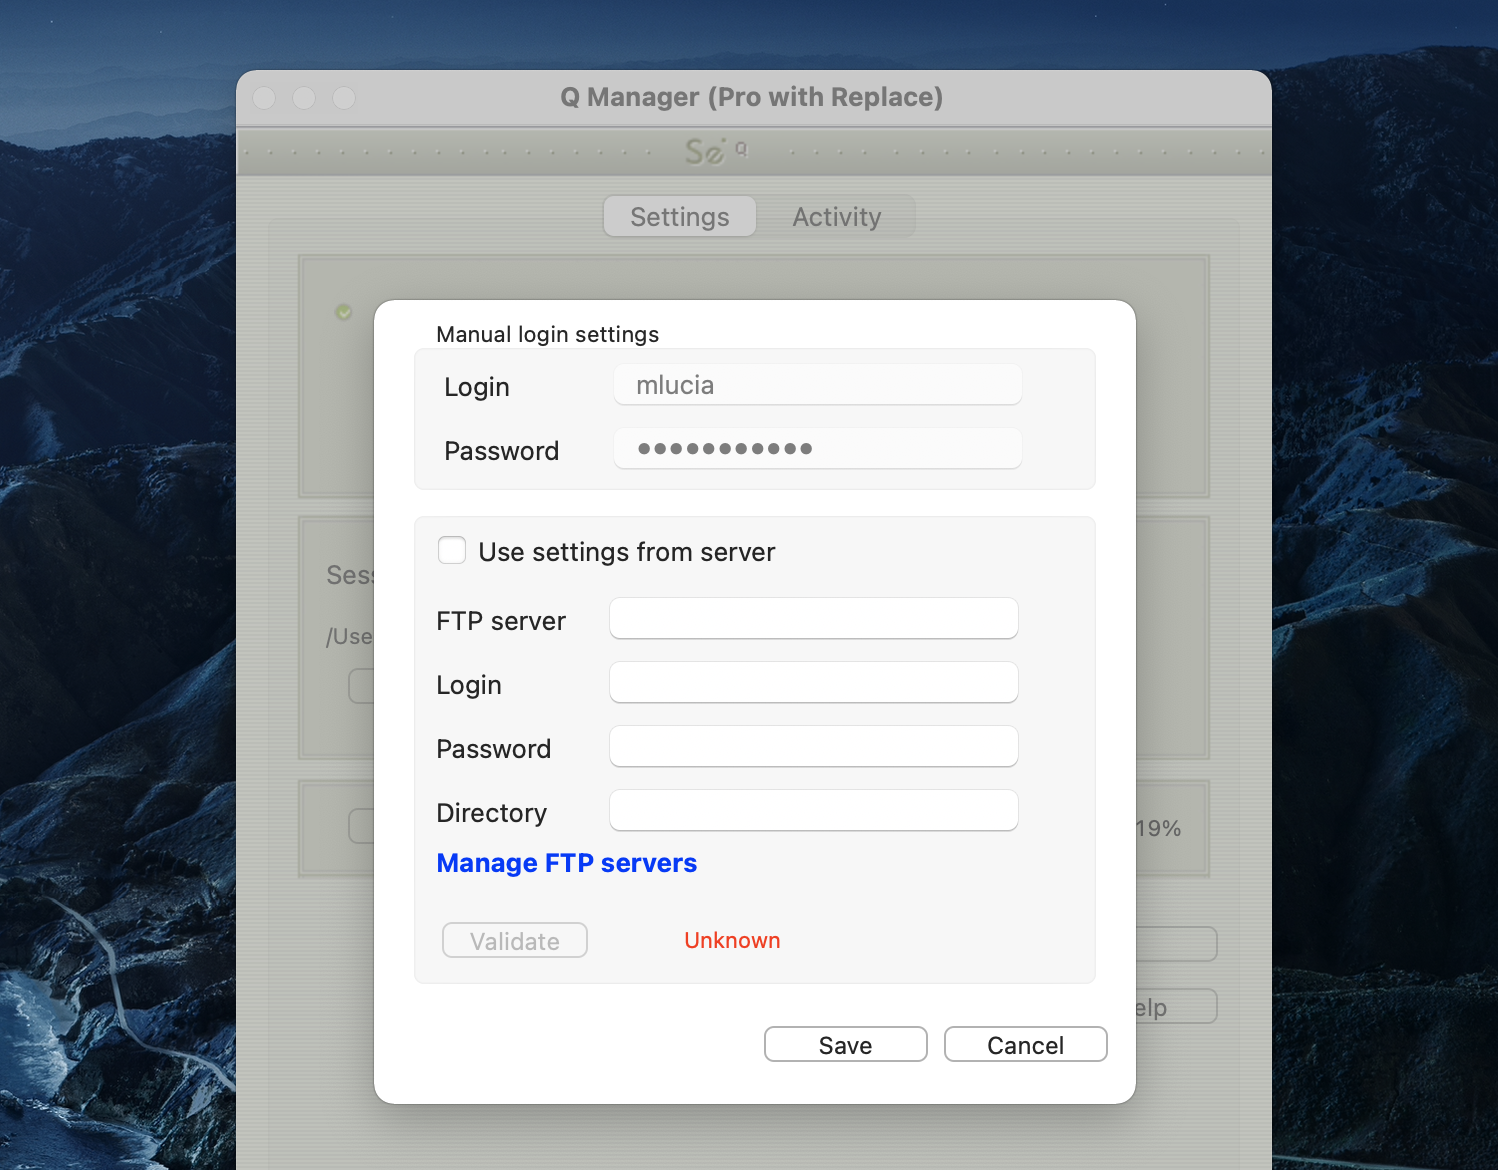
Testing your FTP account
The Q Manager will validate your FTP account by sending a test file on each login or on changing your login settings. The test file will need to be written and downloaded from your FTP site. This means your FTP account much have read and write permission. You can also set a specific FTP path if you need to do so.
Using Auto-Restore and Auto-Replace: Details
- To enable Auto-Restore and Auto-Replace recording on your end, make sure 'restore' and ‘ ‘replace’ is checked in the Settings panel. If your remote contact wishes to record with Auto-Restore/Replace enabled, they should also enable these settings. It is not necessary to both sides to enable restore, only the side which will be recording. Also, you don’t need to enable Restore if you just want Replace.
- Connect to your remote contact over Source-Connect. If Auto-Restore and/or Replace is enabled, you will see a 'Q' icon on your receiving meter, meaning that you can record and receive Auto-Restore and Replace data.
Note: sample-rate converting or stereo to mono converting is not supported. You will receive a message and your Q will have a red slash if sample rate and channel count are not the same on both sides.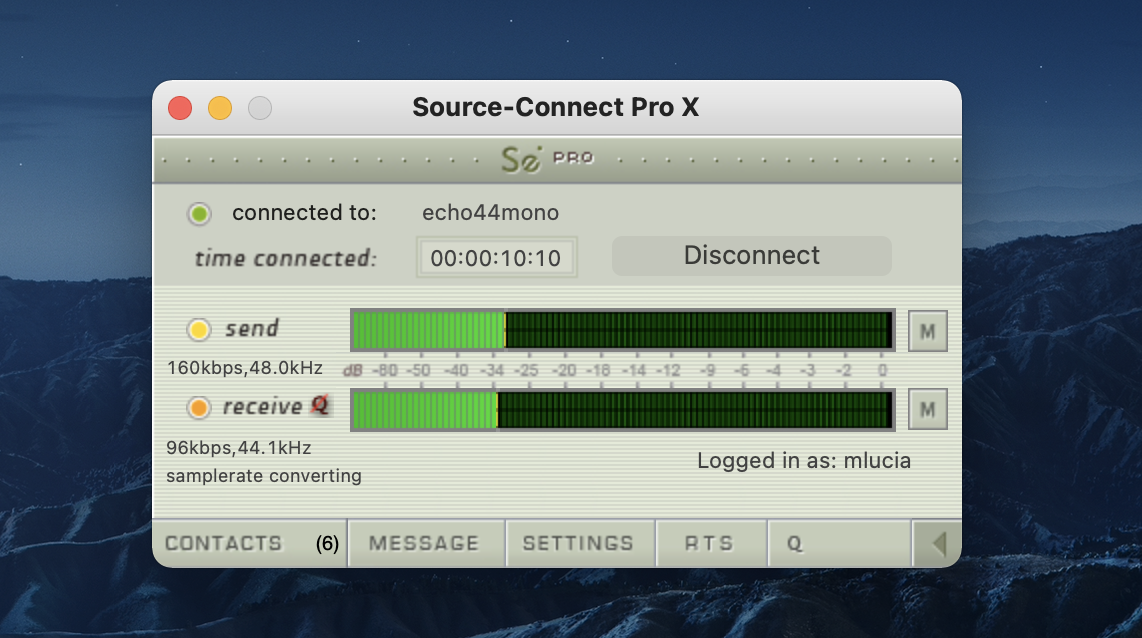
- Record the original signal received from Source-Connect.
IMPORTANT: If you pass the Source-Connect signal through any filters, reverbs or any other kind of signal processing including changes in volume the file will NOT be restored or replaced. We recommend you use bussing to send the signal from Source-Connect or Source-Connect Link plugin to your record track unaltered. Source-Connect Pro fully supports mono and stereo recordings. - If any dropped packets occurred during your recording, the Q Manager will repair your recorded file in the background and send an Instant Message to the IM window of SourceConnect with the status of the file process.
You can disable the Instant Message option in the Advanced settings of the Q Manager.
Configuring your Q Session folder
Your Session folder is very important – you must select the folder you are going to be recording into or the Q Manager will not be able to detect the files to be processed. Choose the Audio Files folder of your DAW session. You can either click the Choose button and find your Audio Files folder in the dialog that pops up, or you can drag the folder from your Finder window. 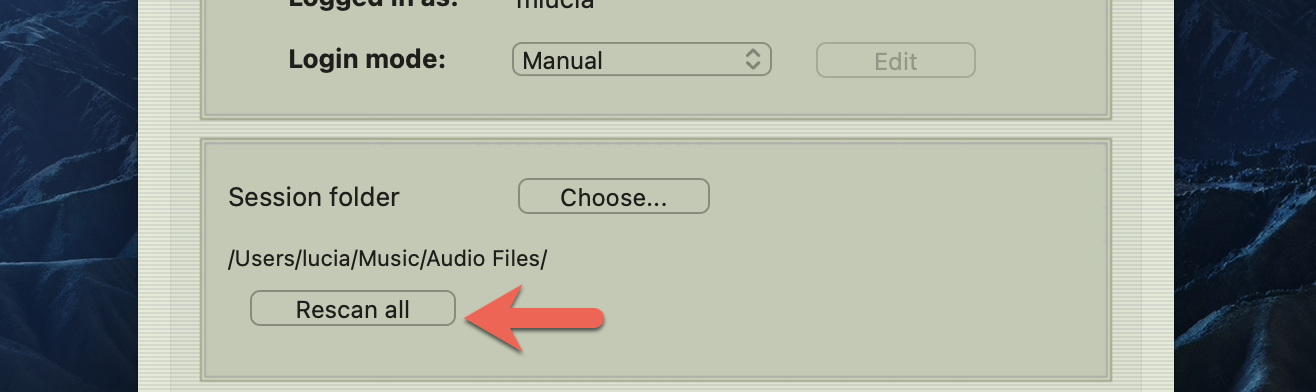
Activating Auto-Replace
If the 'replace' option was enabled in Source-Connect, you will be able to easily replace the encoded and decoded recorded audio with the original PCM audio from your remote contact. There are two ways you can replace recorded audio files: per file individually, or all available files at once.
Manual Auto-Replace
To activate the Auto-Replace process for a single recorded file, simply select the audio file you wish to replace in the Q Requests menu of the Activity panel and select 'Replace Now' from the drop-down menu. The time required to replace the file with the original PCM depends on the size of the file and the available bandwidth. We recommend that you wait until your session is complete before activating the Auto-Replace process, as the process will be much faster and will utilize all your bandwidth without disrupting your Source-Connect session. 
Auto-Replace all
To Auto-Replace all available files at once, select the 'Start Replace process' from the menubar dropdown menu. All available recorded files will be processed, and if your remote contact has not paused transfers, deleted that particular Q Uploads session, or shut down the machine or the Source-Connect Q Manager, you can activate the Auto-Replace process at any time after your session, whether it is an hour later or a week. 
Comprehensive Q Manager interface overview
This section is a complete overview of all available options in the "Settings" menu of the Q Manager and what you can do with each setting.
Settings Panel
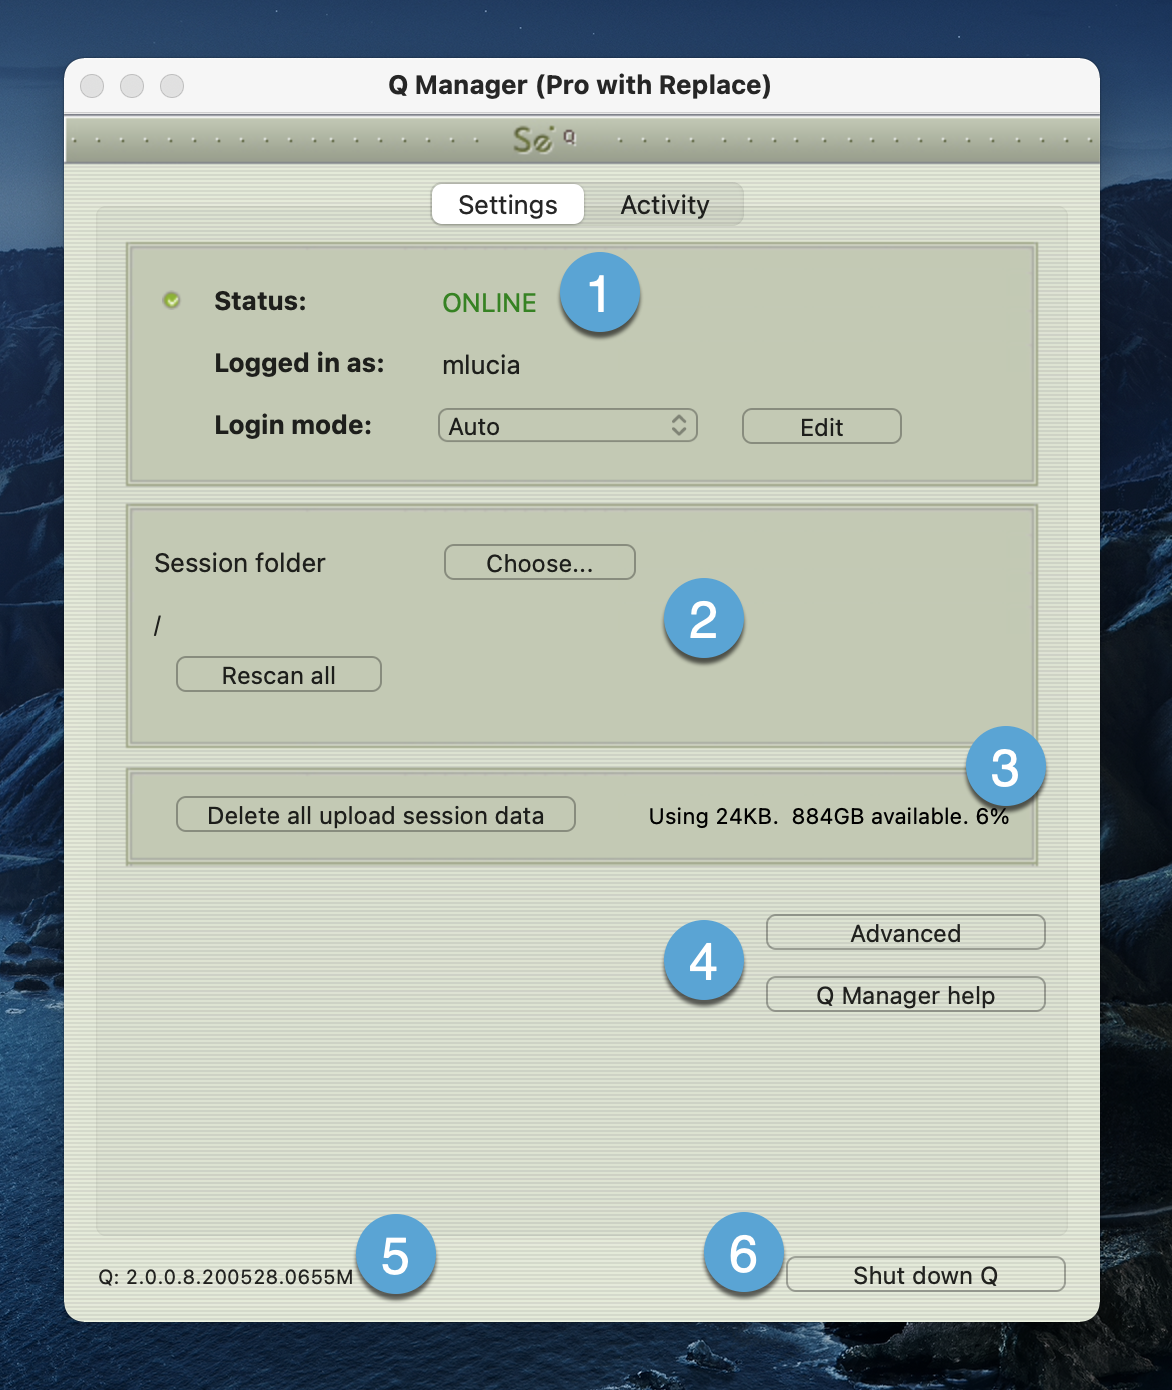
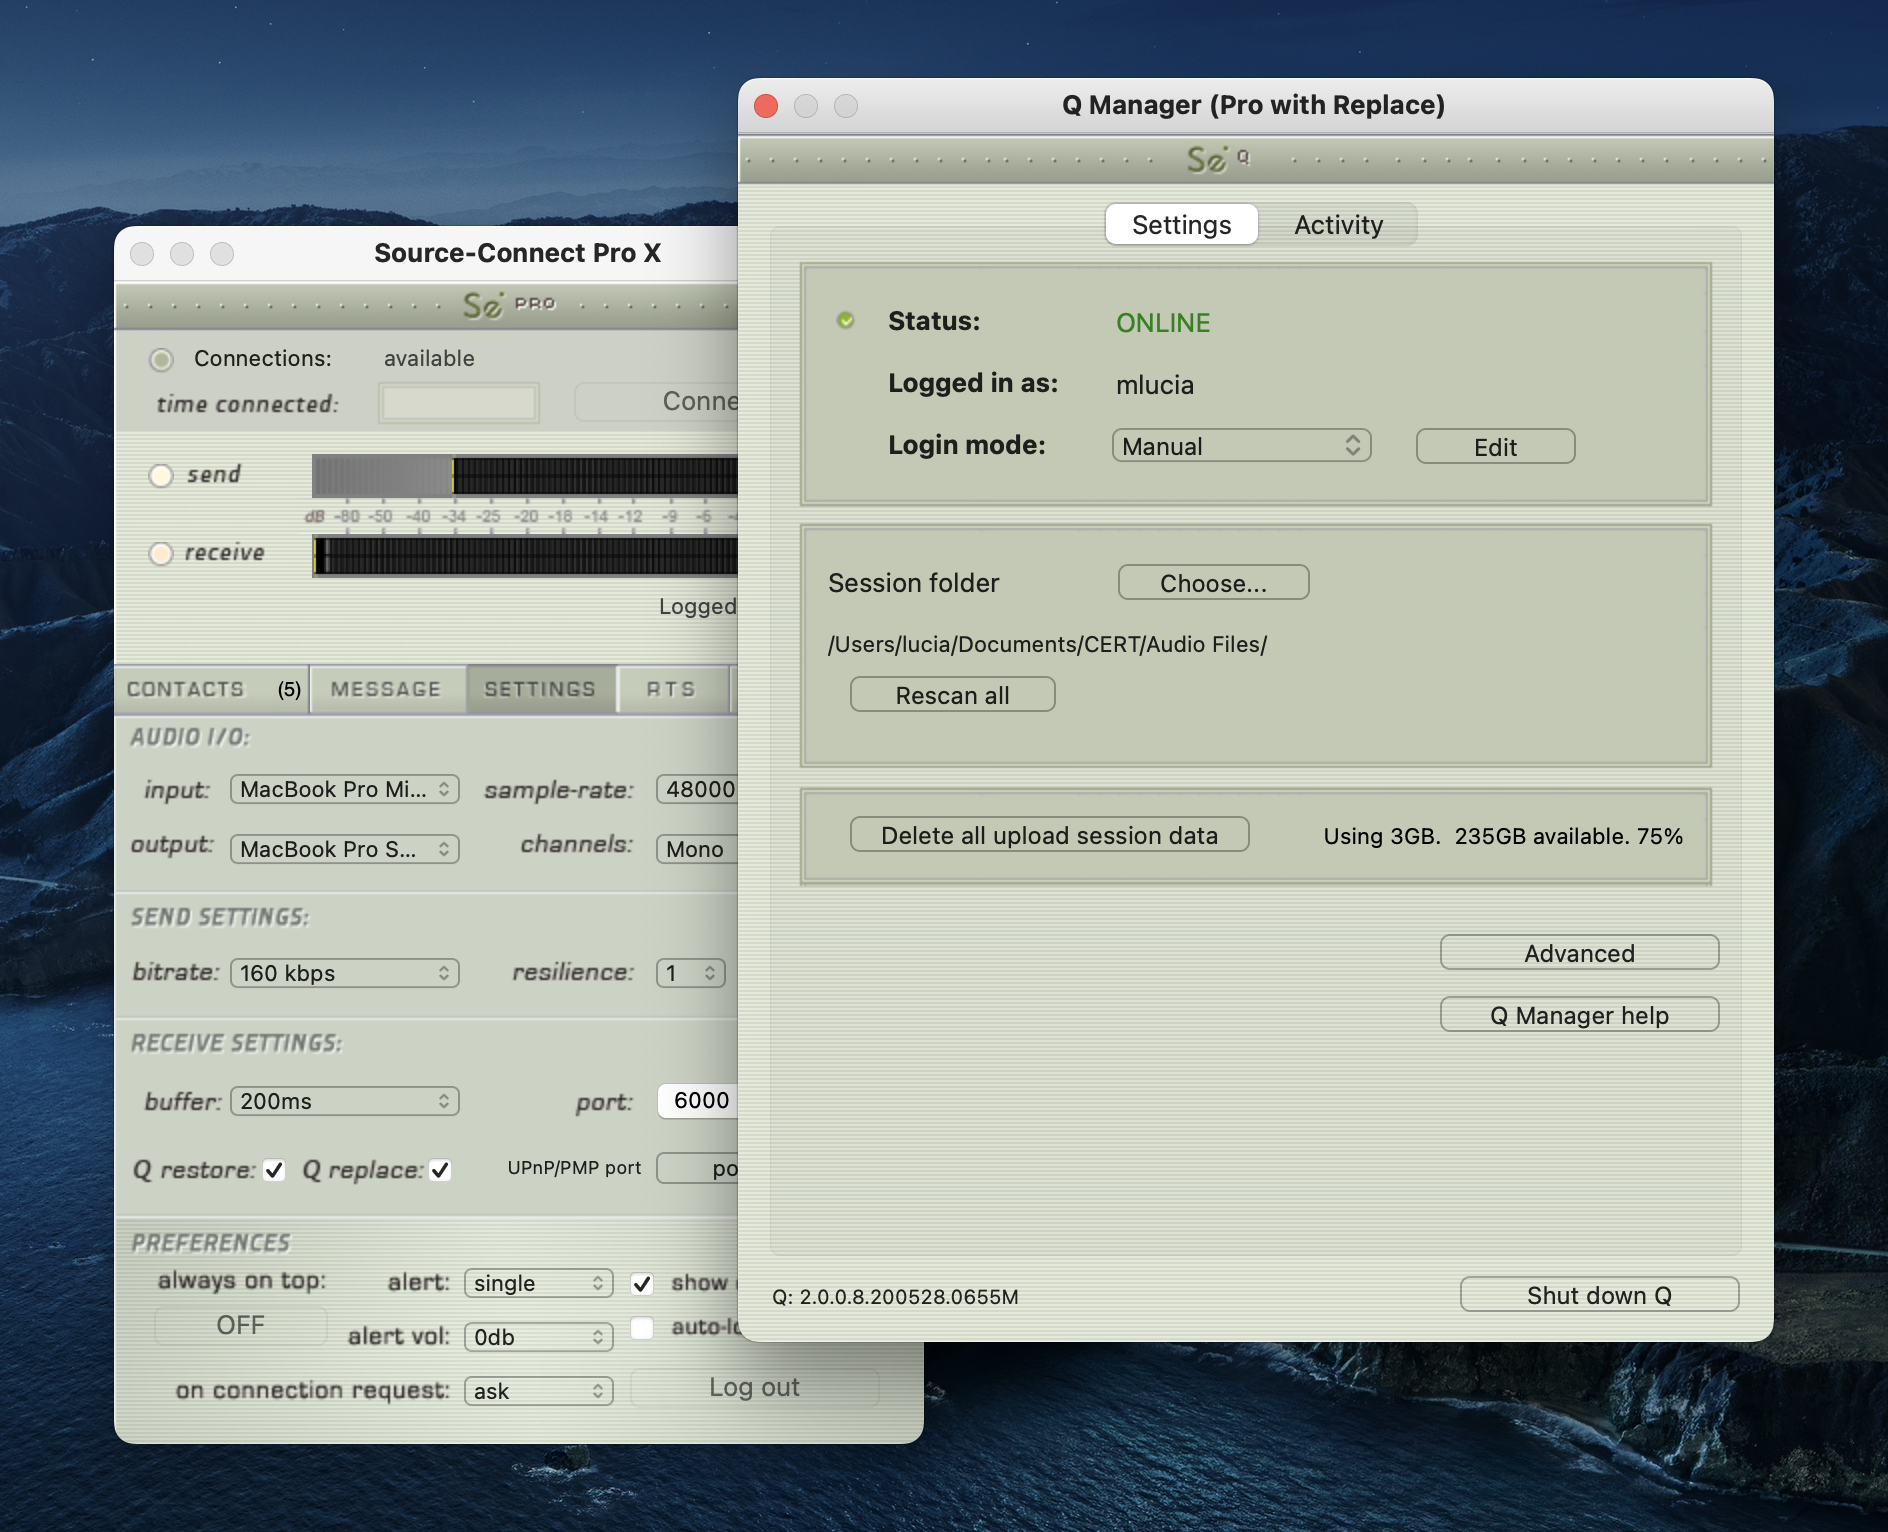
1. Status and Login
Choose which Login mode to use. If your login details are correct you will see that the Q Manager successfully logs in with Status: Online. The Q Manager will take 5-30 seconds to login, depending on the availability of your FTP service.
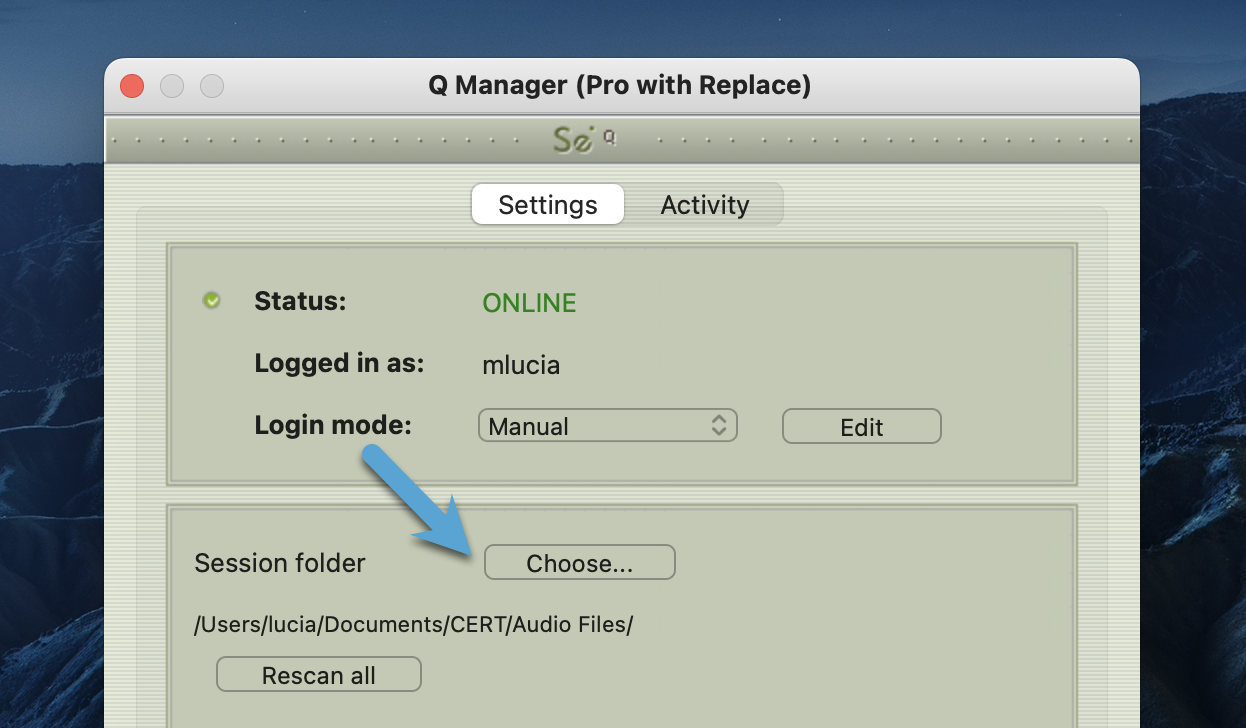
2. Session folder
Your Session folder is very important – you must select the folder you are going to be recording into or the Q Manager will not be able to detect the files to be processed. Choose the Audio Files folder of your Pro Tools session. You can either click the Choose button and find your Audio Files folder in the dialog that pops up, or you can drag the folder from your Finder window.
Once you have chosen your Session folder, any newly recorded files will be processed automatically by the Q Manager. If you have existing files that you would like processed, press Rescan All and see your Activity – Requests panel for details.
This option is useful for when you have existing files in your Audio Files folder which require processing. For example, you may not have restored or replaced your Source-Connect recorded files, or there may have been an error which required a reboot, for example.
Rescan all files can also be used to reload a session which contains multiple files for which processing has been delayed for some reason, for example you are using FTP mode and you wish to Replace all files at the end of the day in a batch.
3. Delete all upload session data
Each time that you establish a session where your connection partner has selected Restore and/or Replace, Source-Connect will immediately begin storing all session data in compressed and/or PCM form. This can quickly fill a hard drive: at the rate of 56MB per hour for Restore and 700MB per hour for Replace.
The Q Manager helps you keep track of your hard drive availability by letting you know when you have less than 20% available.
You can choose to delete this stored upload data at any time, and once you have deleted this data your connection partner will not be able to request any Restore or Replace processes. Please ensure that your connection partner has received everything they need before you delete this data.
If you choose to delete your session data while connected, your current session will not be deleted. This can be useful if you find you are running out of drive space and cannot reestablish the session.
4. Advanced
Additional settings are available under Advanced: 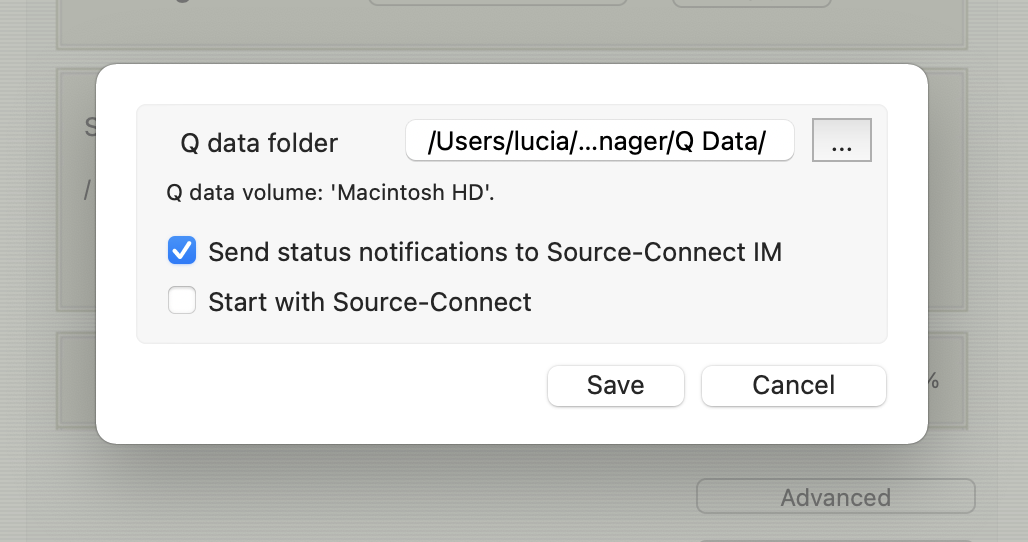
Q data folder
The default location for the Q data folder where all your upload stored data is saved to is:
/Library/Application Support/Source-elements/Q data/
You can choose to store this data in any location, however we strongly suggest that you set this once and leave it. If the Q Manager attempts to send Restore or Replace data to your connection partner, and this folder location has been changed, the process will fail.
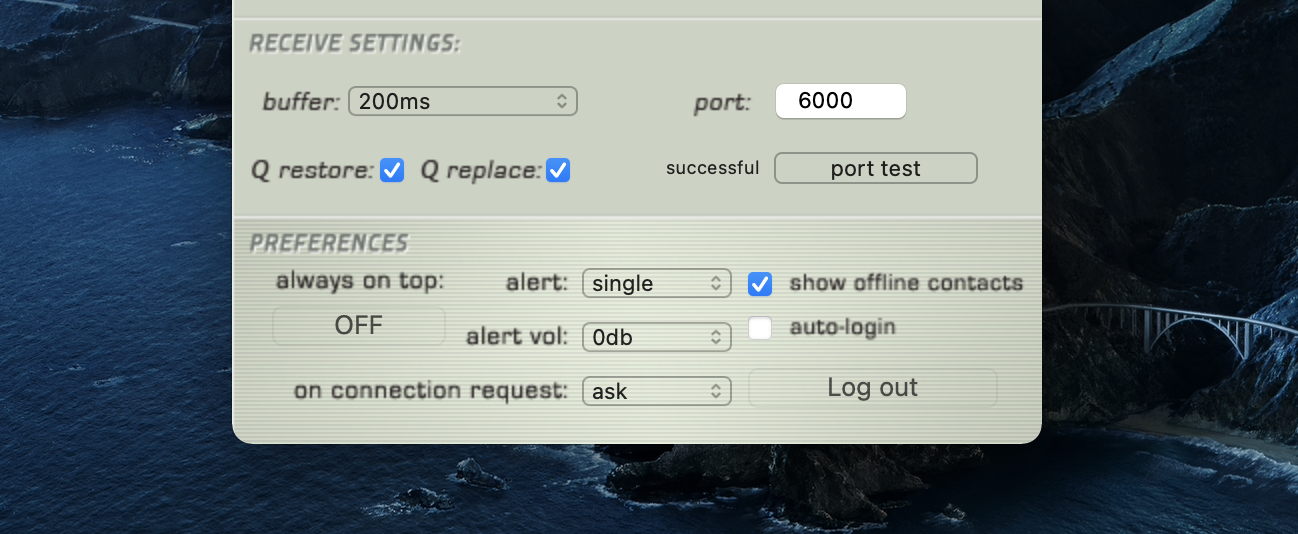
Send status notifications to Source-Connect IM
For each available recorded file in your Audio Files folder, the status of the file can be sent as an IM message to your Source-Connect Instant Messaging panel. This can be useful for quickly monitoring the status of your recorded files. Note that this feature requires that you are logging into Source-Connect as the same username as entered in the Q Manager. For example, if you are logged in as ‘username’ in the Q Manager, you cannot be logged in as ‘username*b’ in Source-Connect or you will not receive the IM messages. If this is the case, the next time you login as ‘username’ into Source-Connect your IM messages will be shown to you.
Start with Source-Connect
If this is checked, the Q Manager will always launch automatically with Source-Connect. If you are not intending to use the Q Manager in any way, for example you use Source-Connect primarily for bridging, you can disable this option.
5. Q Manager version
This shows your installed version of the Q Manager. Source Elements periodically releases updates, so if you are having any issues please contact Support with this information.
6. Shutdown Q
Press this to shut down the Q Manager. You can also Quit via the icon on the Dock, or use the File menu. Once the Q Manager is shut down, any requests made to you from your connection partner will not be communicated and they will receive a process error.
Locating your session audio files folder
The Q Manager needs to find the folder where audio files are recorded to for your DAW. This is the folder you configure as a “Session folder” in the Q Manager standalone app:
For Pro Tools, for example, the folder is always called 'Audio Files' by default. If you use a custom record folder setup, find the folder where session audio files are recorded to and set it on the Q Manager. In the screenshot above, for example, we have created a “CERT” session on Pro Tools, and the Audio Files are located in /Users/lucia/Documents/CERT/Audio Files.
Finding your Audio Files folder in Pro Tools
Please note that, when creating a new project, there is a “Location” setting at the bottom of the new session screen, where you can change the location of your audio files.
- On Pro Tools, go to Setup > Preferences.
- Go to the “Operation” tab.
- Check the “User Media and Settings Location” section.
- In the “Documentation and Settings” folder, you will see the path to where the project's files are saved.
- Open a Finder window.
- Navigate to the path from step 4.
- Double click the folder for your current project. You will see the “Audio Files” folder there.
Finding your Audio Files folder in Logic Pro
Logic manages your projects as packages. Therefore, you will need to locate where the .logicx file is saved for the session.
- Open your Logic session.
- Press “cmd+s”.
- Check where the .logicx file is saved.
- Open a Finder window.
- Navigate to the path from step 3.
- Right click the file.
- Select “Show Package Contents”.
- Go to Media > Audio Files.
Finding your Audio Files folder in Cubase/Nuendo
Each Cubase or Nuendo project has a separate Audio folder (which is, by default, where the audio files are saved). You can change or check where the folder is by following these instructions.
However, you can also set where each individual track is recorded to.
Setting your Audio Files Folder on the Q Manager
Once you are sure of your project's audio folder location, open the Q Manager and click the “Choose” button in the “Session folder” section:
Setting your session audio files folder
This information applies to Source-Connect Pro users who wish to use the Auto-Restore and Auto-Replace functionality.
Why do I need to set the session audio files folder?
If you are recording and wish to use the Restore and/or Replace features, you must set the correct Session folder in the Q Manager for each new session you open.
The Q Manager 'watches' this folder for all incoming recordings, and if it finds a recording from Q-enabled Source-Connect it will look for any drop-outs. If needed it will start the Restore process (if 'Suspend' is not enabled, the process will start immediately). Depending on the length of the file and the available bandwidth this process can take as little as a couple of seconds.
Each file recorded with Q-enabled Source-Connect will return a status. See the User Guide for details on all possible statuses.
If you are recording with Q-enabled Source-Connect and do not see your files in the Q Manager activity panel, you need to verify your Session folder in the Setup panel and re-apply the Q Manager.
How do I set the session audio folder?
There are three ways to set your Audio File session folder:
- Drag the Audio Files folder to the Q Manager Setup window
- Choose the folder from the Q Manager Setup window
- Choose the folder from the Menubar (macOS) or System Tray (XP)
- Drag the Audio Files folder to the Q Manager
- Select your Audio Files folder in the Finder and drag this folder to the center panel of the Q Manager setup panel
- Choose the folder from the Q Manager Setup window
- Click the Choose button. The Finder dialog will show, and you can browse for the Audio Files folder
- Choose the folder from the Menubar (macOS) or System Tray (XP)
- On your menubar (macOS) or System Tray you have a Source Elements icon. Click on this to see the 'Set Session folder' option
Processing Files with the Q Manager
This information applies to Source-Connect Pro users who wish to use the Auto-Restore and Auto-Replace functionality.
When using Auto-Restore and Auto-Replace you may find that your files are not appearing correctly in the Activity panel. This document discusses why this may happen and how to resolve it.
Verify your session folder is correct
You must set the correct Audio Files folder of your current Pro Tools session.
Verify your Pro Tools routing is correct
When you record a file with Source-Connect you must take care of the following:
Q Activity Panel
This panel gives you a full overview of what files are being processed, what the result was, and allows you to fully manage your restore and replace processes.
When you record a file in your Audio Files folder, the Q Manager will analyze the file to determine whether it is suitable for processing. If the recorded file was created with Source-Connect and the Q Manager is set to ‘listen’ to the Audio Files folder that this file was recorded to, the Q Manager will list it immediately after the recording is completed and, if needed and the settings are at the default, a restore process will take place. Depending on the length of the file, the number of dropped packets, and the available bandwidth, the file can be fully restored within a few seconds. All files are subsequently listed in the Activity panel with the corresponding process status. 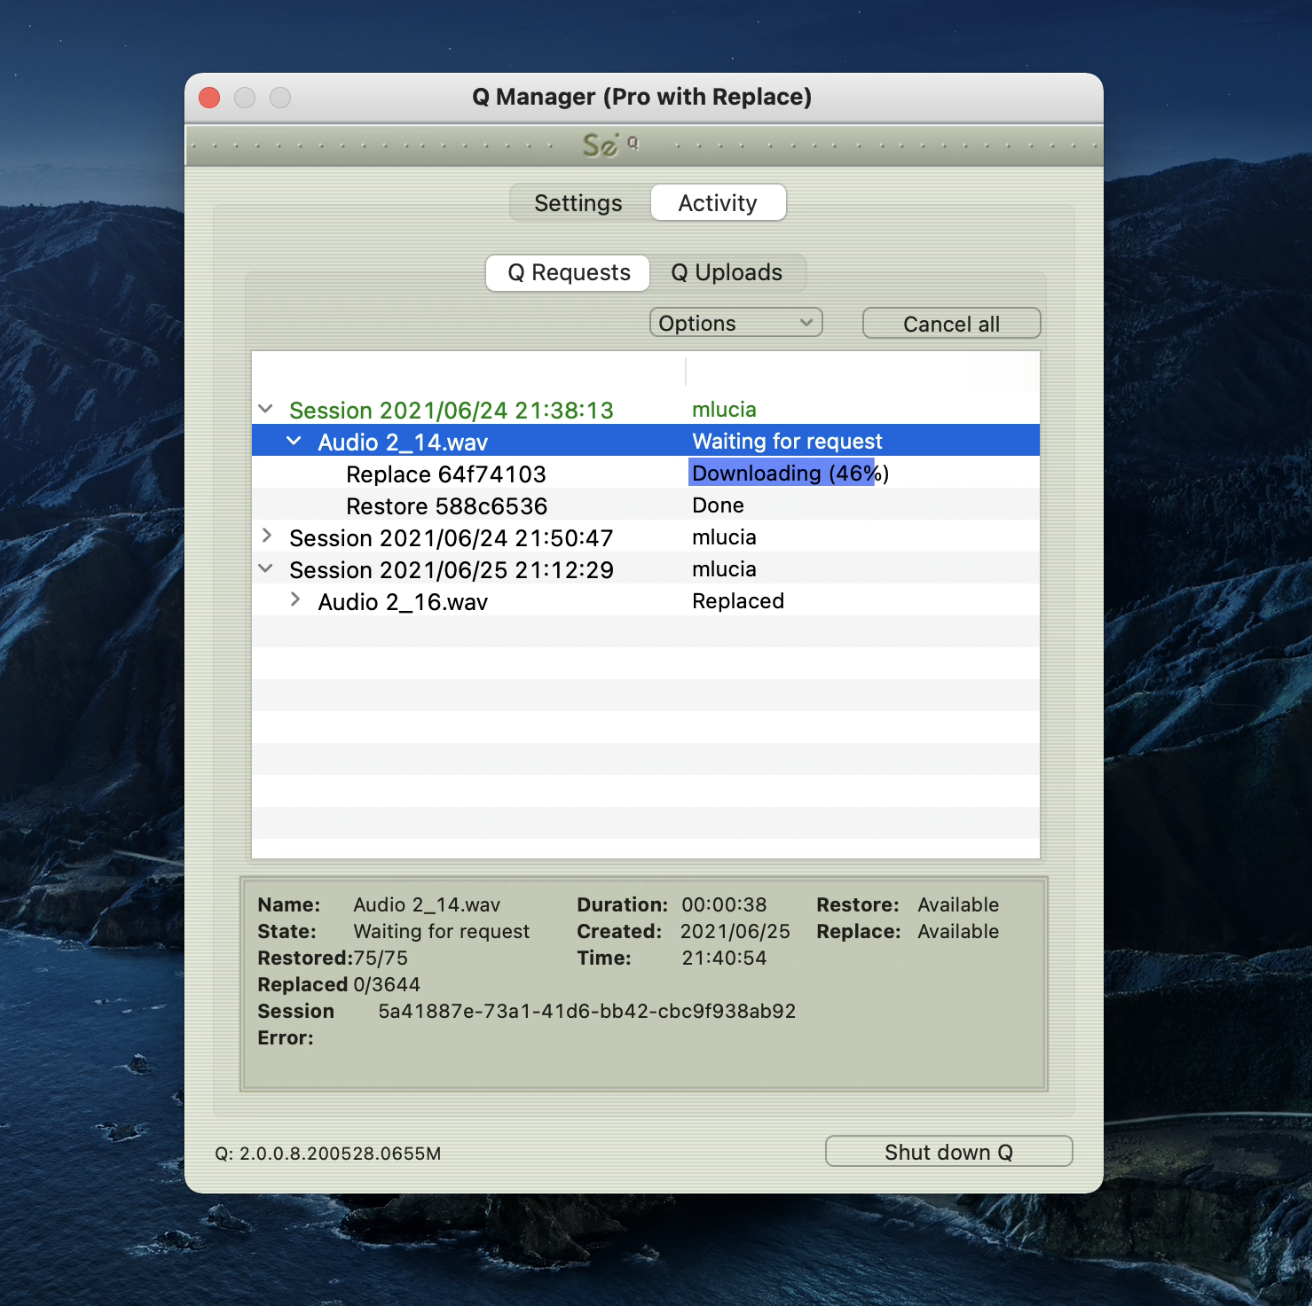
Activity Panel: Requests
Each time you establish a Source-Connect session, the Q Manager will create a new Session in the ‘Q Requests’ panel. All files recorded during this particular session will be listed under this session, allowing you to manage your files per connection. A new session is created each time you connect with Source-Connect.
File status
Next to the filename will be the status of that file. When the Q Manager first detects a file, it is scanned to see if any restore operations are required. If not, the file status will be ‘Restore not required’. Otherwise, the file proceeds to be restored, or if you or the other side has transfers paused, the file will remain ‘Waiting for requested’ until transfers are resumed. Additionally, if you manually scan a file (see “Q Requests options menu”) and the audio file was not recorded with Source-Connect the status will be 'Q not present'.
File process status
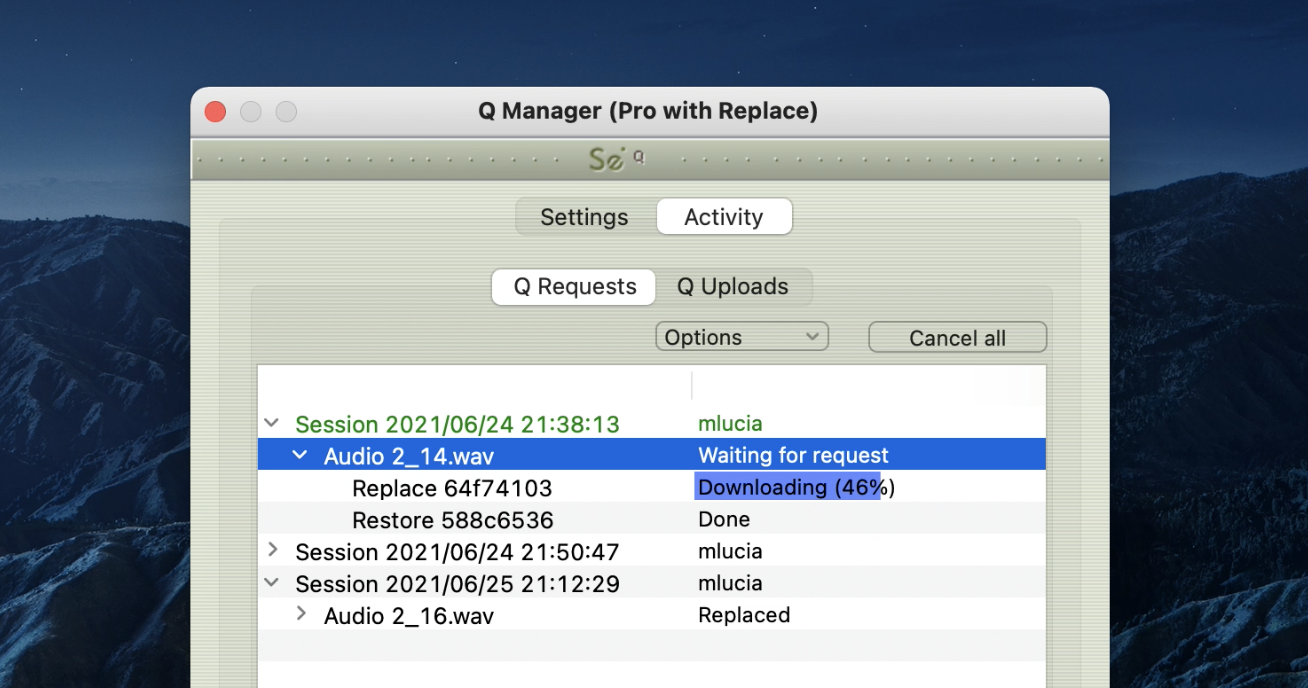
There are two possible processes for files: Restore and/or Replace. Each process can be viewed by clicking on the arrow next to the filename. The status will change according to the stage of the process. When a process is complete the status is ‘done’.
For each process, a progress bar will show to indicate the process is underway. Depending on the length of the recorded file and the transfer speed between you and the other side, the progress bar can be an indication of how much time the process will take. Note that there are many factors involved and the time required will vary depending on the size, bandwidth and requested process type. Restore processes are generally very fast. For Replace processes a full replacement of the decoded AAC audio is made with the full resolution PCM audio. Thus the transfer of an entire Replace session this may require some time.
Q Requests: Information panel
Information about each session, file and transfer process is available by highlighting a line in the Q Requests panel and viewing the info panel underneath the session list. 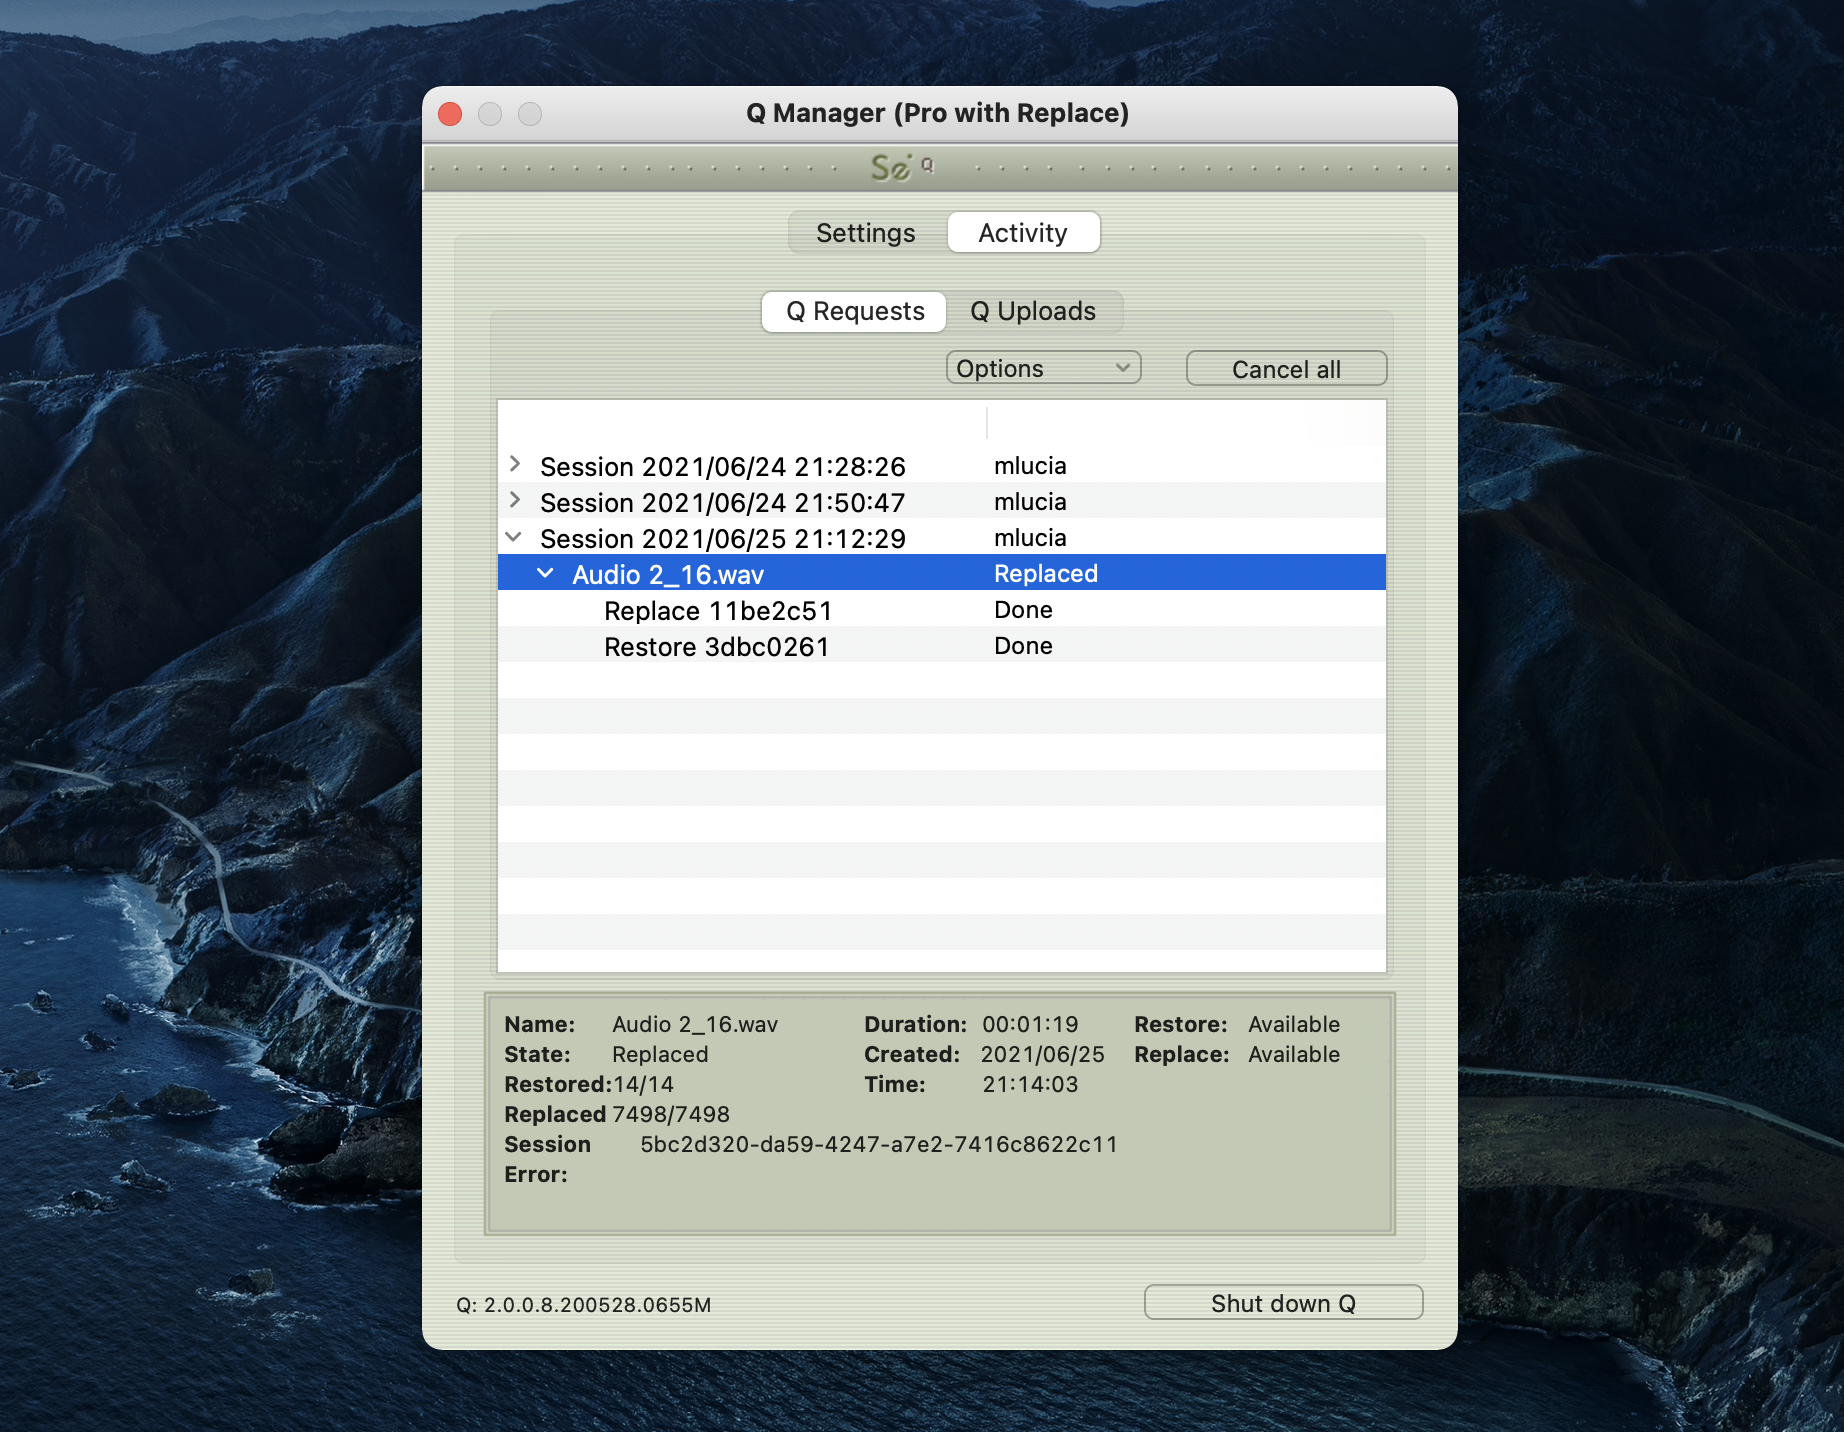
The information available is:
- Name: Name of the file.
- State: Current status of the file.
- Restored: How many packets (or ‘drops’) were detected and recovered by the restore process.
- Replaced: How many replace ‘pieces’ are to be transferred and processed.
- Session ID: The session ID used for file management.
- Error: For successful processes the error number is blank. If an error occurred the number will indicate the nature of the error. See Troubleshooting and Error reporting for more information on finding out what the possible errors are and how to resolve them.
- Duration: Duration of the file.
- Created: Date that the file was recorded.
- Time: Time that the file was recorded Restore: Whether the restore process is available to you.
- Replace: Whether the replace process is available to you.
Q Requests: Options menu
For each file and session, you have additional options available to you via the Options menu. Depending on what you have highlighted, various options will be available to you. 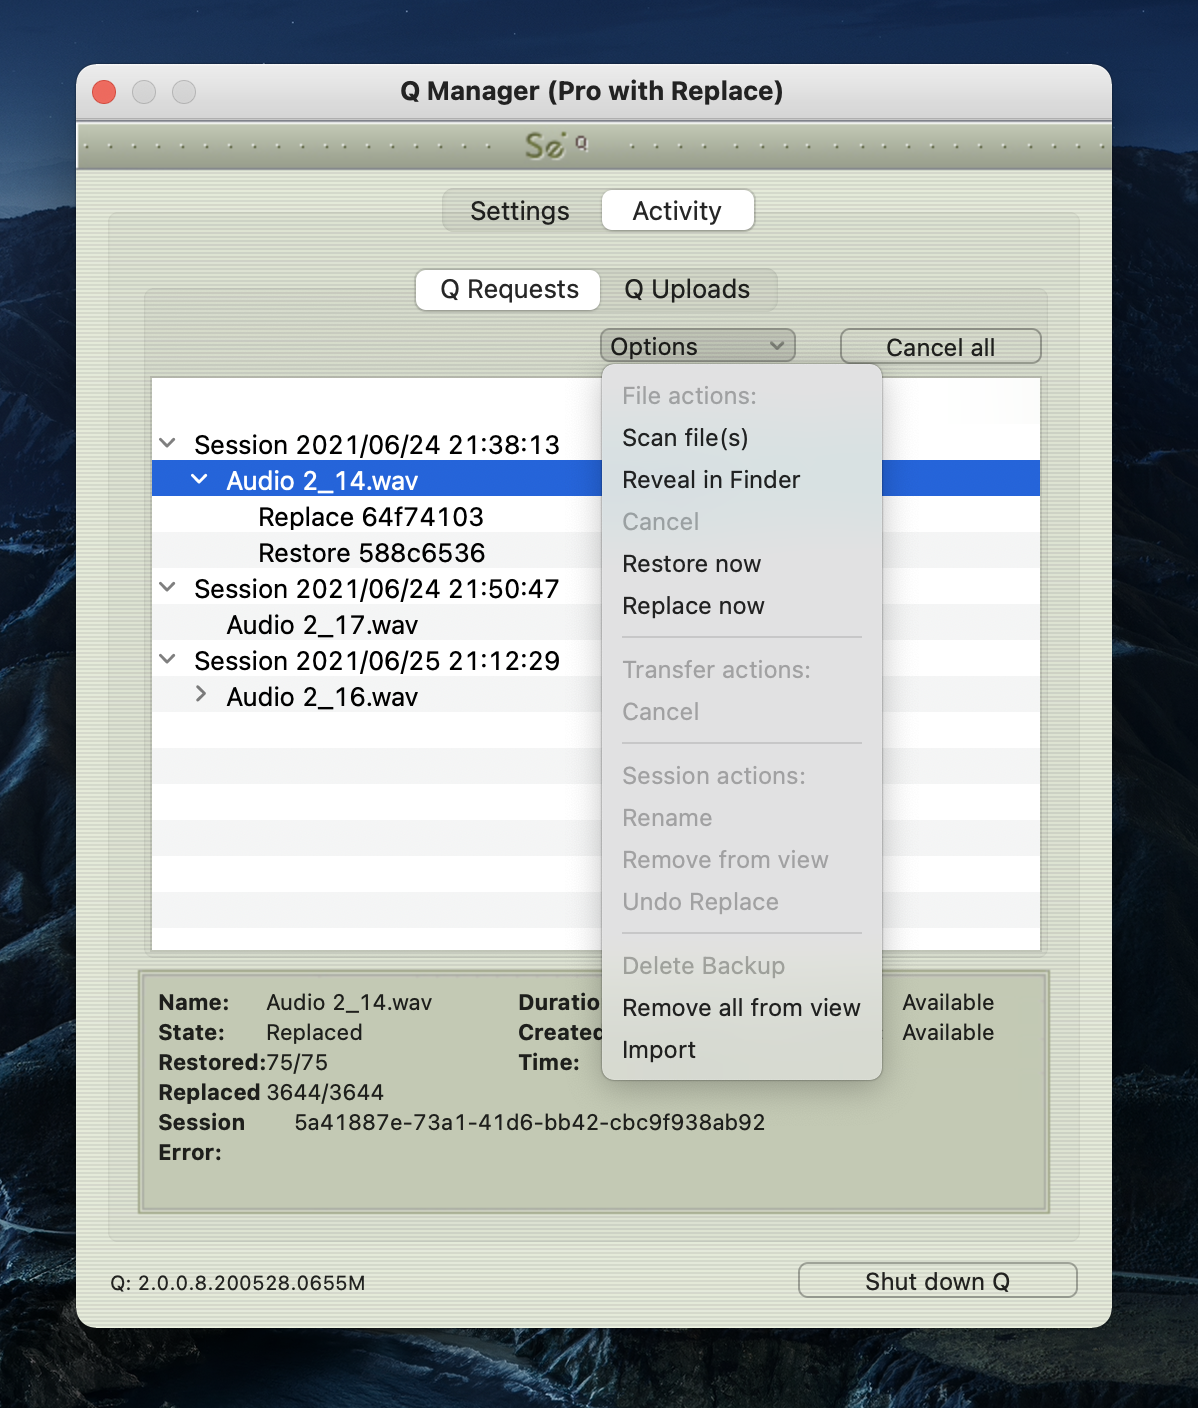
File actions
Scan file(s)
This option allows you to scan a particular file or files which have not been processed. This can be useful if there has been a system error and certain file processes have not been completed, or if you have a very large number of files from a previous session and only need to process particular files. This option can also be useful when there are certain errors which result in a newly recorded file not showing up in the Requests menu, for example a Pro Tools CPU error may result in new files remaining undetected. Multiple files can be selected in the File dialog by holding down the ‘Shift’ or ‘Command’ keys.
Reveal in finder
Reveal the highlighted file in the macOS finder .
Cancel
This option is available to use when a file is currently being processed. This option is useful, for example, when you have a very large file which is being processed or a transfer is underway and you prefer to cancel the process. You can restart the process by selecting Restore or Replace now.
Restore now
To start the Restore process on an individual file, highlight the file to be processed and select Restore now. If the file has not been restored already, and the other side has not deleted or moved the corresponding data and is online, your file will be restored.
Replace now
To start the Replace process on an individual file, highlight the file to be processed and select Replace now. If the other side is compatible with the Replace process and has not deleted or moved the corresponding data and is online, your file will be replaced.
Transfer actions
These options apply to your overall network transfers, not to individual files.
Cancel
Cancel all current Request transfers. Any current file transfers underway will be cancelled. You can restart transfers by using the appropriate Restore or Replace option.
Session actions
Rename
It is highly recommended that you rename the Session name for easier management. You can do this by highlighting the Session name and selecting ‘Rename’ from the Q Requests Options menu. You can rename the session at any time.
Remove from view
Over time your Q Requests panel will become full of session data. Once your session is complete and your data transfers are successful, you can remove a session from view. This does not delete existing files or data, it only ‘hides’ the session.
To show a session again, select the Audio Files folder in the Setup panel with ‘Rescan all files’ selected and Apply. Your session will show up again in the Requests panel.
Undo Replace
To ensure the integrity of your recorded audio files, the Q Manager allows you the option to undo the Replace process in the event of a corrupted process.
NOTE: This option requires that ‘Backup before replace’ is checked in the Advanced panel.
Delete Backup
This option deletes the Replace data backup for your highlighted session. Once your session is fully replaced or other processes are completed successfully as required, you can delete the backup to preserve disk space.
Remove all from view
This is the same as 'Remove from view', however it will remove all visible sessions in your Requests panel. This is a great way to quickly clear the panel.
Import
If a transfer has failed, or if you choose to have the remote connection partner manually transfer the Q session, use this menu to import that data file, or you can simply drag the data file onto the Activity panel.
Activity panel: Q Uploads
Q Uploads Overview
If your connected partner is recording and requesting Restore or Replace data, you’ll be storing data on your side to enable the Restore and Replace processes. You will see the status of this data storage and any requested transfers in the ‘Q Uploads’ panel. 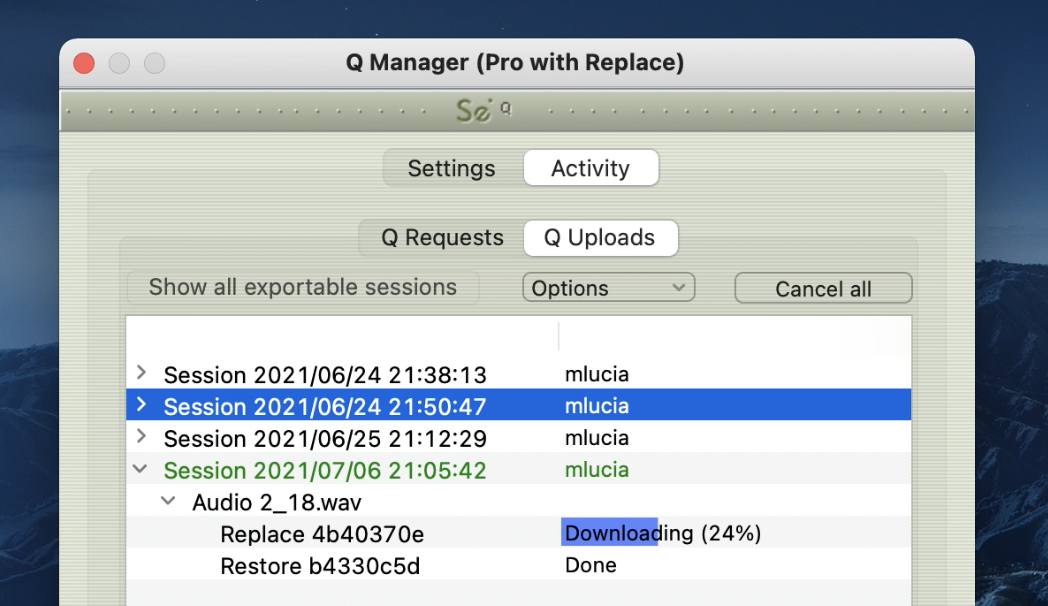
Each upload process will show a progress bar and the current status. The currently active session will be displayed in blue lettering, for easy viewing. When the upload is completed successfully the status will be ‘Done’.
The current disk usage is displayed to help you know when you may need to allocate additional resources, or delete the session data from disk (see "Delete all session data from disk" further down).
Q Uploads : Options menu
For session you have additional options available to you via the Options menu. 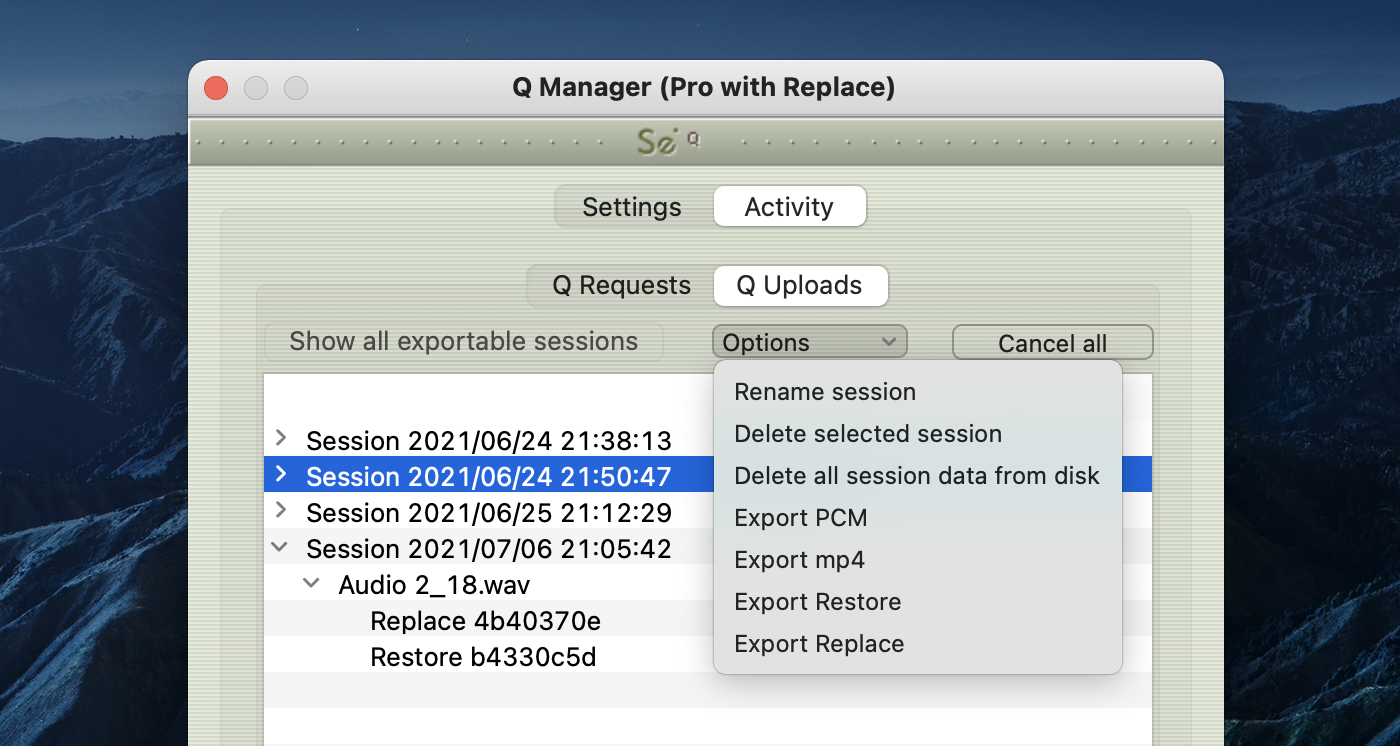
Rename session
For easier session management and later session recognition you can rename the session.
Delete selected session
Once your connected partner has successfully completed all required transfers you can delete the Uploads session to preserve disk space. Note that this option is not undoable. It will mean that your connected partner will no longer be able to request any further restore or replace operations. 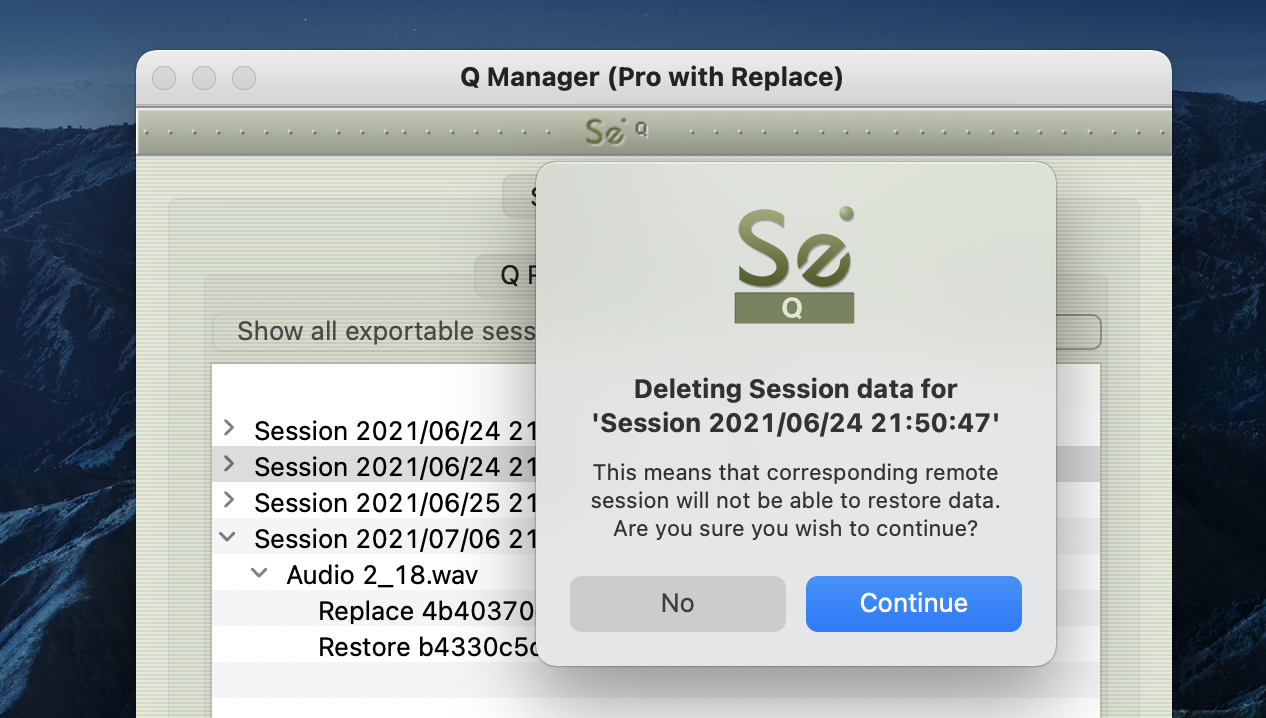
Delete all session data from disk
If you know that your recording partner has successful completed all Restore and Replace processes, you can now delete all session data from disk. This will permanently remove all stored data to date. You will be asked to confirm this action. After deleting all data you will see that the disk usage at the bottom of the panel has gone down to a small number. 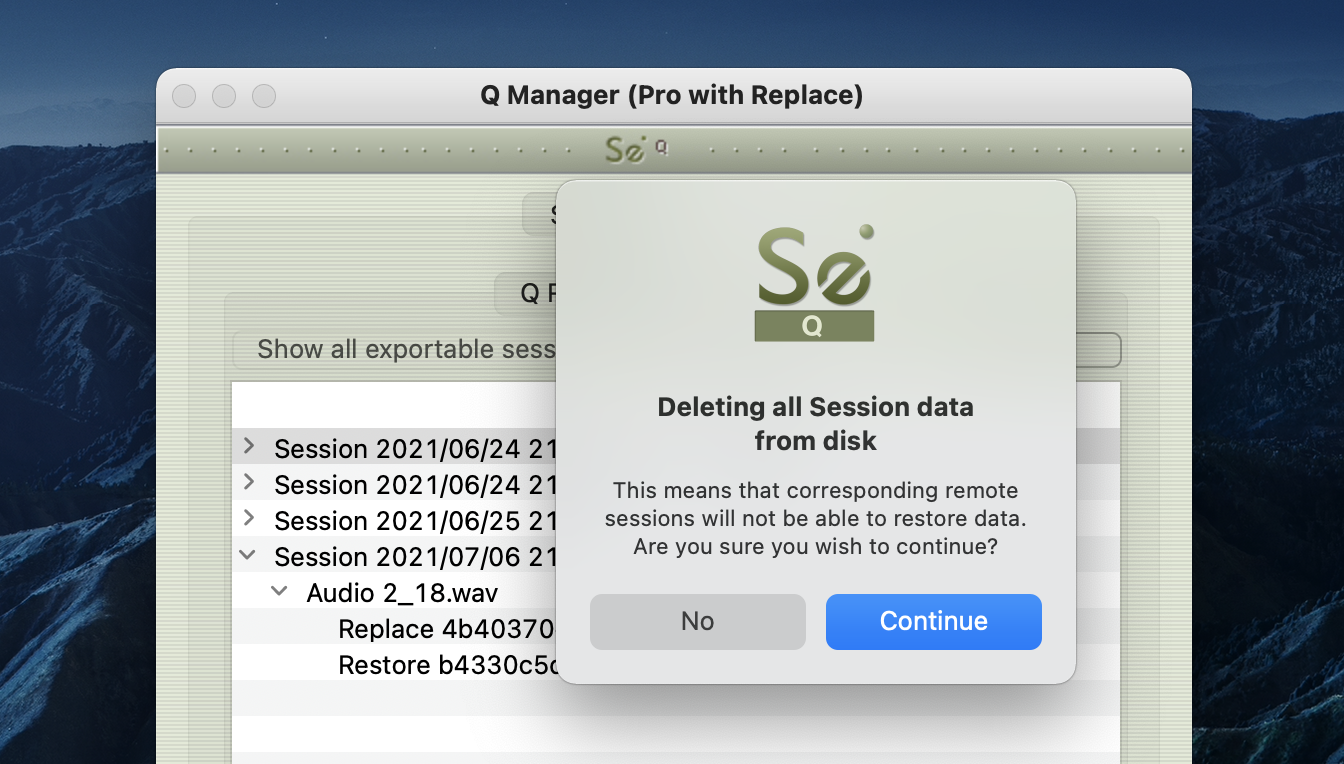
This option is not available to you while currently connected via Source-Connect. The remaining Export options are explained in this article.
Q Uploads: Information panel
Similar information about each session transfer process is available by highlighting a line in the Q Uploads panel and viewing the info panel underneath the session list. 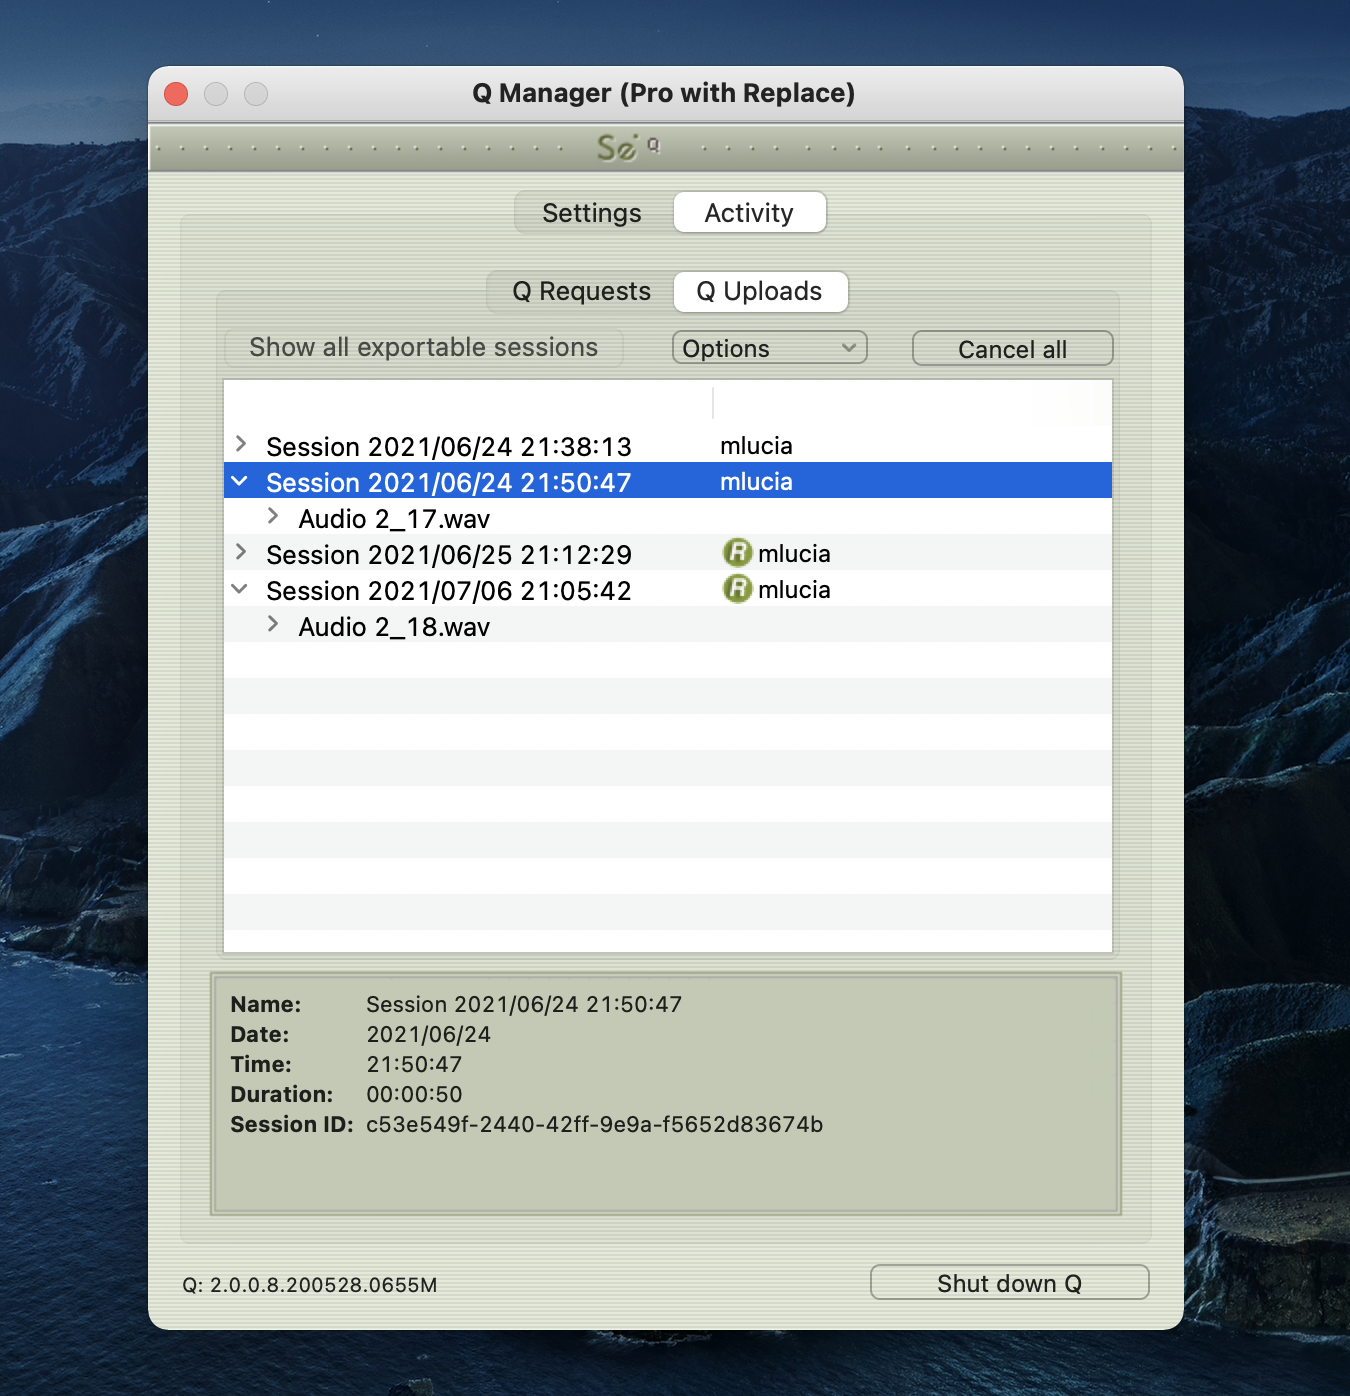
The information available is:
- Name: Name of the file.
- Date: Date when the upload was created.
- Time: Time that the file was uploaded.
- Duration: Duration of the file.
- Session ID: The session ID used for file management.
Activity panel: Export session options
This powerful feature of the Q Manager allows the export of the stored session data from the Sending side. What this means is that if Auto-Restore or Replace fails for any reason, you'll always have a perfect back up of the entire session from the moment you were connected. The session is provided in various formats depending on what method is preferred.
Once there are drop-outs (if any!), the Sending side will see that a Session has been created in the Uploads panel of the Q Manager Activity. Once you disconnect the session is now available to be exported.
These options are available for all Source-Connect Pro users assuming the Q Manager was correctly configured for both sides while during the connection, i.e. there was no red slash in the Q icon in the Source-Connect connection status.
Export MP4
To export the session as an mp4, select the Session name in Q Uploads, and choose 'Export mp4' from the Uploads options menu. 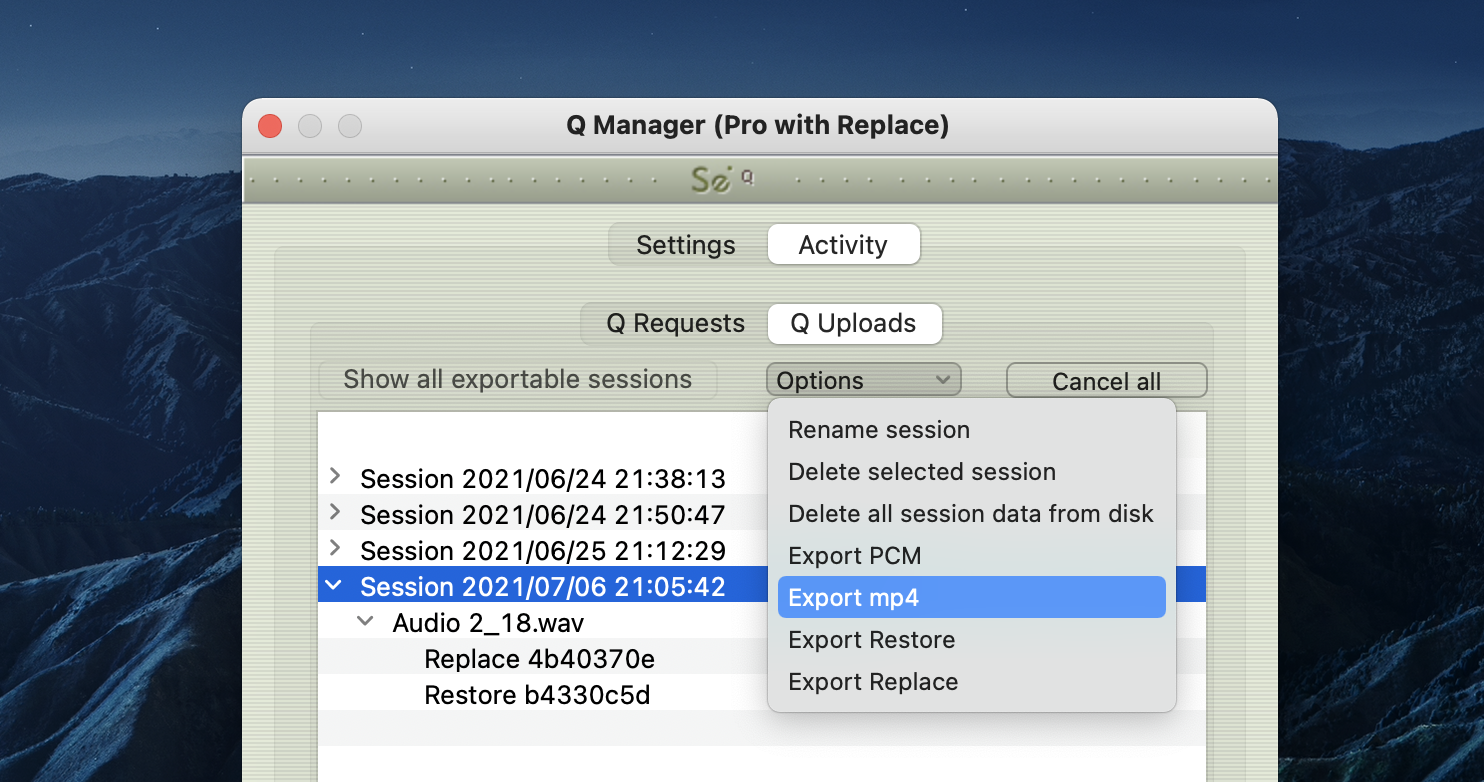
The export helper application will launch, and you will be asked to save the file. 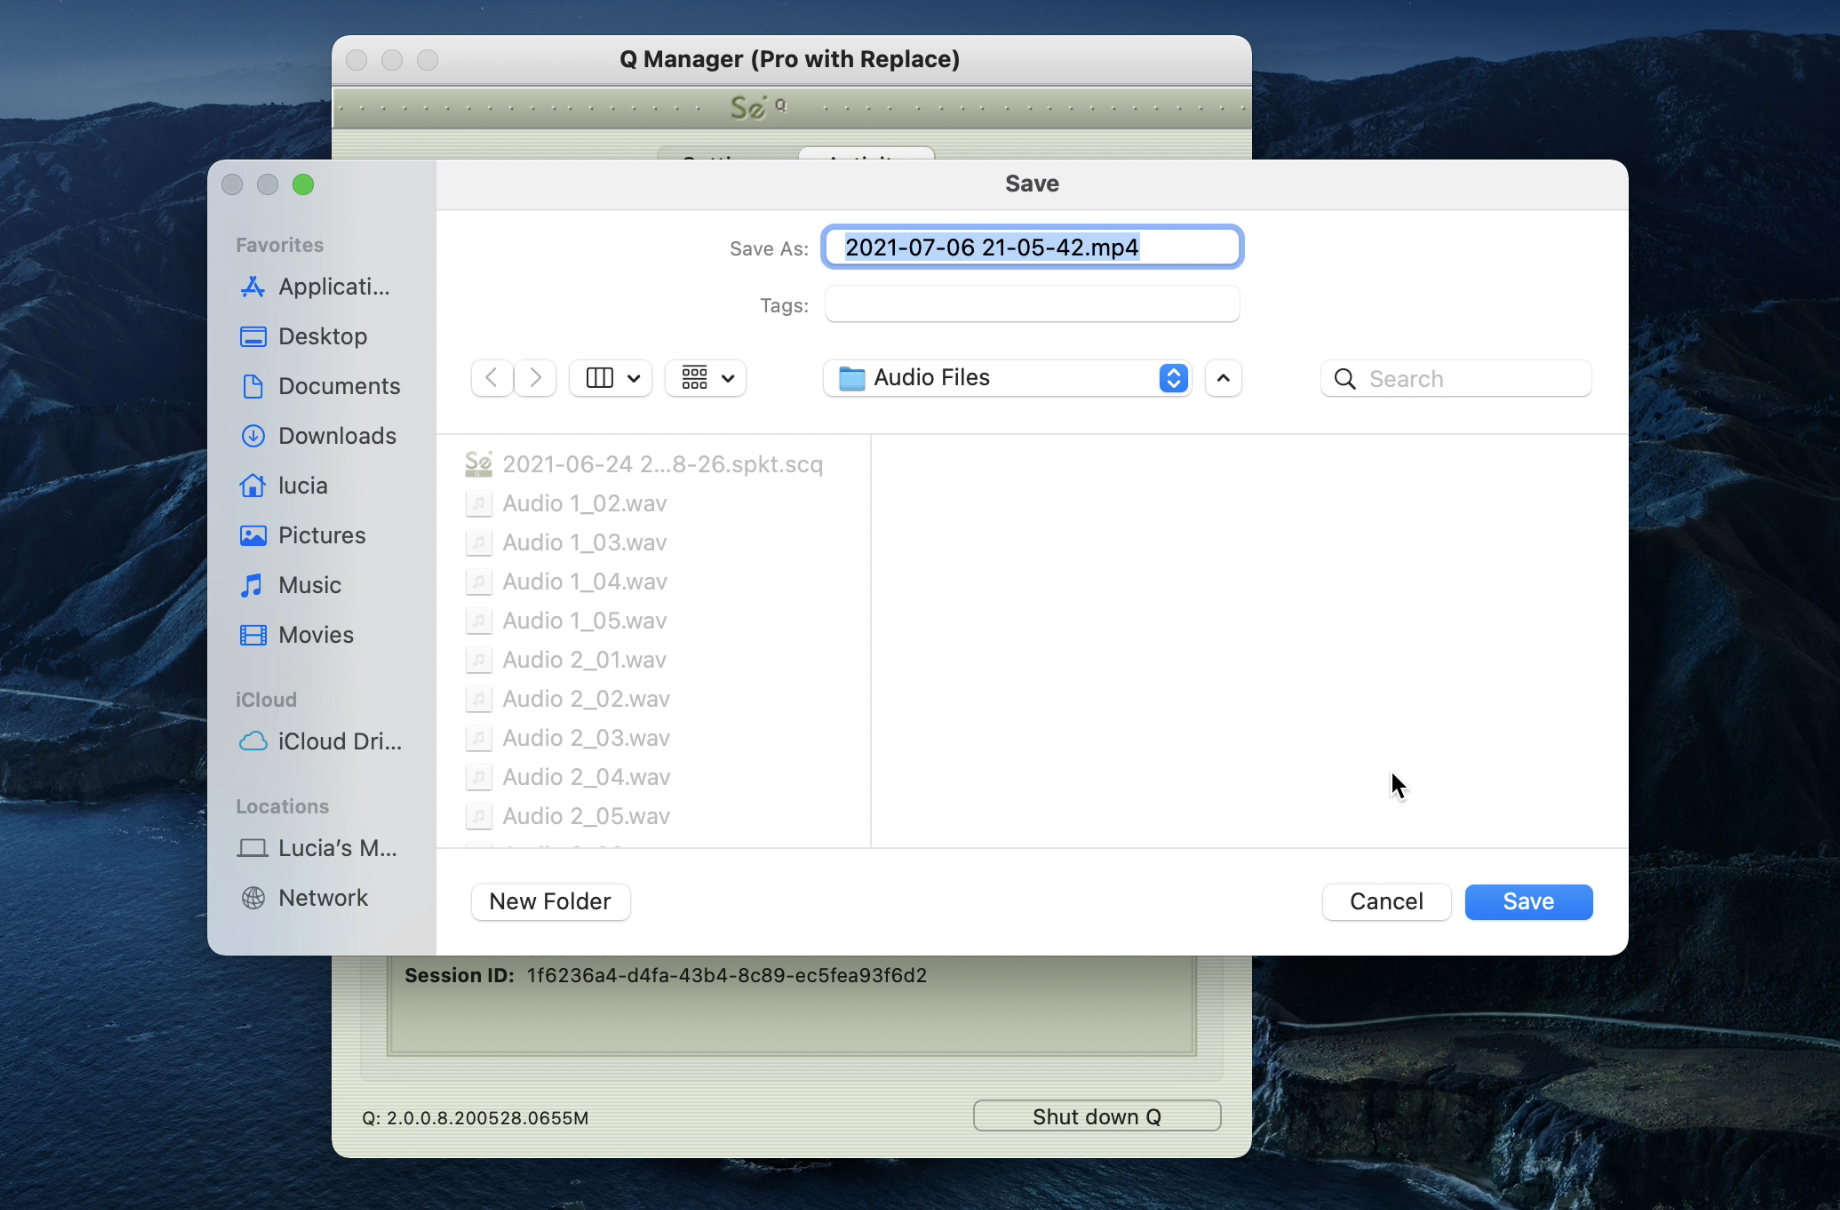
By default the filename is the date and time of the session connection. You can rename the file as required. This file can be played in any MP4 player, such as Quicktime or iTunes, or it can be imported directly into most editors. 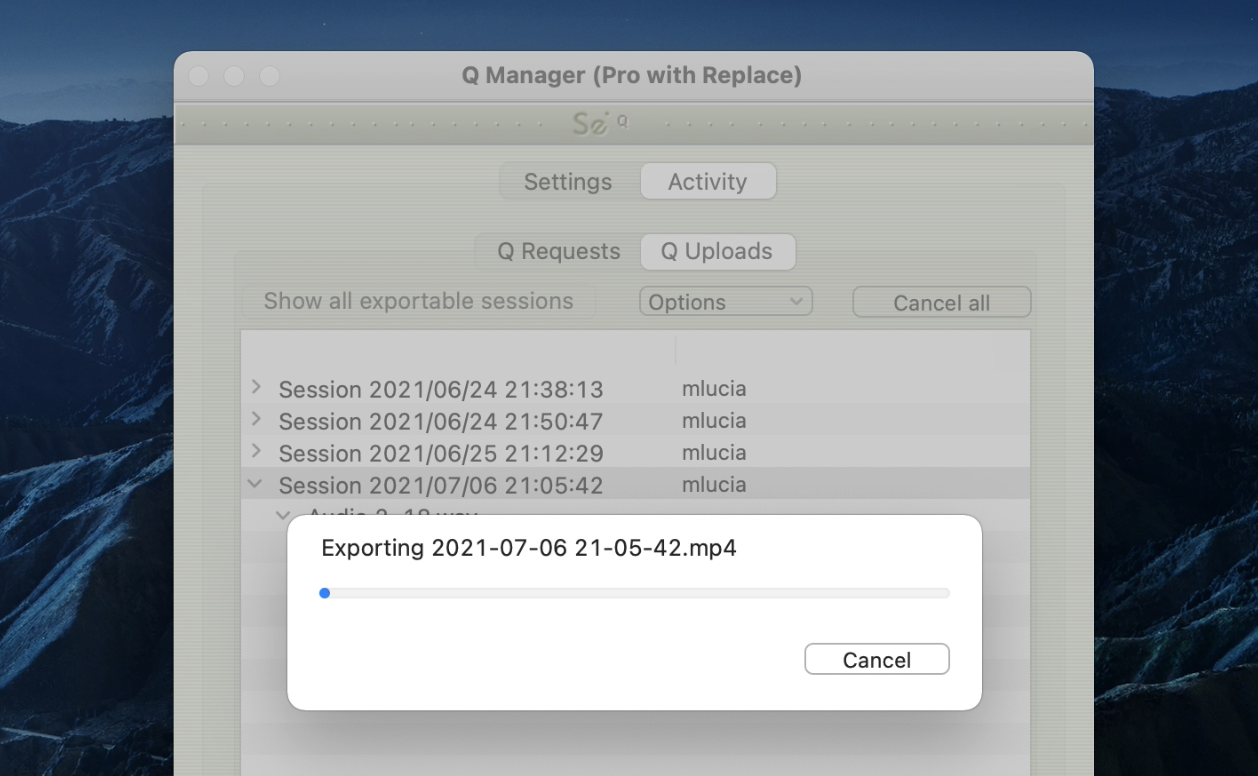
You can choose the cancel the export process by hitting the Cancel button.
Once the Export is complete you can now play back your complete session without network dropouts, and email or FTP this to your connection partner.
Export PCM
This option is only available for Source-Connect Pro, if the Receiving side has the Replace option for Source-Connect Pro, and the Replace checkbox was enabled for that connection. The same method applies as for Export MP4 above. 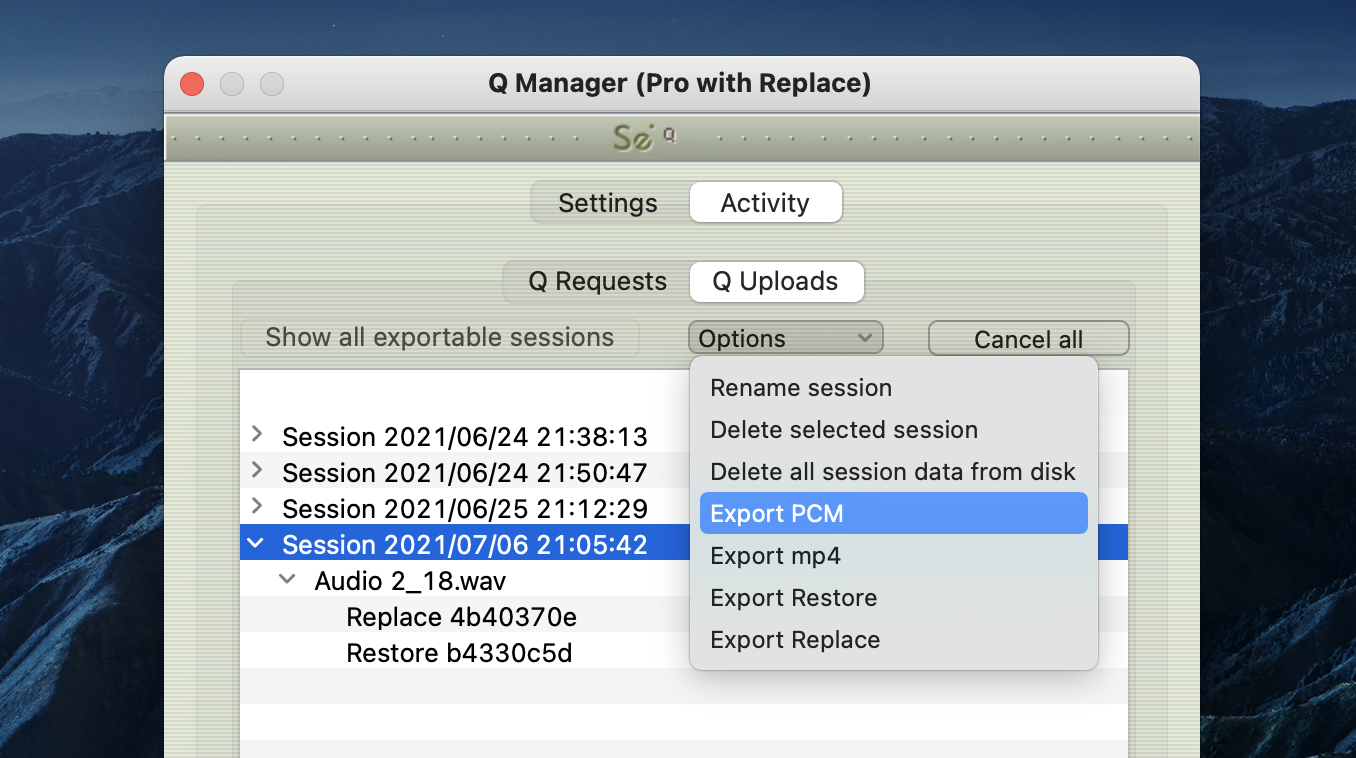
Export Restore and Replace
Export Restore and Replace is highly useful in case of issues of your connection partner not receiving your data due to network errors or FTP failure. Essentially this is a manual process of transferring the Restore and Replace data, instead of automatically having it transferred by the Q Manager on request.
When you are disconnected from your session, select Export Restore or Replace: Restore will export the AAC data and Replace will export the PCM data. The Replace export process will require additional disk space and transfer time. 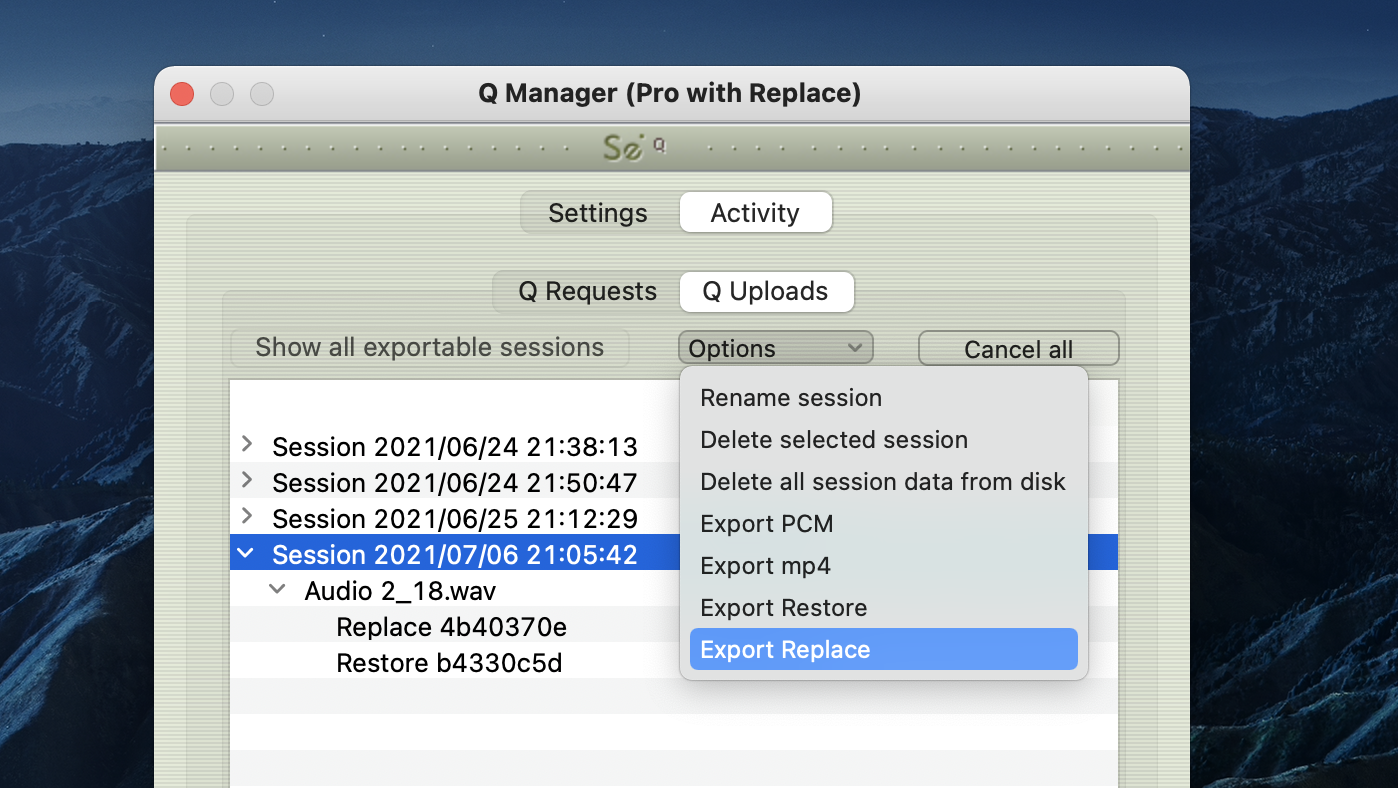
You will be prompted to save the data file: 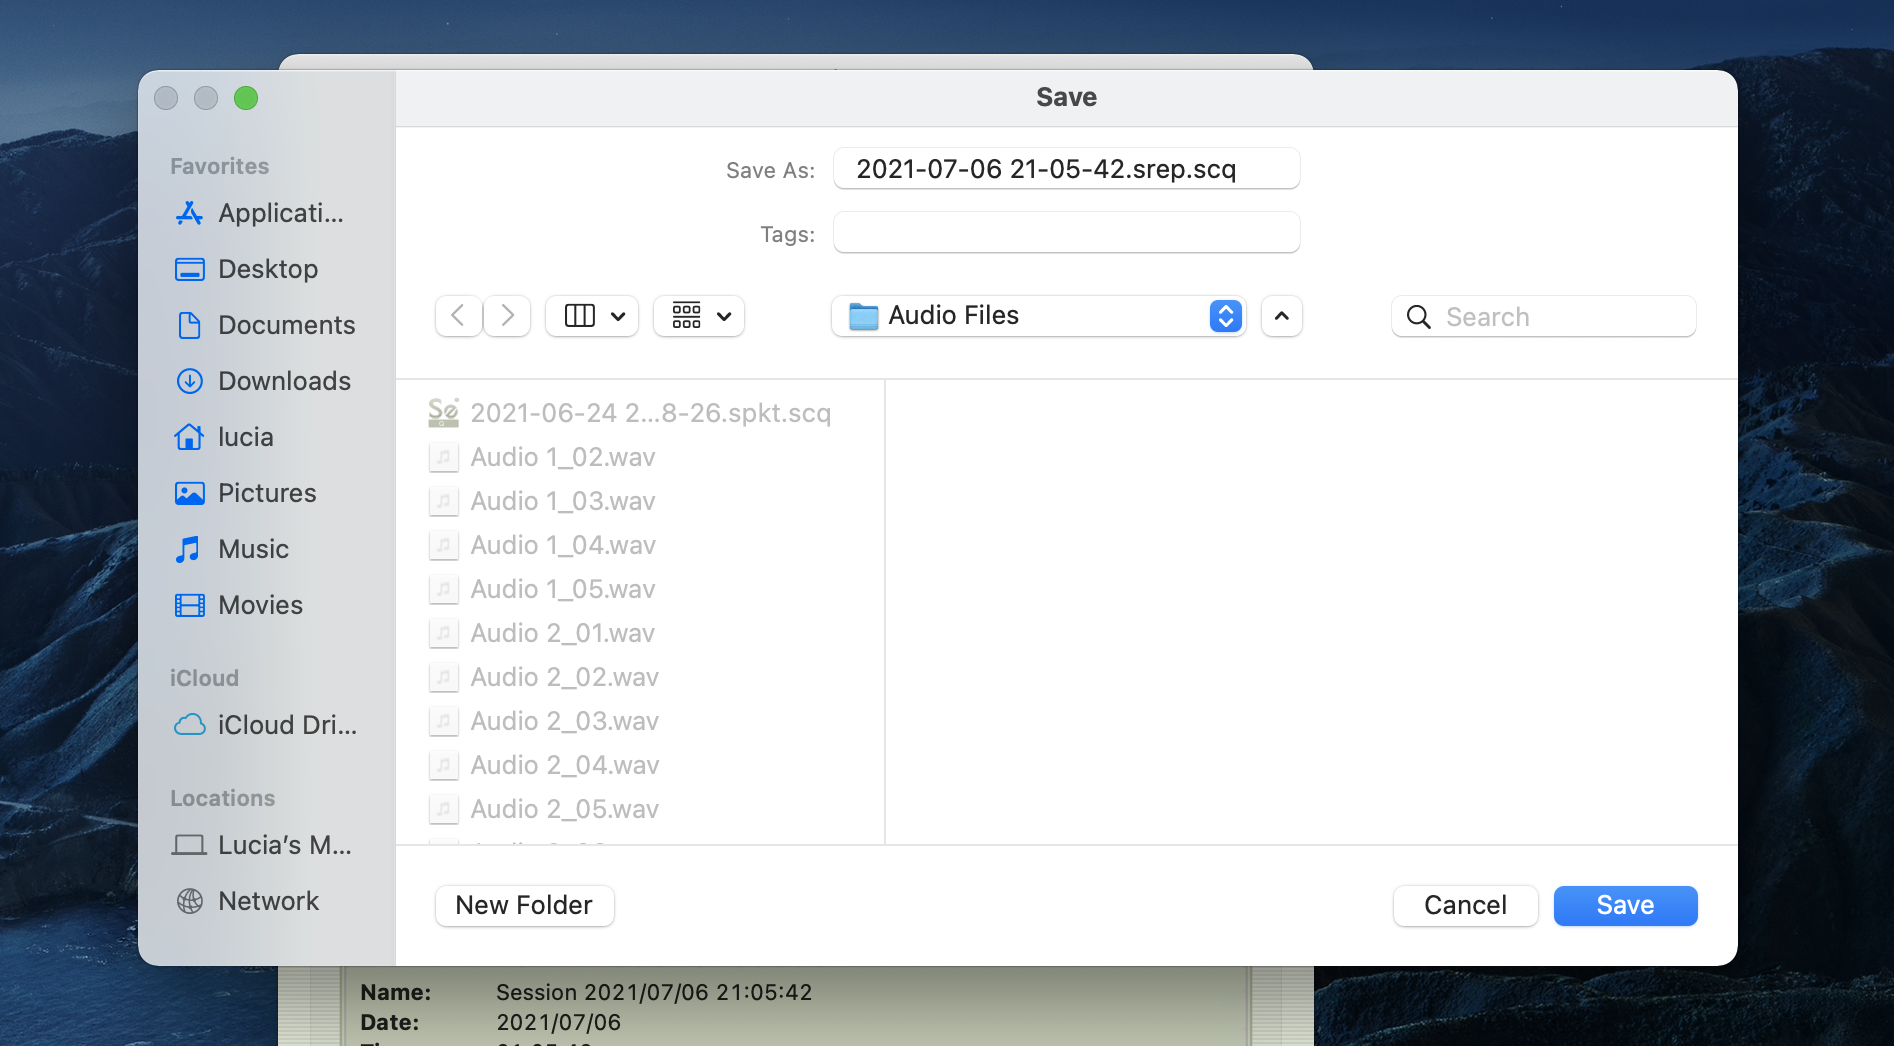
You can now manually transfer this data file to your remote connection partner, by email or FTP for example.
Your connection partner will receive this data file and import it by using either the Import option on the Q Requests menu, or dropping the file onto the Requests panel. 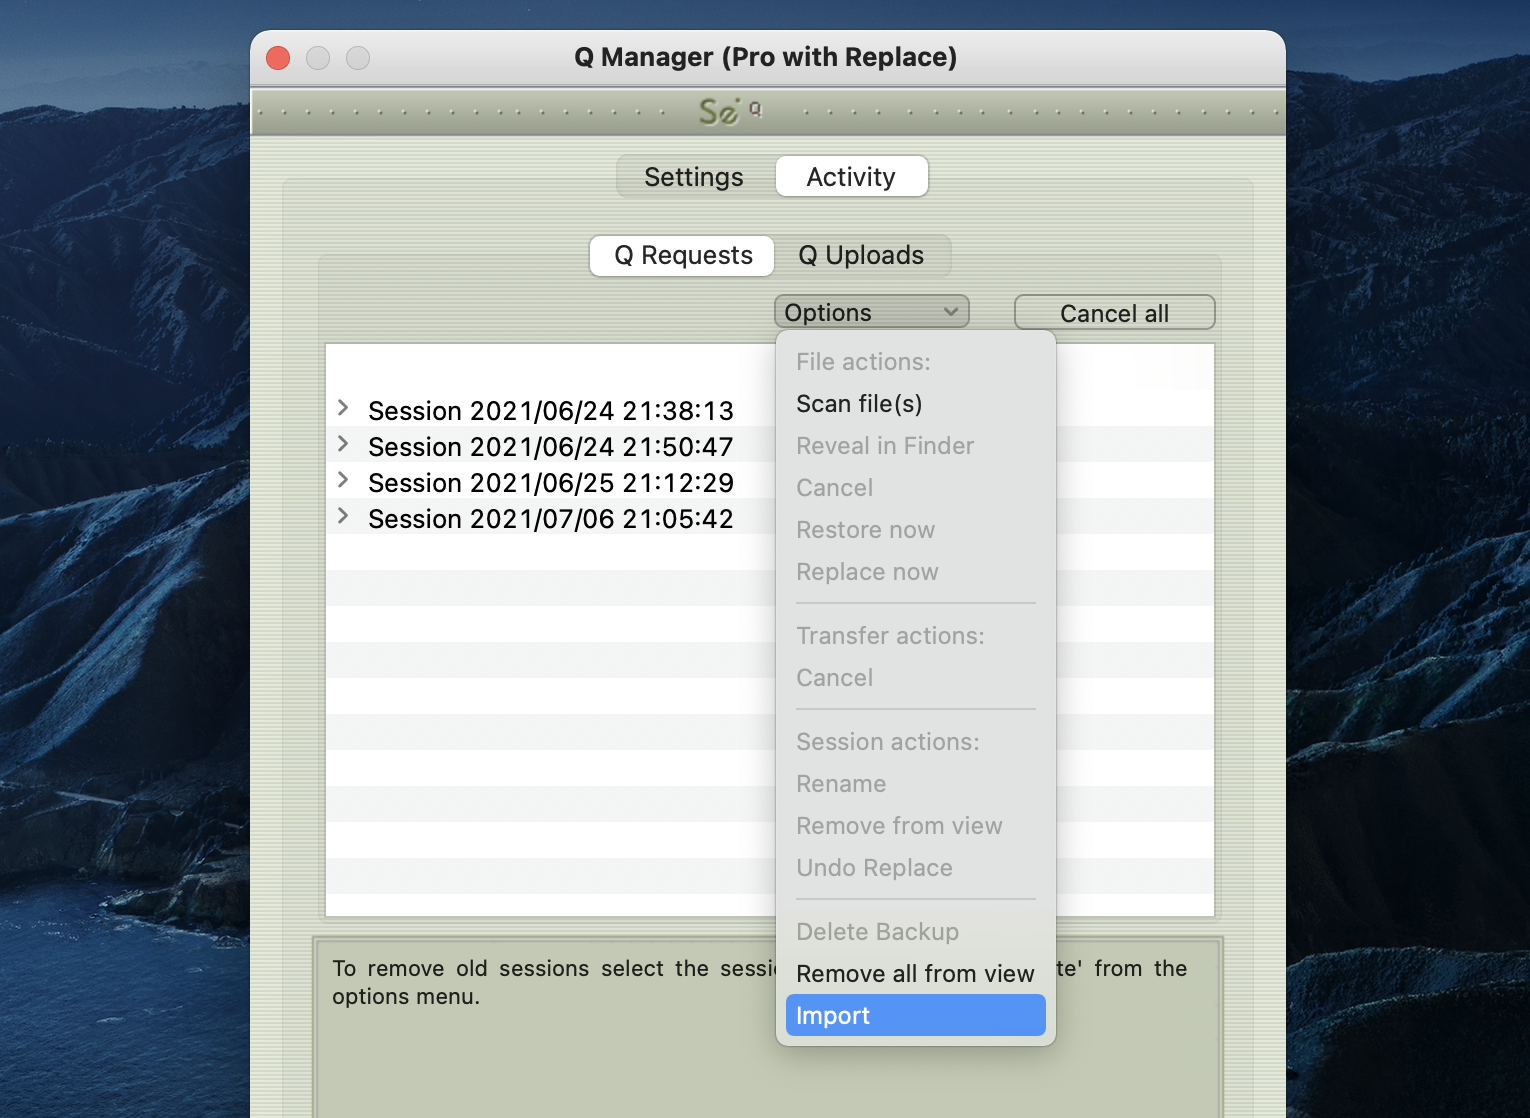
The Q Manager will import the data: 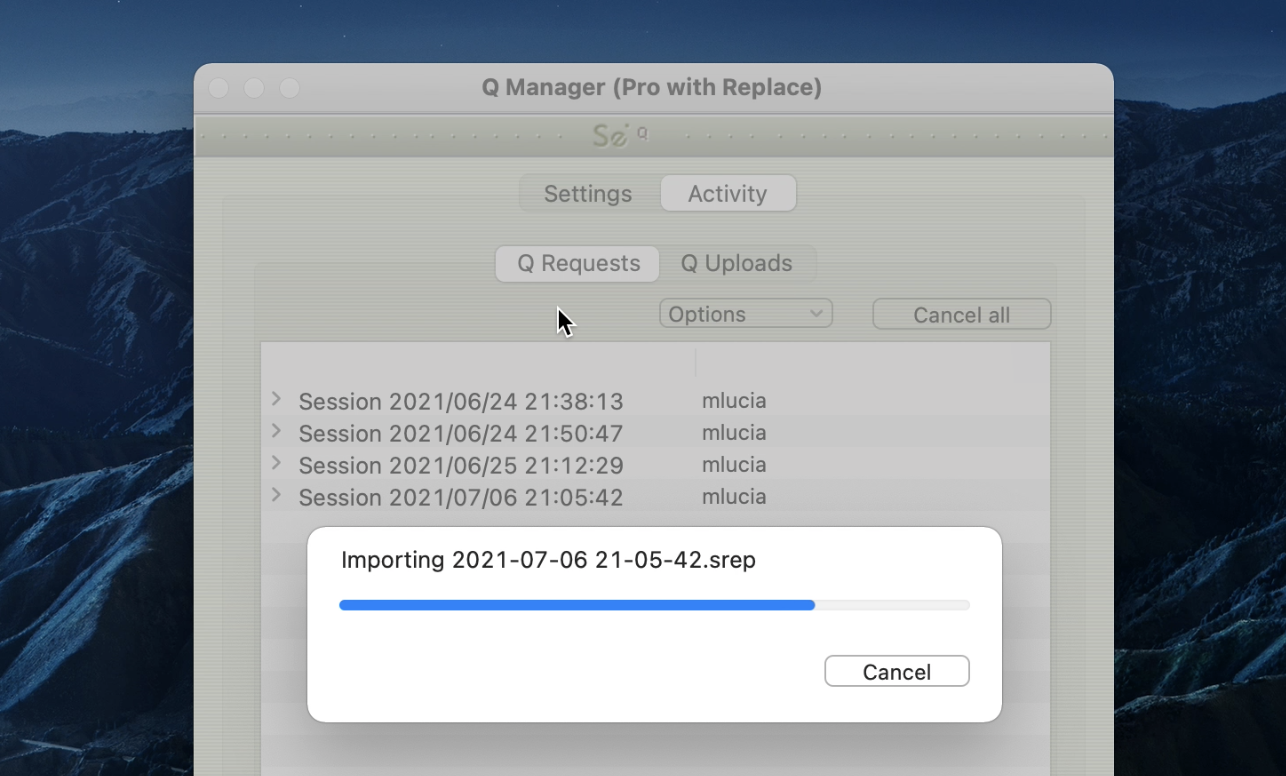
When a Restore or Replace session has been exported and successfully imported, that session will have a green R icon (for Restored) or orange R icon (for Replace).
This indicates that all files for the session have been successfully Restored or Replaced and no more operations are required for this session. 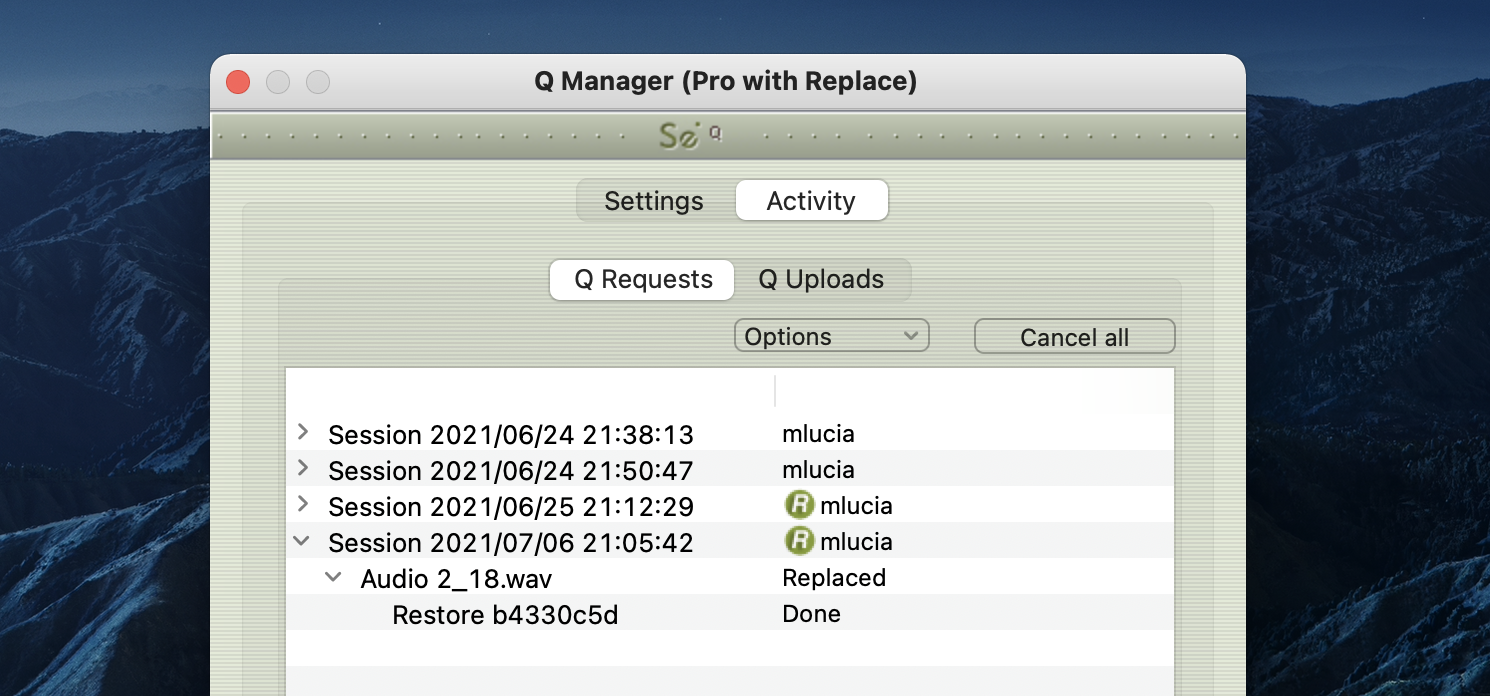
Activity panel: Cancel all
If a transfer is in process and you need to conserve bandwidth or no longer wish for the process to continue, the Cancel All button will pause all transfers currently in process. 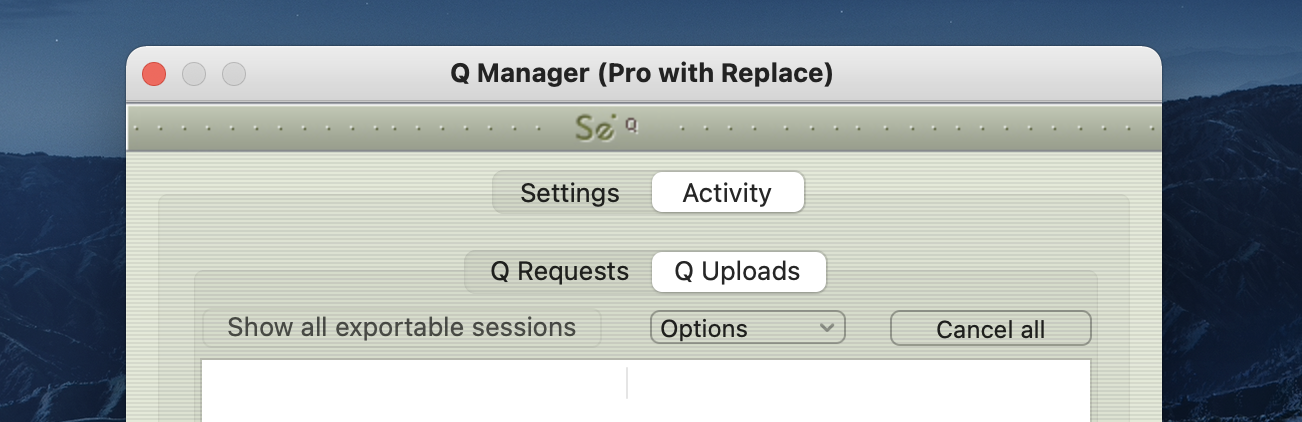
You can resume any transfers again at any time, however transfers will be reset so any data that has been uploaded or downloaded will begin again.
Q Menubar options in Source-Connect Pro/Pro X
The Q Manager has several functions available to you via the Menubar and also provides a quick glance at what processes are active. 
Set session folder
Use this option to quickly change your Audio Files folder between sessions. After you select the folder the Setup panel will show and you’ll need to click on Apply to save the new folder setting.
Q Requests
This shows all files available for restore and replace and the total overall percentage processed.
Start Replace process
This option is only available to you via this menu: it will start the replace process for all available files in your Q Requests menu. Note this may take some time if you have a large number of files. Individual or all processes can be cancelled as needed via the Q Requests option menu.
Show Activity / Settings panel
Open the Activity or Settings panel.
Q Manager Menu options
The Q Manager menu offers a ‘Clean up’ process. Over time your sessions, while being removed from view, may cause your Q Manager database to become very large. Cleaning up your database is recommended once in awhile, you will be warned if your disk usage is less than 20% on the Q Manager by a red bold text notification. 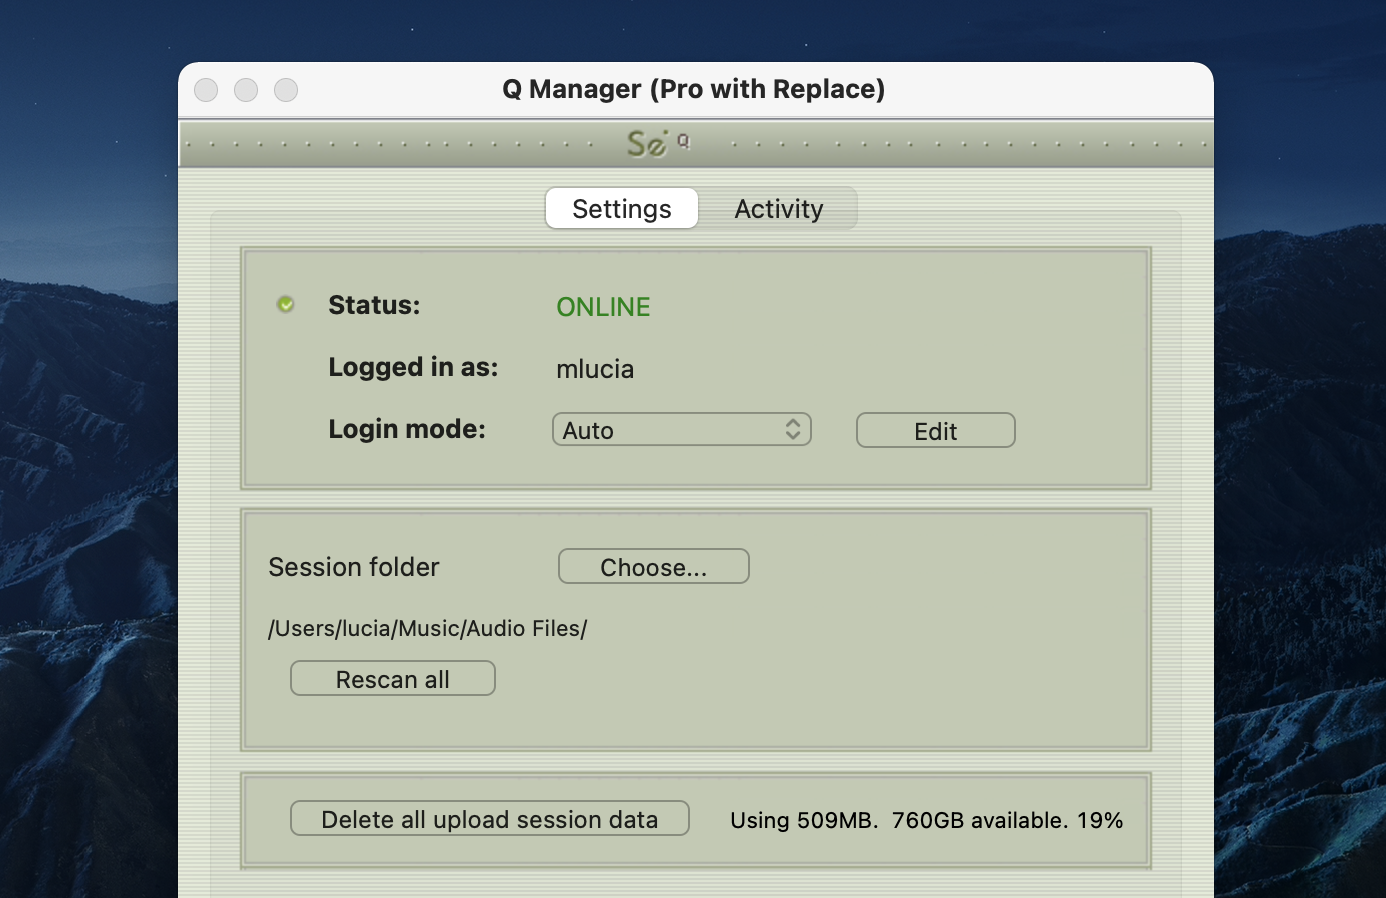
Simply choose ‘Clean up’ from your Q Manager menu and any sessions no longer in view in your Activity panel will be permanently removed. 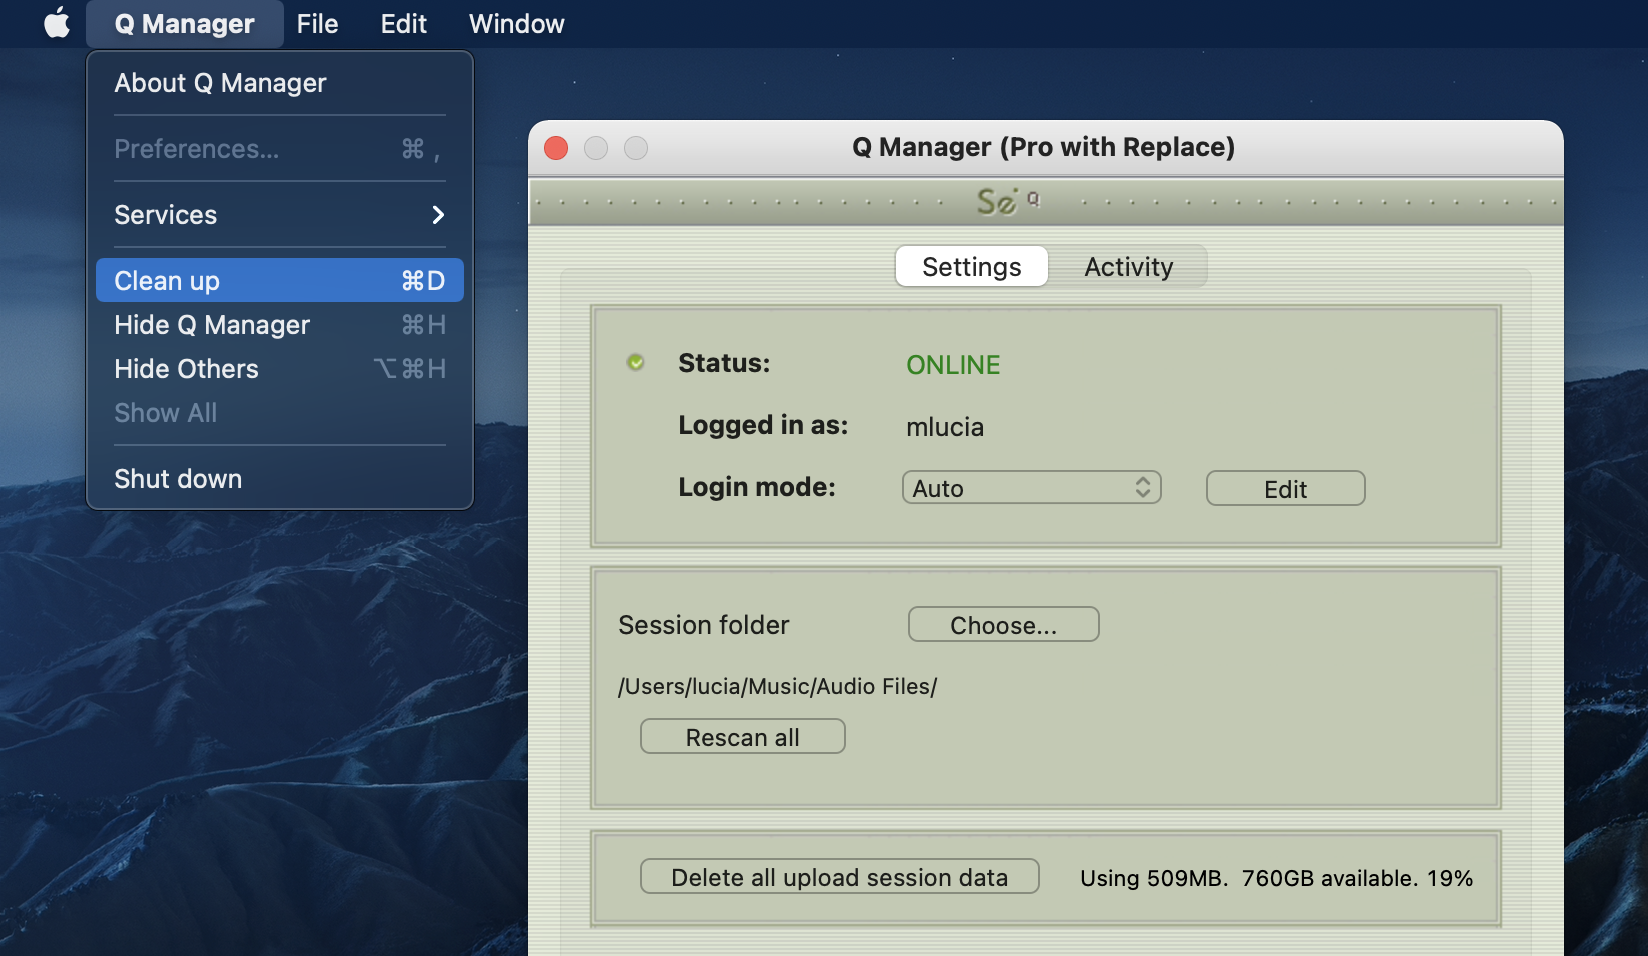
Troubleshooting Auto-Restore and Replace
For each file and process there is a status. For successful files the status will be Restored or Replaced depending on the type of process last completed. If you see that the status for a file, or files, is ‘Failed to restore’ or ‘Failed to replace’ it means that either you or your connection partner has invalid settings or a component is not properly installed or configured.
There are various reasons as to why a file may fail to replace or restore. To find out the exact reason for a failed process, select the file in the Q Requests panel: 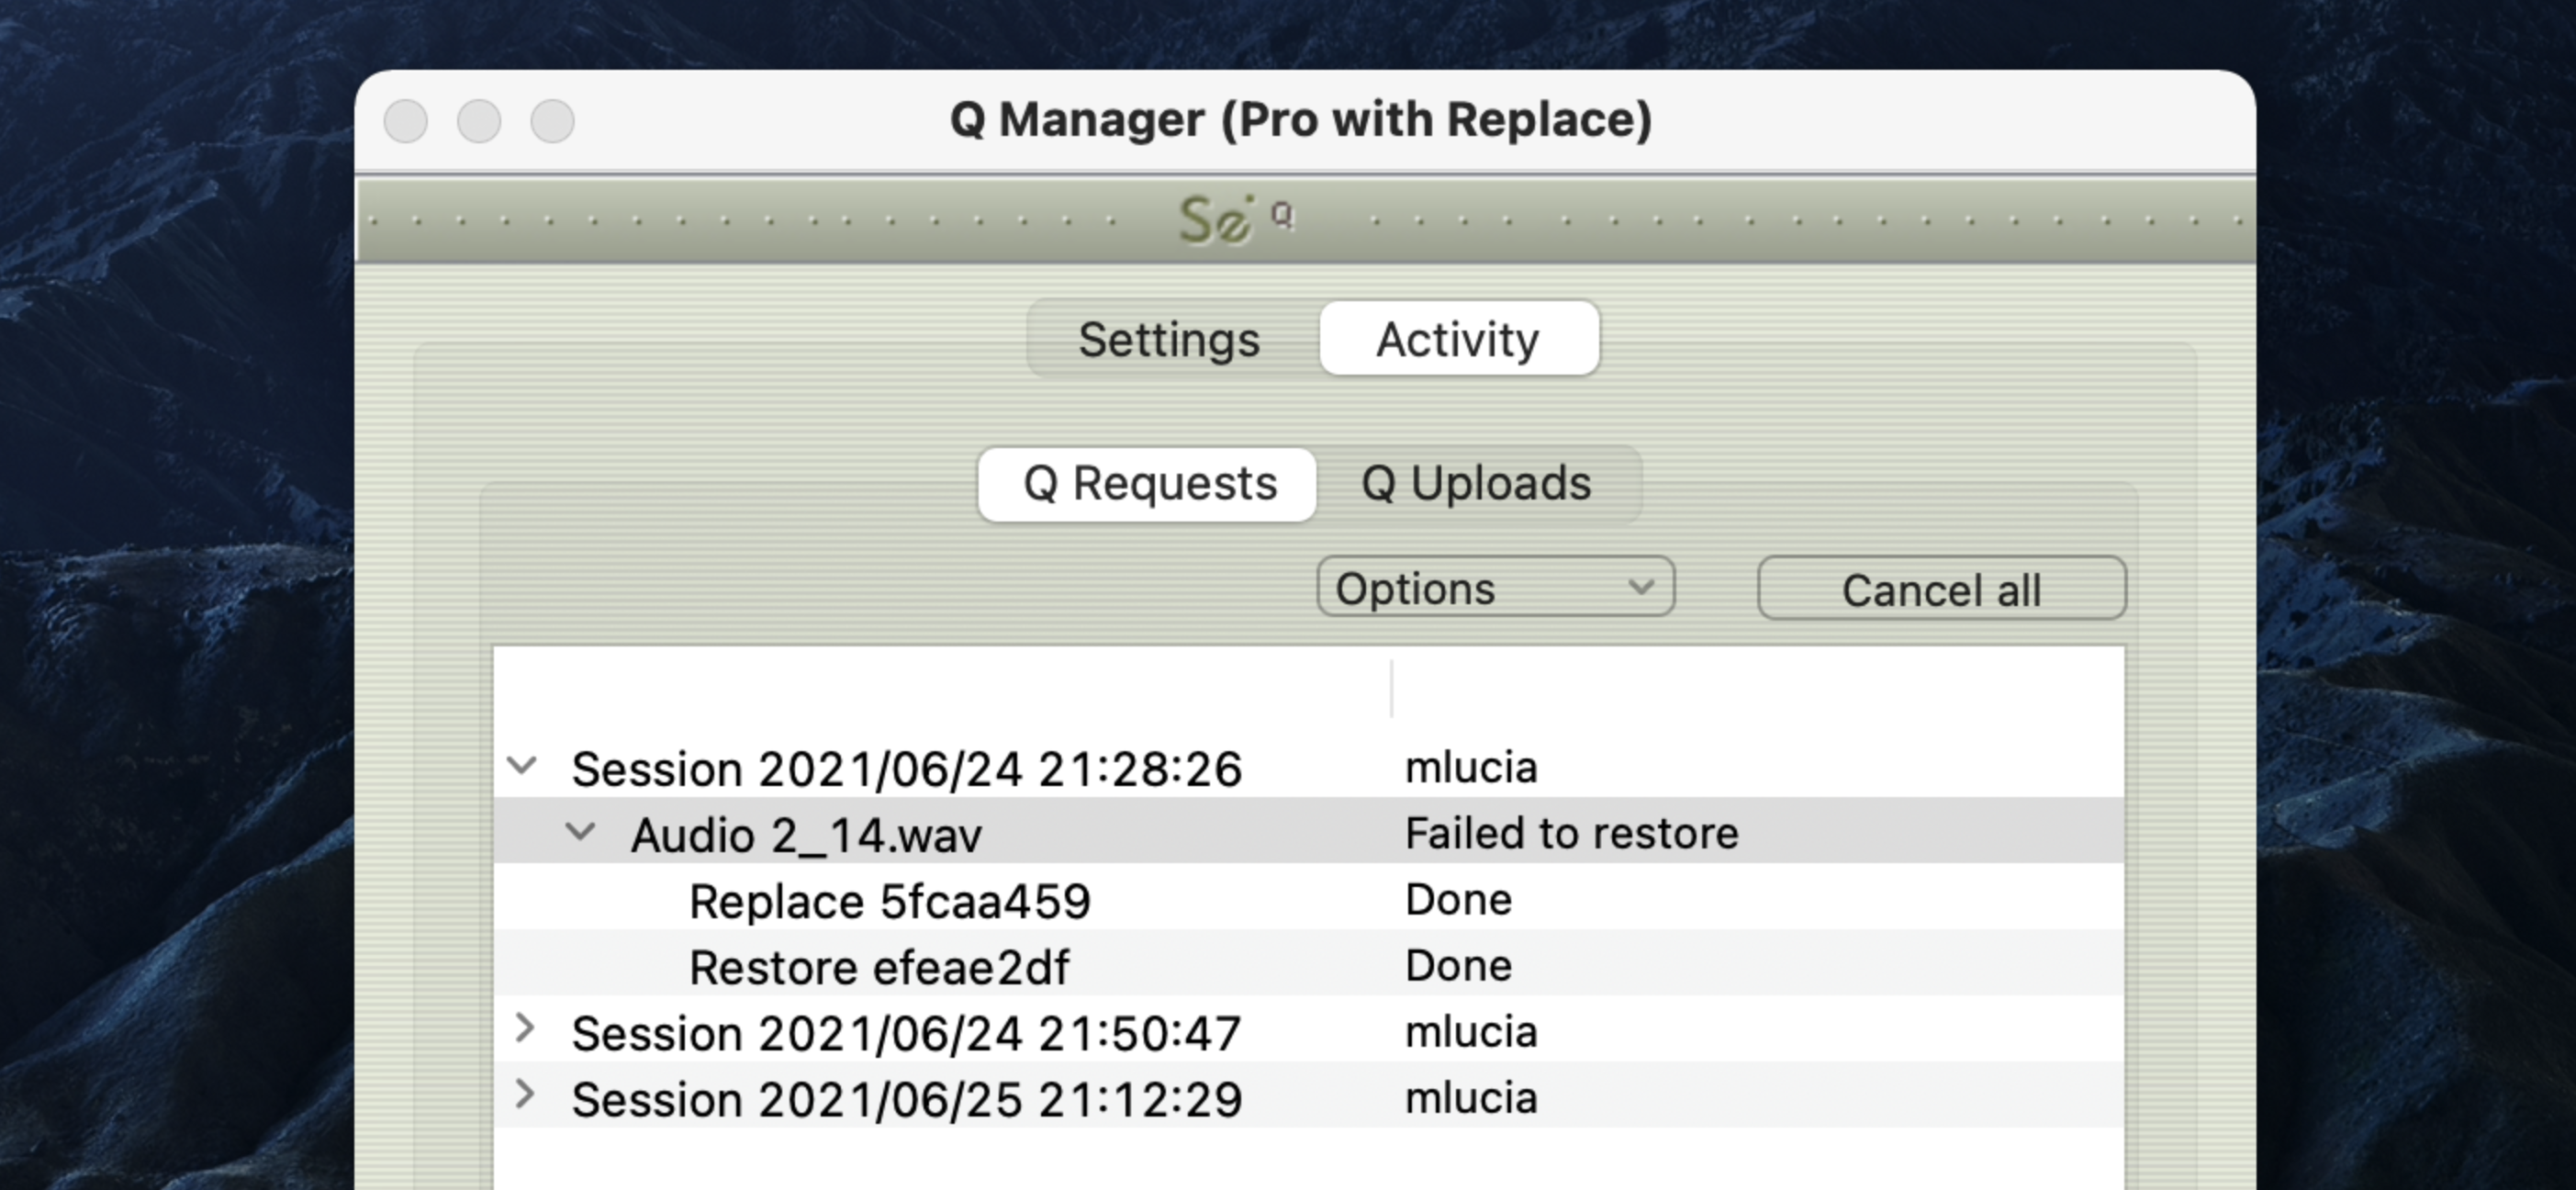
Now, look at the error code message to the very bottom: 
For example, this error tells us that the Q Manager was quit before the process could be completed. To resolve this, simply restart the process.
Q Manager errors are rare, and generally mean that the other side is offline, or has moved or deleted the Q data. Contact support with any specific questions, we will be able to provide detailed information on a case-by-case basis.
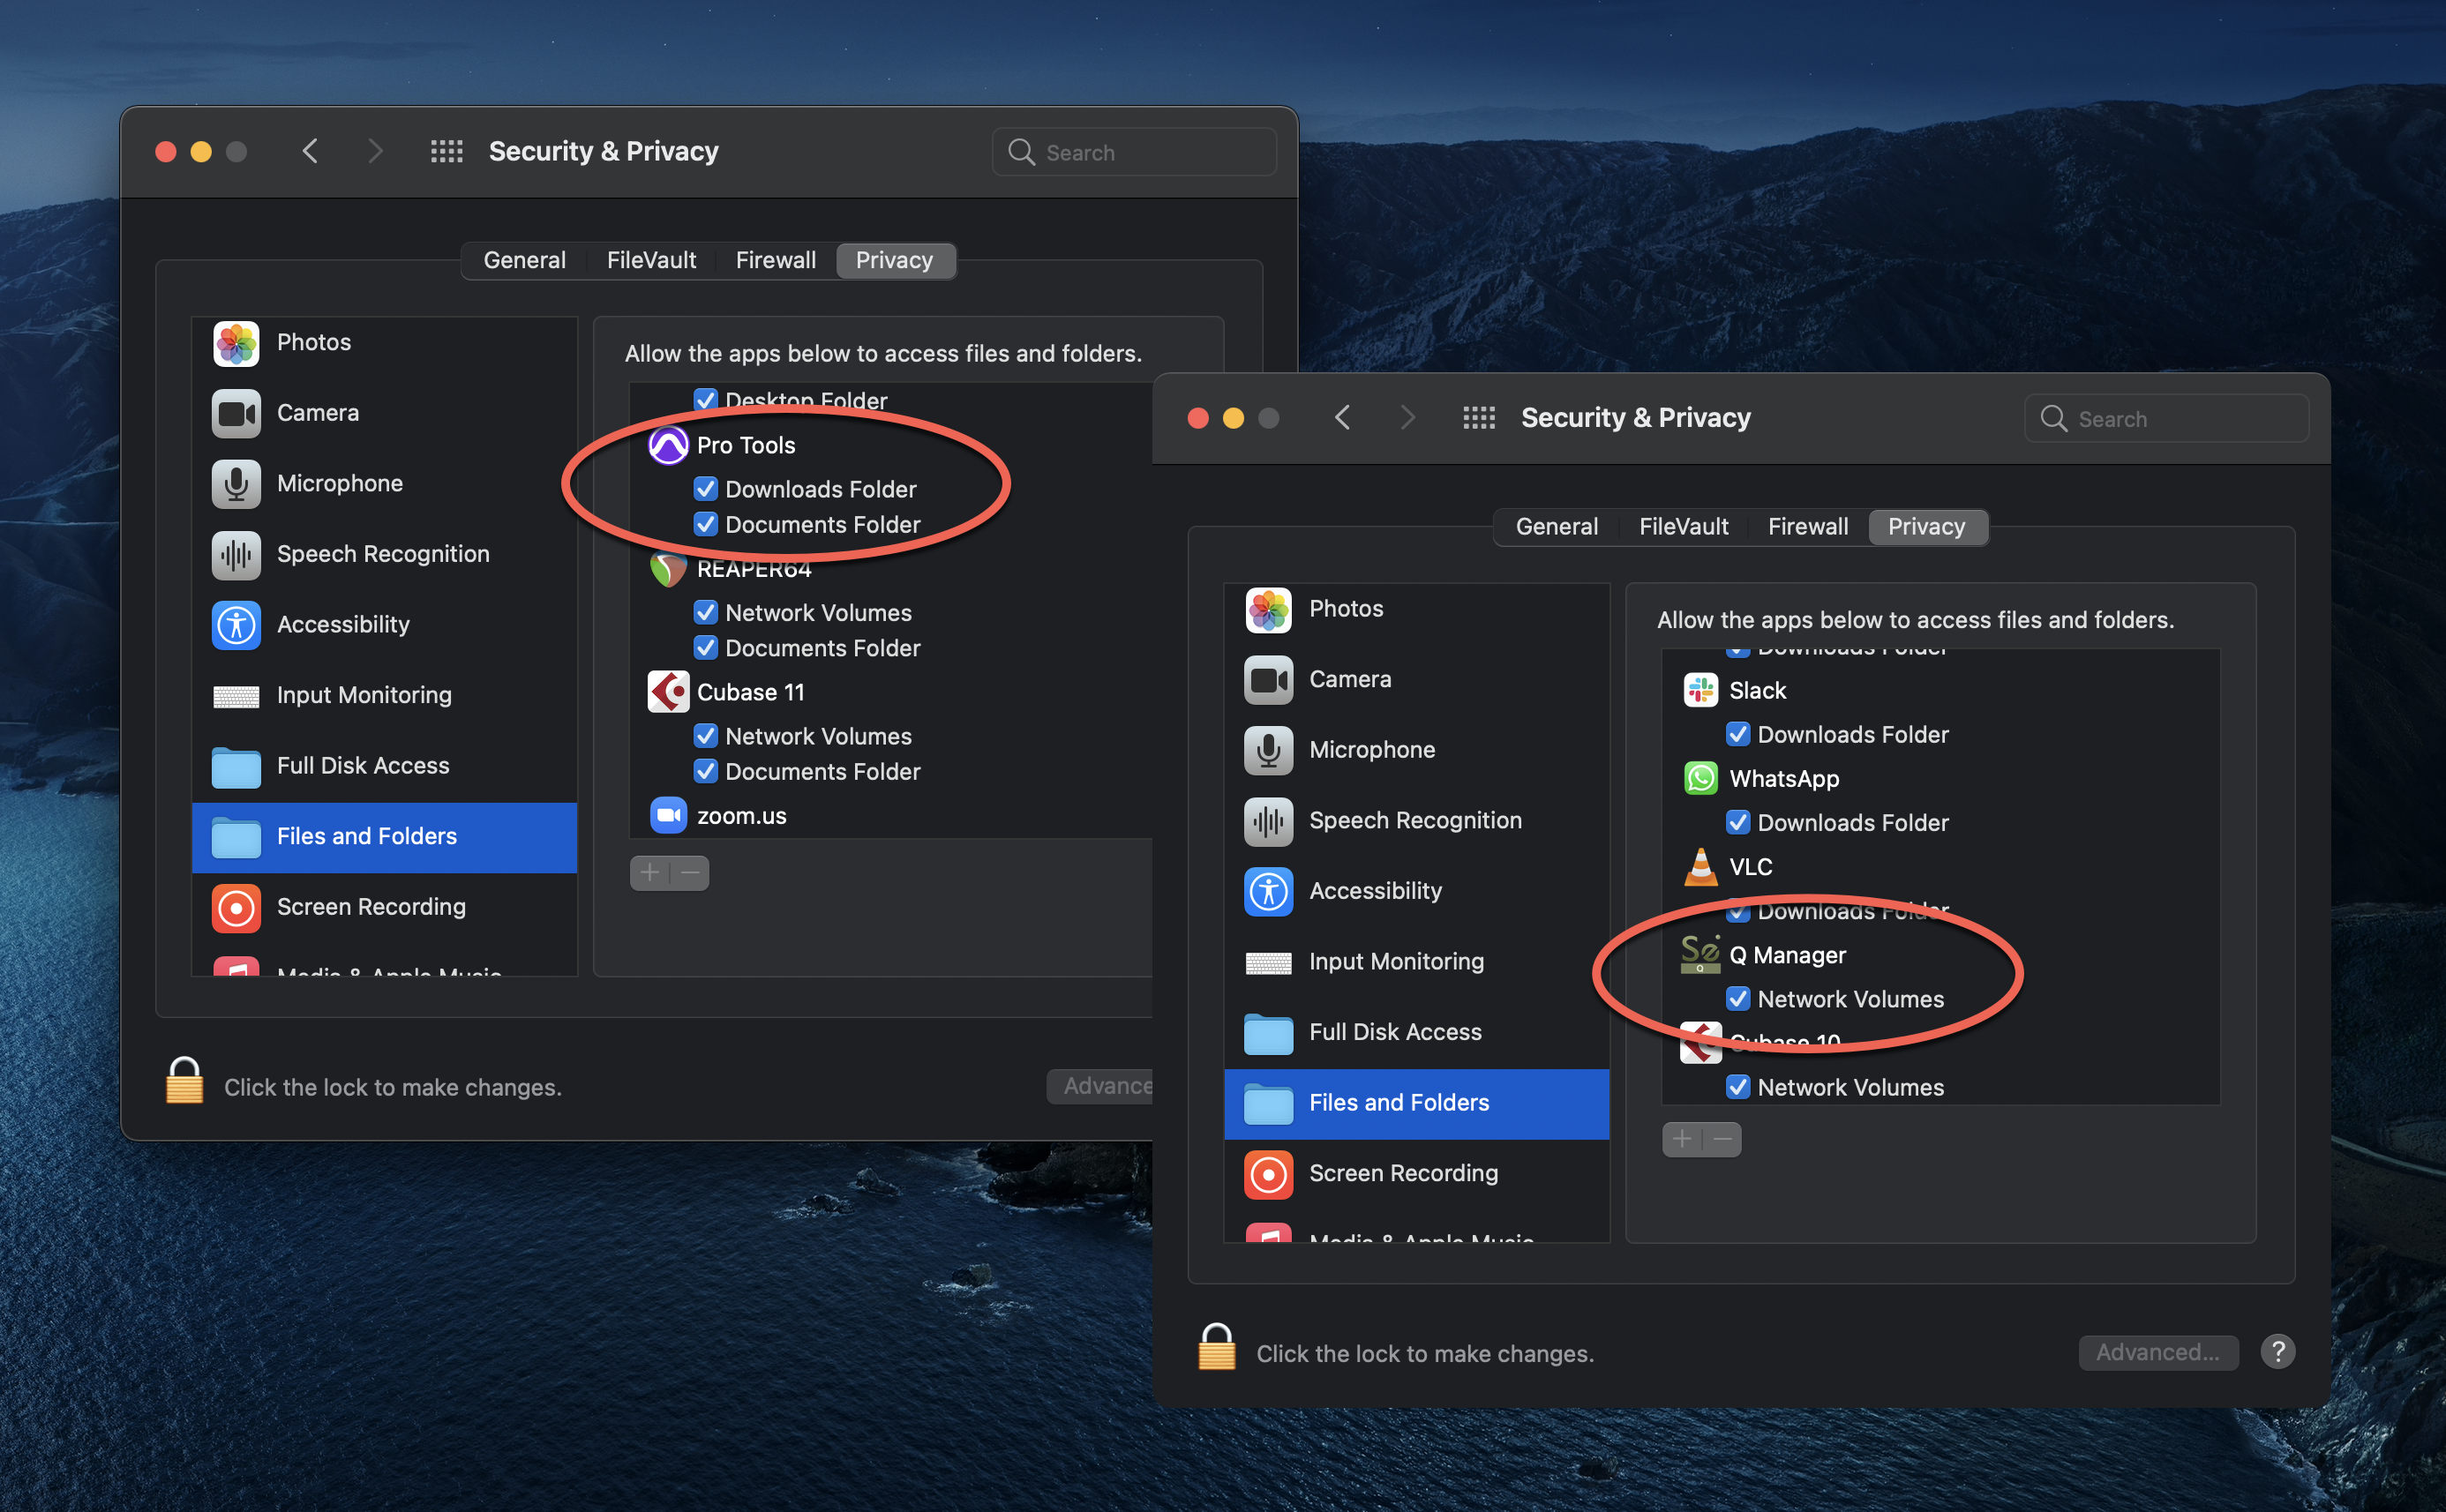
Network Volume Permissions
If files are not showing up on Q Manager after recording a session on your DAW (for example, Pro Tools, Logic Pro or Cubase/Nuendo), it might be related to any of the applications not having access to the music files from your recording. In order to attempt to solve this, check the following:
- Open the Security & Privacy menu.
- Go to "Privacy".
- Scroll down to "Files and Folders".
- Make sure that both Q Manager and your DAW have access to "Network Volumes".
Common Q Manager issues
The following are common reasons why Auto-Restore and Auto-Replace may fail.
Verify the following:
- Check that Q is enabled. You should have a Q icon to the left of your Source-Connect receiving meter if you are the recording end, and on the Sending meter if you are the sending end. Verify that the Restore and/or Replace checkboxes are checked in the Source-Connect Pro Settings panel before establishing a connection.
- It is important that you do not have any audio plug-ins or volume level changes between the signal from Source-Connect and your record channel. You must have both the Source-Connect Link aux track and your record track set to 0dB or the Q Manager will not be able to process your files, and you cannot insert any other plug-ins between Source-Connect and your record track.
- Pro Tools errors, for example CPU errors, may cause the Q Manager to not detect the file. If this is the case, reapply the Q Manager with ‘Rescan all files’ selected or select ‘Scan file(s)’ from the Q Requests menu in the Activity panel.
-
Verify your Q Manager settings:
- Your username and password should be correctly entered
- Ensure that you have selected the correct Audio Files folder for your current Pro Tools session
- Ensure that your FTP settings are correct and accessible to the Q Manager.
- Q Manager should be launched: make sure you can view the Q Manager via the MenuBar icon. NOTE: Files which are recorded with Source-Connect when the Q Manager is not launched can be later processed by rescanning the Audio Files directory.
- Files should be recorded while Source-Connect session was established. Files recorded when Source-Connect is not established will not appear for processing in the Q Manager.
- Sample-rate converting is not supported. Verify your connection is not sample-rate converting.
Table of Contents