Setup Guides - What Works? The "Recommended" Method
This article contains best practices for Source-ConnectWindows Audio: Best Practices
Record and Playback Source-Connect Sessions: The "Recommended" Method
By Jason McCOY
As a voice over talent, I love how easily Source-Connect links my recording studio with other studios around the world and delivers my signal with amazing quality. Being directed live from my studio saves everyone involved time and helps to prevent simple errors like incorrect pronunciation or specific emphasis.
Unfortunately, using Windows for advanced audio recording and editing purposes has some challenges. I was not able to record and playback on my end during a Source-Connect session. Windows would say the audio interface was busy.
Why would a voice over talent want to record and playback during a Source-Connect session?
It's true; the voice over session is usually being recorded on the listening studio end. Even so, there are several reasons why having the ability to record/playback a session is useful.
Most importantly, I don't want to be limited in my studio. I want to be prepared for anything. If a client asks for playback, I don't want to tell them I can't.
What if the perfect take is interrupted by a glitch caused by internet traffic? My recording serves as a backup and I have it available. After a session if a client asks me to record a word change on my own and email it, I'm able to reference the session, match the original voice style and send the client a revision that sounds seamless.
I can record while listening to the background music track and adjust the pace and delivery of my voice accordingly. I can even playback the audition or portion of my demo the client liked to help me lock in that exact sound.
And finally, with the release of Source-Nexus Gateway, a client who may not be able to record on their end can to listen to the session in high quality while I record it.
Several possible solutions but this is the easiest way to get the cleanest audio
When I first attempted to solve this issue I used two audio input devices, my main audio interface and my computer's sound card. It worked but I heard interference in the audio. I assumed it was from a low quality built in sound card or maybe the audio cable was too close to a power cord. Who knows where the interference came from? I probably could have narrowed it down but instead it got me thinking. What if I could accomplish this with only my main audio interface? Well guess what? I can and did. And you can too! If you have the right equipment.
In case you don't have the "right" equipment but still want a solution, I've laid out similar steps for the "Built-in Sound Card" method. The trick to making this recommended method work is simple. My preferred audio interface, an AudioFire 2 from Echo Digital Audio has the option of multiple output channels. You wouldn't know it from looking at it but the headphone jack gives two more separate output channels. Here are the steps to take advantage of it!
My studio setup for playback and recording during Source-Connect sessions
- Windows Operating System: My studio PC has Windows 10 Home Premium.
- An audio mixer: I use a Mackie 1604VLZ-Pro Mixer (I know, overkill for voice over) .
- One awesome audio interface: AudioFire 2. Any would work with at least 4 separate output channels.
- Source-Connect: Standard, Pro, or Source-Nexus Gateway
- Audio recording/editing software: Adobe Audition CS6 is amazing!
- Audio Cables: Exact cables you'll need will depend on your studio and gear. For my setup I used one XLR cable, four mono cables and one stereo 3.5mm to dual Y cable.
Since your mixer or audio interface may be different, I'll be as detailed as possible. So even if you don't have this exact gear, you'll know if yours is capable or at least know what to look for when upgrading.
I setup my studio inputs/outputs for stereo. I'll probably only ever need mono, but I'd rather have the option in case it ever comes up.
Step 1: Run an audio cable from microphone to audio mixer.
I connect an XLR cable (female end) to my Neumann TLM 103 microphone and run the other end (male end) to the Channel 1 mic input on my Mackie 1604VLZ-Pro.
Purpose: Simple enough, this gets the audio from the mic to the mixer so we can control volume and send the mic signal where we want it to go.
Step 2: Run audio cables from audio mixer main outputs to the audio interface inputs.
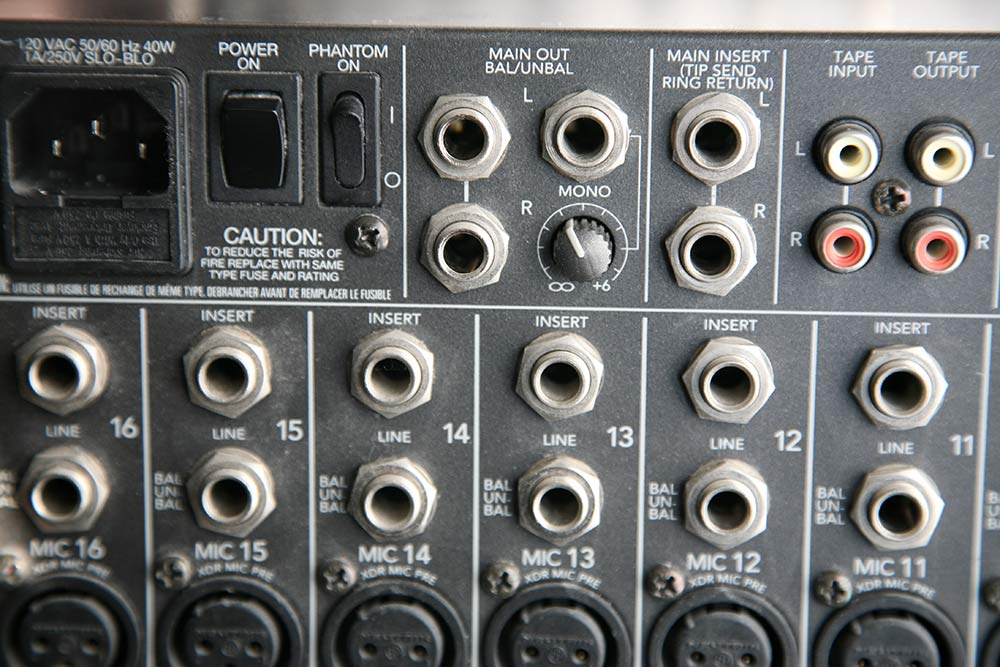
Purpose: This sends all the main audio out of the mixer to the audio interface. We'll use this path to send our mixer audio (including mic signal) to Source-Connect and Adobe Audition.
Step 3: Run audio cables from audio interface outputs 1 & 2 to input channels on mixer.
Connect two mono cables to the outputs of your audio interface (found on the back of the AudioFire 2). Connect the other ends of these cables to Channels 2 and 3 inputs on your mixer. On the mixer, turn the pan knob on channel 2 to the left and channel 3 to the right.
Purpose: This sends the audio from your computer (from any program that is assigned outputs 1 & 2) to your mixer. We'll use this path to hear playback from Adobe Audition. So mixer channels 2 and 3 are designated for Adobe Audition playback.
Up until now I've laid out a pretty basic recording setup and probably how you are already using your audio interface with a mixer. It's a good idea at this point to confirm you have left/right plugged in correctly. You can do this by recording a stereo waveform in your audio editing software. Pan your mic channel (channel 1 in this guide) left and right. You should see the waveform reflect how you pan. If it's reversed (left shows audio when you pan right), you've got a cable crossed. Just swap the connectors of one end of the cable in Step 2. Next, playback your panned recording and confirm your mixer has left and right correct. Again, if it's reversed, swap the connectors on one end of the cable, in Step 3 this time.
Step 4: Run an audio cable from audio interface outputs 3 & 4 to input channels on mixer.
Using a cable such as the Hosa Technology REAN 3.5mm TRS to Dual 1/4" TS Pro Stereo Breakout Cable, connect the stereo 3.5mm or 1/8" end to the headphone jack (found on the front of the AudioFire 2) and turn the headphone volume knob all the way up. Then connect the two mono cables to Channels 4 and 5 inputs on your mixer. On the mixer, turn the pan knob on channel 4 to the left and channel 5 to the right.
Purpose: This sends the audio from your computer (from any program that is assigned outputs 3 & 4) to your mixer. This path will bring the audio you hear from the other studio in your Source-Connect session to the mixer. We'll later setup the mixer so this audio is only heard in our headphones/monitors and not sent out. So mixer channels 4 and 5 are designated for Source-Connect incoming audio (from other studio). Whew! We're done with connecting cables. Let's move on to pushing buttons.
Step 5: Setup the mixer to send the mic signal to computer.
On channel 1 (your mic channel) of the mixer, make sure the L-R button is pressed.
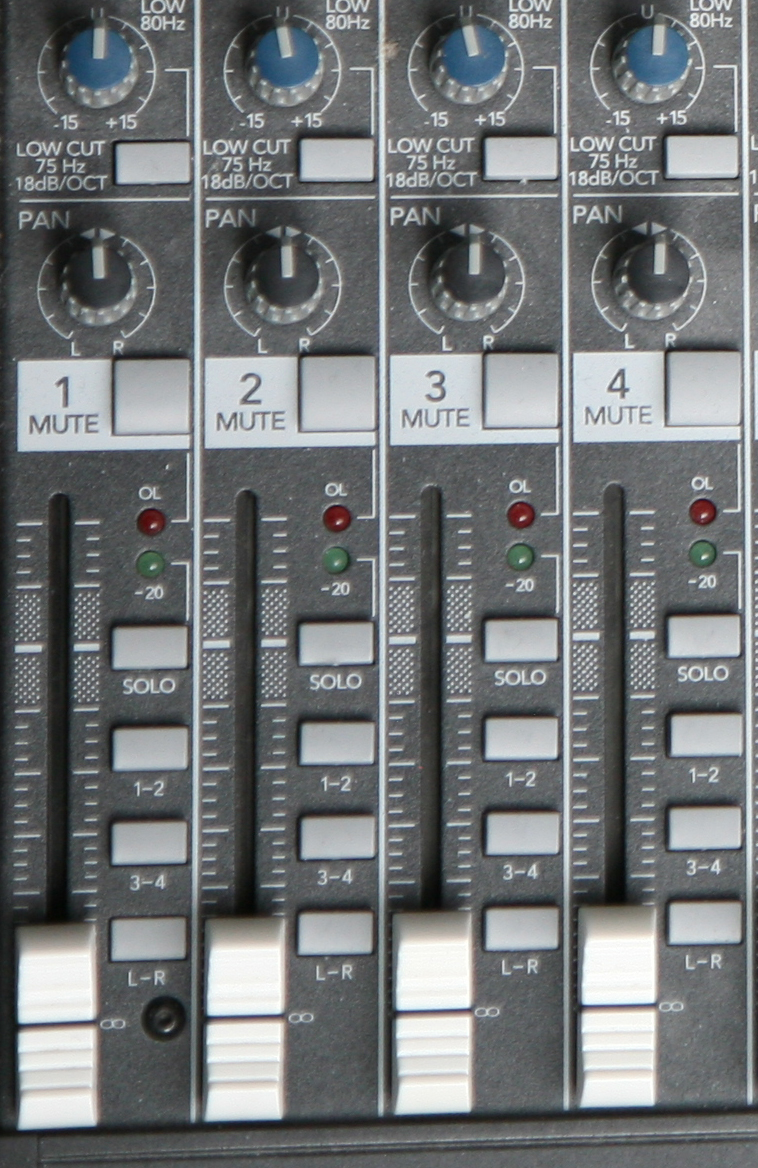
Purpose: This tells your mixer to send your mic signal out through the main out. So both Source-Connect and Adobe Audition will receive this same exact signal.
Step 6: Setup the mixer to send Adobe Audition playback to Source-Connect.
Since the Adobe Audition audio will come through your mixer on channels 2 and 3, make sure the L-R button is pressed on those channels.
Purpose: This tells your mixer to send audio played in Adobe Audition out your main outputs (which is sent to Source-Connect).
Step 7: Setup the mixer to hear Source-Connect but not send the signal.
On channels 4 and 5 of the mixer, make sure 3-4 is pressed and the L-R button is NOT pressed.
Purpose: This tells your mixer to receive audio from your caller on Source-Connect but not to send it back out to Source-Connect or Adobe Audition. You'll be able to hear the person on the other end of the Source-Connect session without recording them.
Step 8: Setup the mixer so you hear everything in your headphones.
On your mixer, look for CTL ROOM SOURCE and press "Subs 3-4" and "Main Mix". Also, in the "Assign to Mix" area, move 3 and 4 to "U".
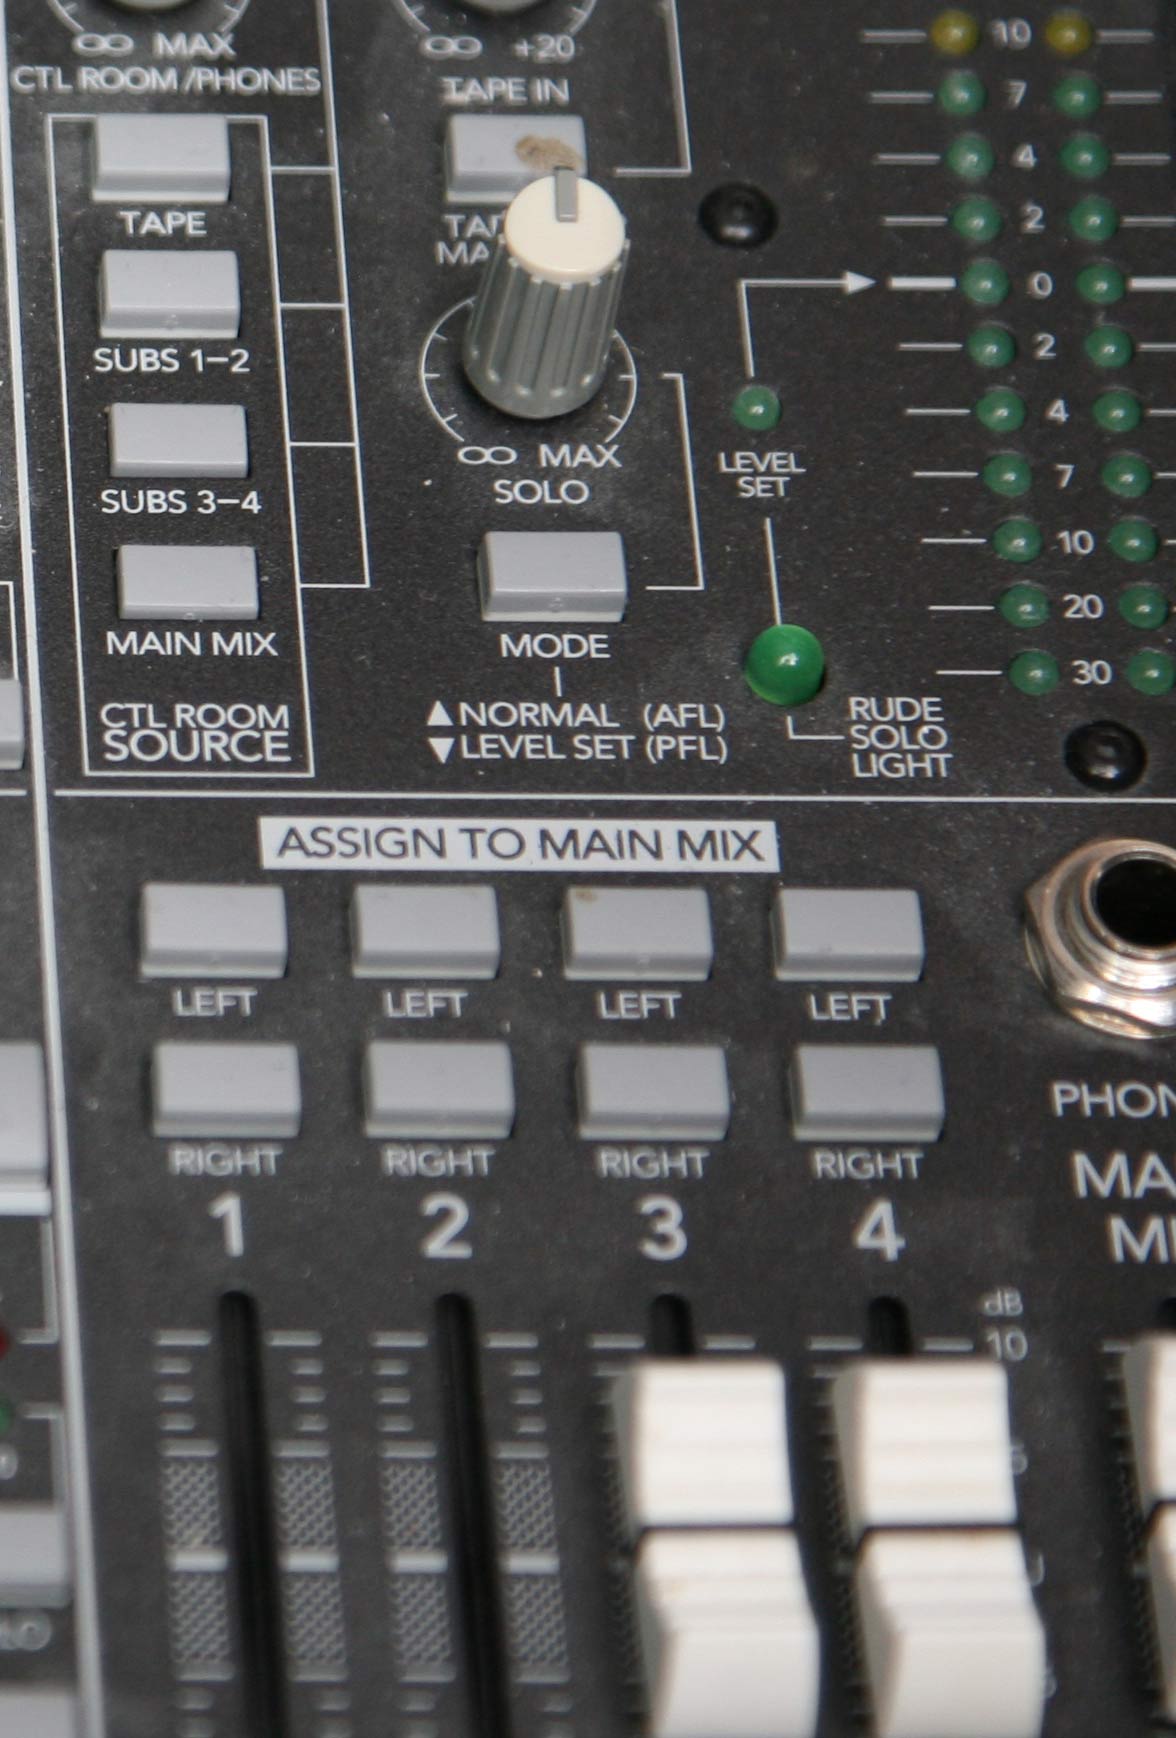
Purpose: This tells your mixer that in your headphones you want to hear your mic, Adobe Audition playback and the other person on Source-Connect.
Step 9: Configure Adobe Audition
In Adobe Audition CS6, go to Edit, Preferences, Audio Hardware. Default Input should be "Analog in 1-2 (AudioFire 2)". Default Output should be "Playback 1-2 (AudioFire 2)". Click OK.
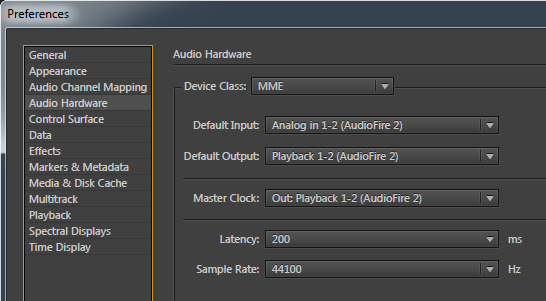
Purpose: We setup Adobe Audition to record AudioFire 2 inputs 1 and 2 and to playback through AudioFire 2 outputs 1 and 2 (found on the back of AudioFire 2), which is channel 2 and 3 on the mixer.
Step 10: Configure Source-Connect
In Source-Connect, click the cog and make sure that AudioFire2 analog in 1-2 and AudioFire2 playback 3-4 are both selected.
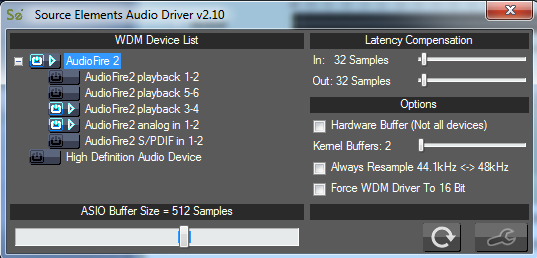
Purpose: We setup Source-Connect to record AudioFire 2 inputs 1 and 2 and to playback through AudioFire 2 outputs 3 and 4 (headphone jack on front of AudioFire 2), which is channel 4 and 5 on the mixer.
That's it! You are now able to record and playback Source-Connect sessions!
Remember, with the exception of the Source-Connect caller audio, what you hear in your headphones is exactly what is sent to Adobe Audition and Source-Connect. Adjust your channel slider to adjust the volume being sent to these programs.
There are so many things you can do with a setup like this; you may even find it useful outside of Source-Connect. And most importantly, you won't have to tell a client "I can't".
About Jason McCoy

Jason McCoy is a North American male voice over artist and founder of McCoy Productions located in Salisbury, Maryland. He has over 15 years of voice over experience and has voiced projects for leading brands including John Deere, Samsung, Ford, AT&T, Intel, PBS, Volkswagen, Intuit, Honda and many others!
His friendly, genuine, conversational and caring young adult voice style is why clients hire him for eLearning, radio, tv and internet commercials, explainer, safety and sales videos, radio imaging for stations and national radio shows, audio books, phone prompts and more.
Clients around the world are able to direct voice over sessions with Jason live via Source-Connect. To contact Jason McCoy or to hear his demos, visit McCoyProductions.
To connect with Jason over Source-Connect or Source-Nexus Gateway, see his Source Elements Profile.
And over on Social Media:
Table of Contents