How to host a multi-conference setup using Source-Live, Source-Connect and the Source-Nexus Suite with Pro Tools
This article is a comprehensive step-by-step tutorial on how to host a multi-conference setup so multiple parties can join your session using their preferred communication tool. This way, clients can be brought along with professional voice talent.
Required software to complete this tutorial
- Pro Tools Intro, Artist, Studio or Ultimate - a version that supports importing third-party plugins.
- A Source-Nexus Suite subscription (which will include access to Source-Nexus Control, Source-Nexus I/O and Source-Nexus Gateway, all of which will be used in this tutorial).
- A Source-Connect subscription (which will include access to the Se Rewire plugin used on this tutorial).
- A Source-Live subscription.
- A Source-Talkback license (optional, but helpful).
What we will do
Let's assume, for the purpose of this tutorial, that there will be:
- One voiceover talent recording over a video (connecting via Source-Connect),.
- An engineer managing the recording and monitoring on Pro Tools, hosting a session via the Source-Nexus Gateway and transmitting video using Source-Live.
- Clients monitoring the recording connecting through various conferencing applications, such as Google Meet, Skype and Zoom.
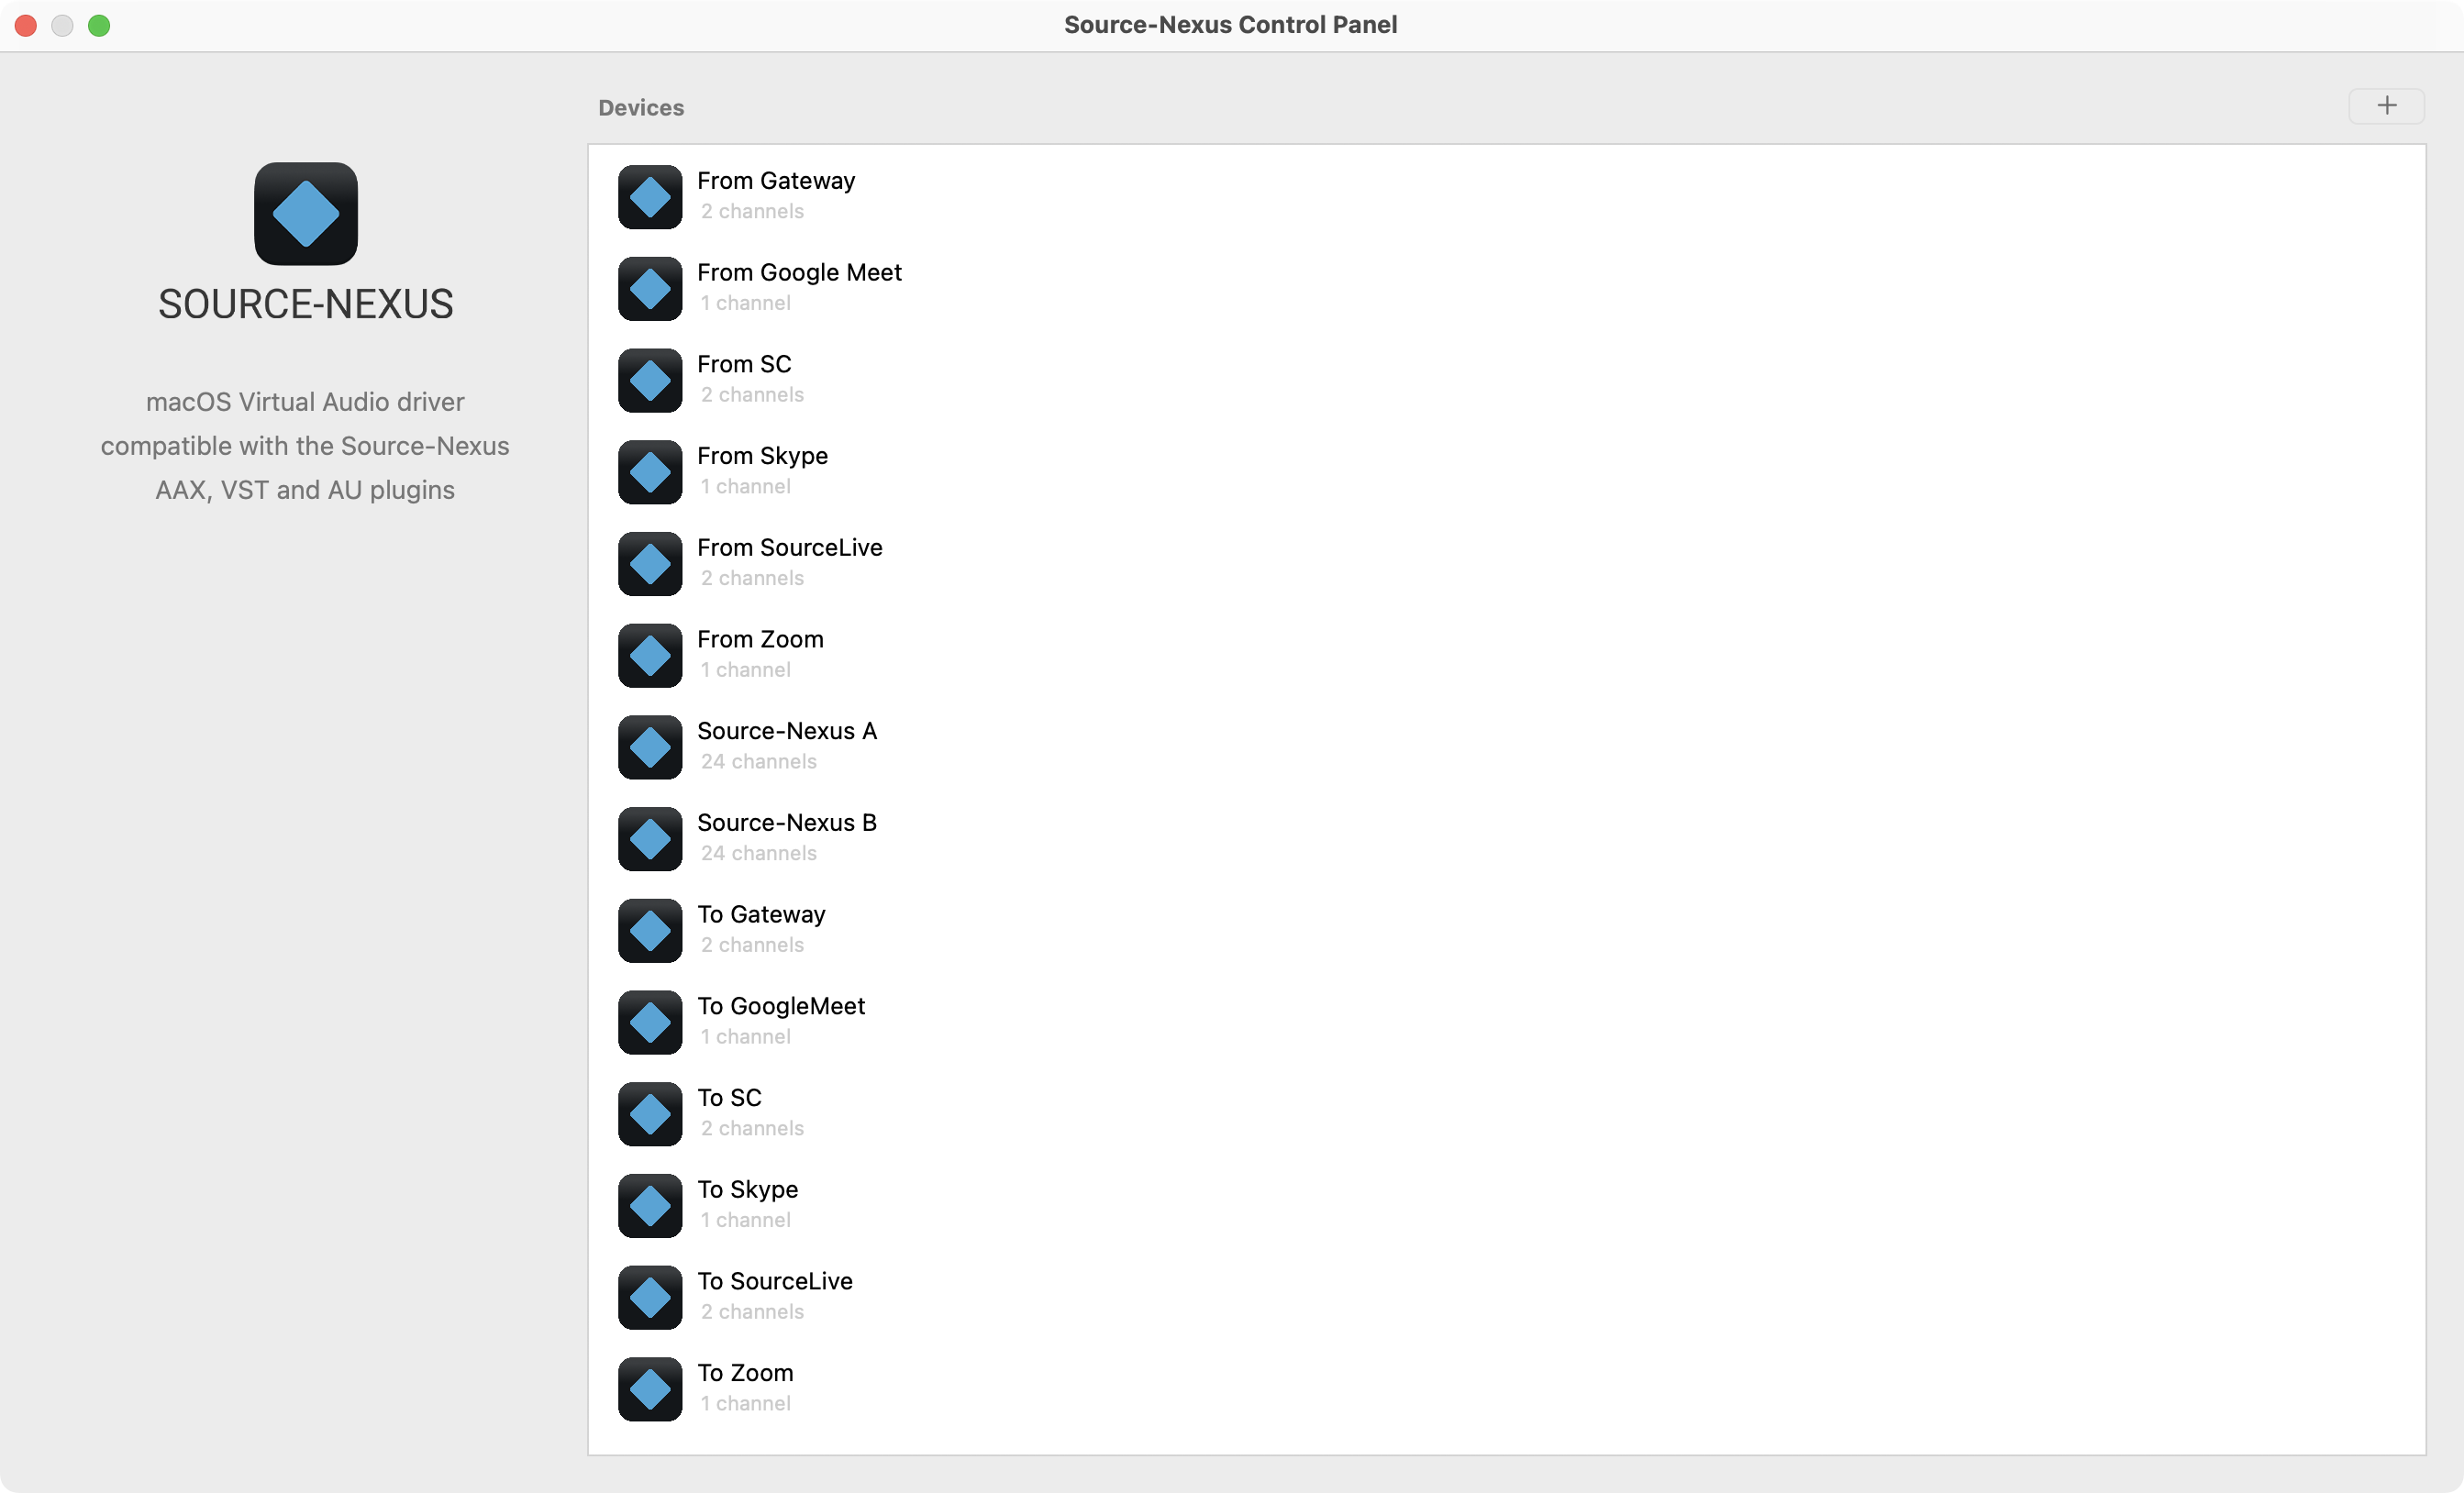
1. Setting up all endpoint drivers on Source-Nexus Control
- 1-channel drivers for all conference-type applications: “To Skype”, “From Skype”, 'To GoogleMeet", “From GoogleMeet”, “To Zoom” and “From Zoom”.
- Two-channel drivers for all other apps: “To SC”, “From SC” (for Source-Connect), “To Gateway” and “From Gateway” (for the Source-Nexus Gateway) and “To SourceLive” (for Source-Live - to have the clients view the edit with high-quality picture).
2. Configuring all tracks on Pro Tools
For this tutorial, we are assuming you already have two tracks on Pro Tools:
- A video (the same one you will be transmitting via Source-Live)
- A scratch track with the audio for the video.
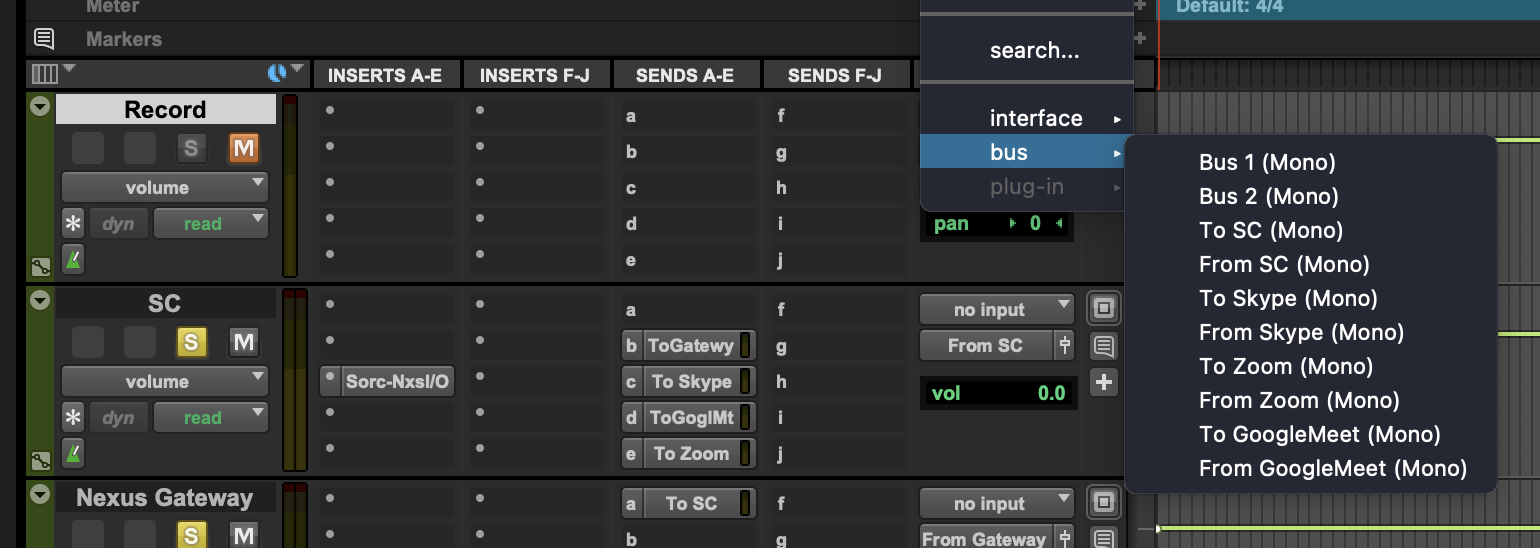
On Pro Tools, we will first create buses for each one of the virtual drivers we created via Source-Nexus Control. In Pro Tools, go to Setup > I/O > Bus and add the following buses - take note of the Mono/Stereo channels.
Mono Buses: “To SC”, “From SC”, “To Skype”, “From Skype”, “To Zoom”, “From Zoom”, “To GoogleMeet” and “From GoogleMeet”
Stereo Buses: “To Gateway”, “From Gateway”, “To SourceLive”.

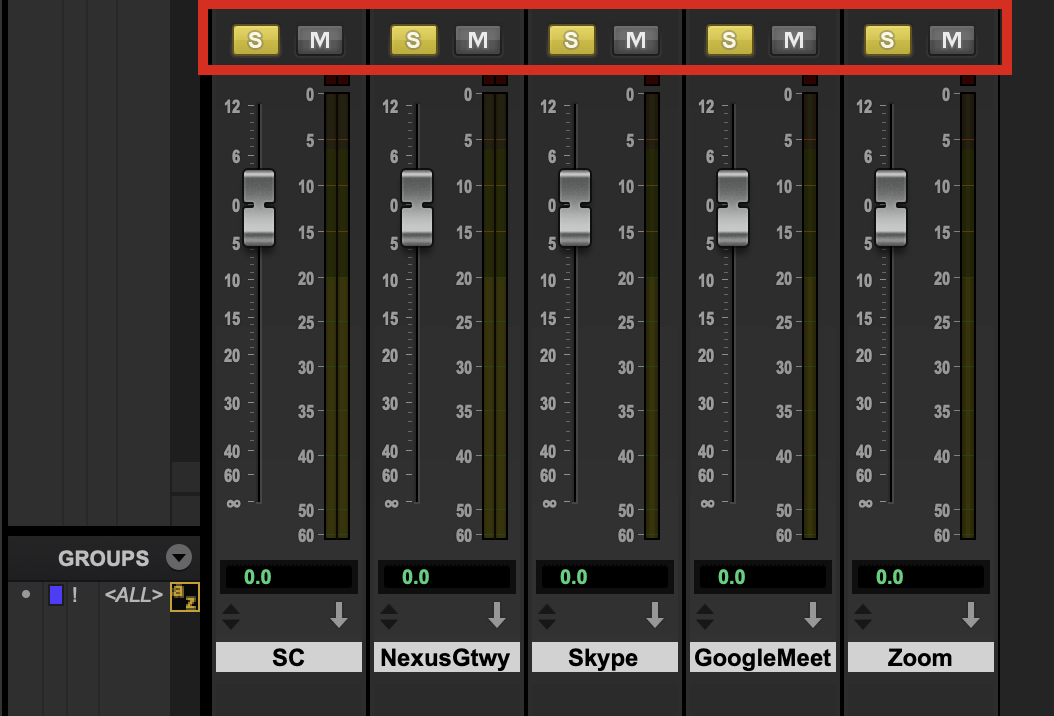
Then, let's create auxiliary tracks for each of the endpoints - some are mono and some are stereo. We only need a single aux track per endpoint because the aux track handles the input to the endpoint and the output from the endpoint back into Pro Tools.
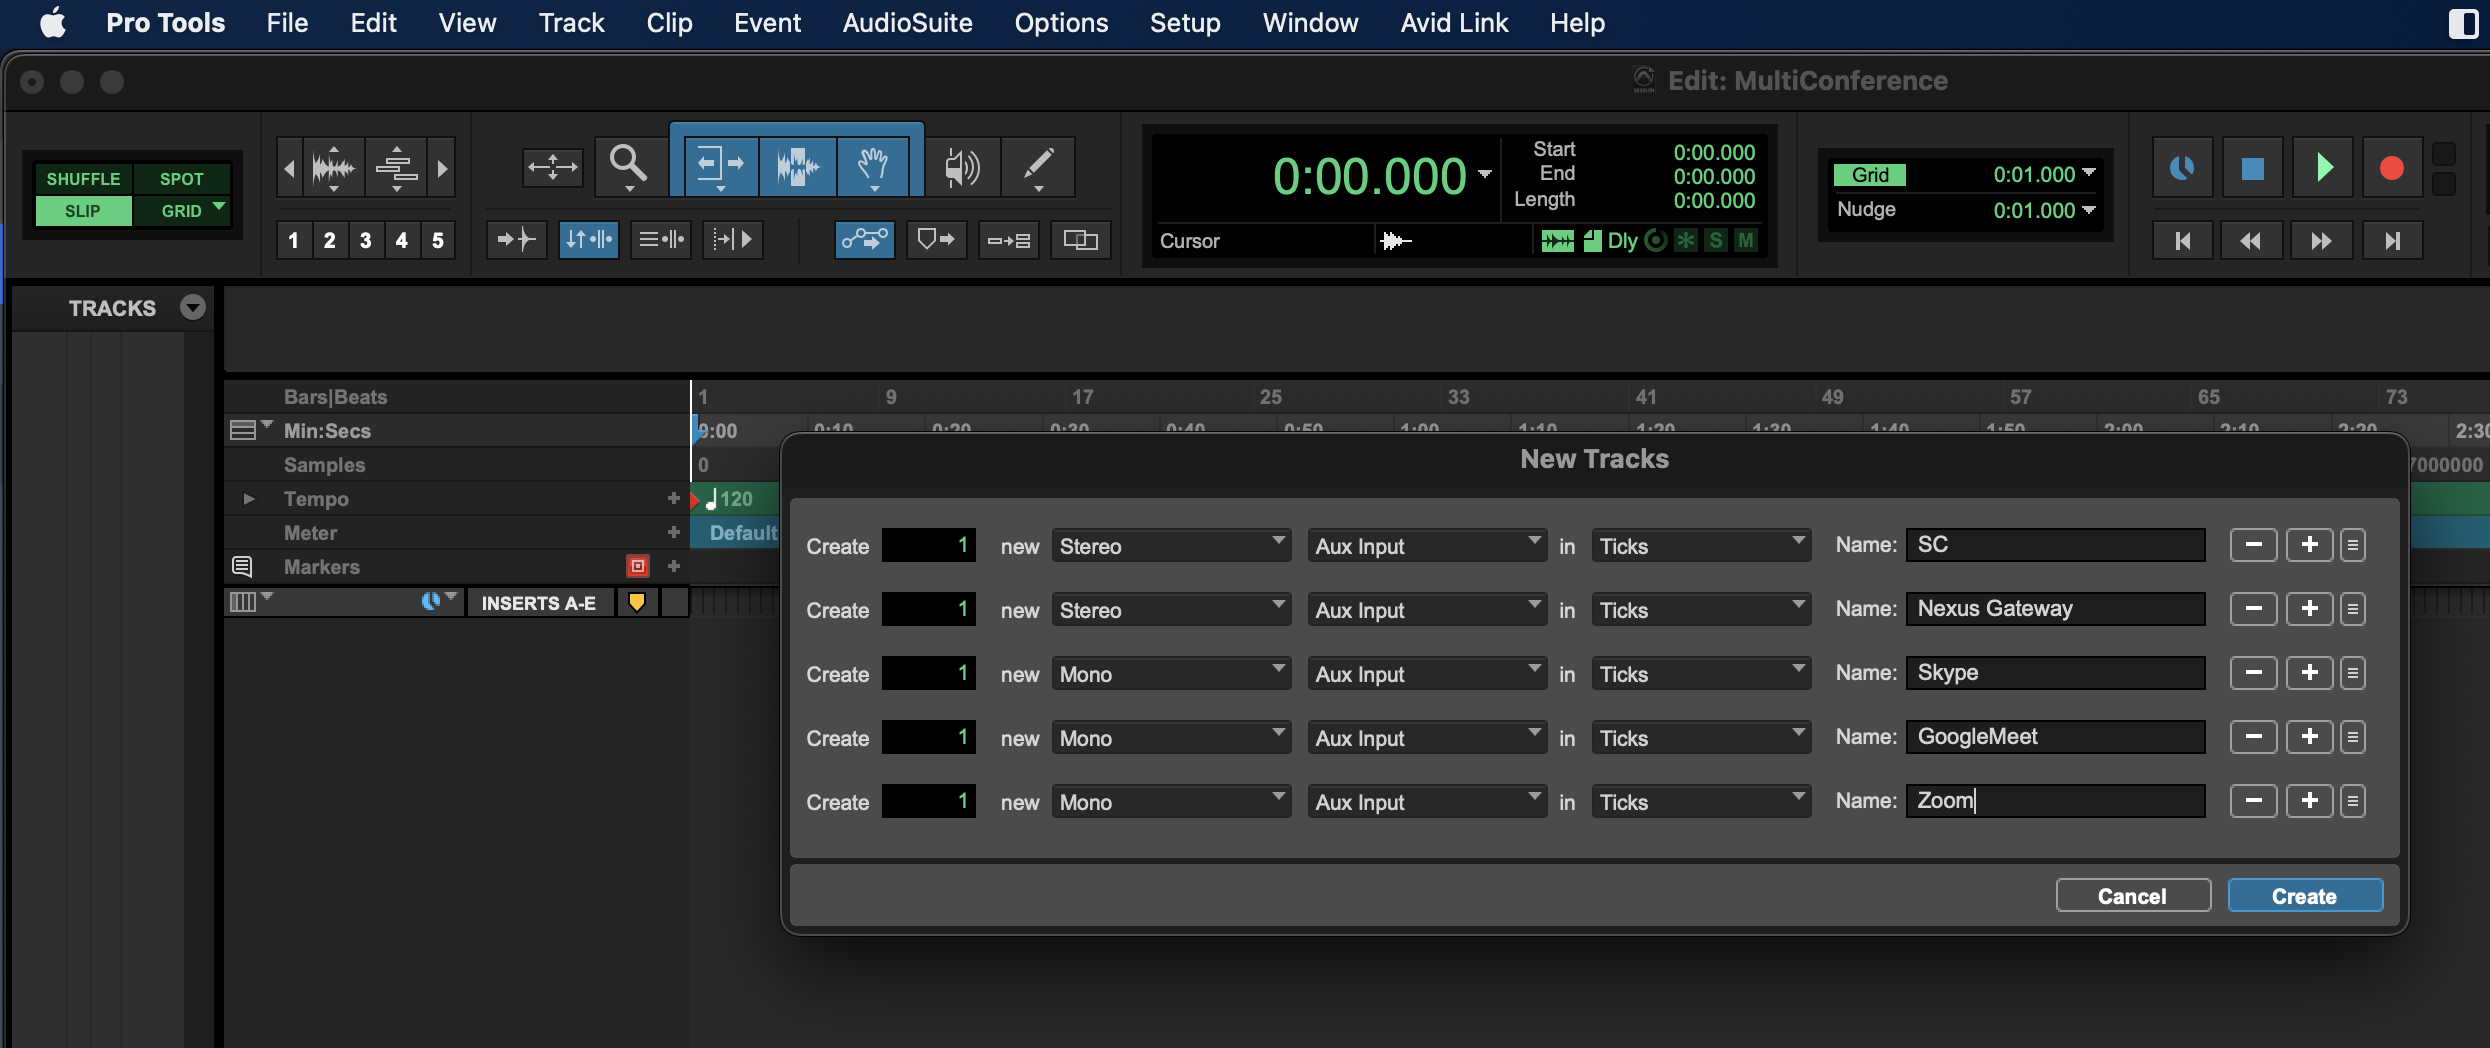
- Aux Stereo track named “SC”
- Aux Stereo track named “Nexus Gateway”
- Aux Mono track named “Skype”
- Aux Mono track named “Google Meet”
- Aux Mono track named “Zoom”
Now, we will configure the auxiliary track inputs so everyone can hear each other. The most important thing is to be careful at this point, because we do not want to send someone back to themselves.
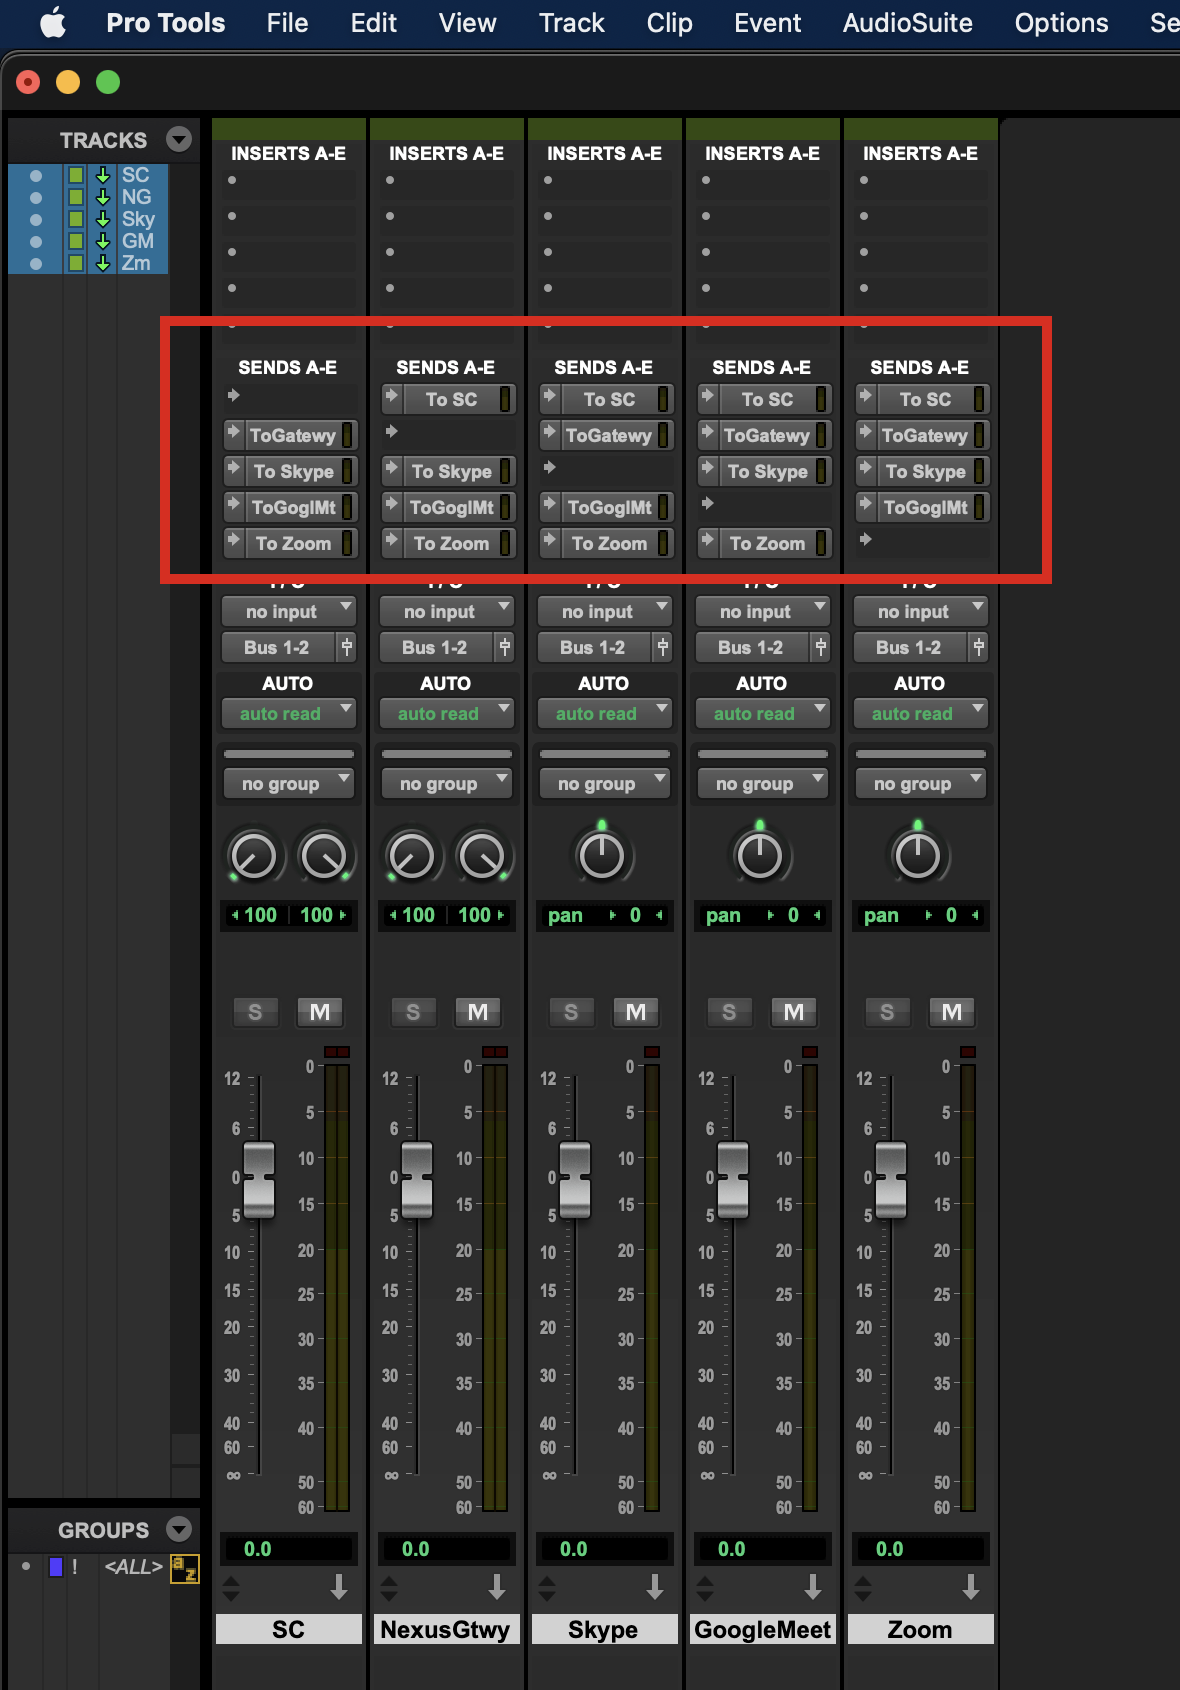
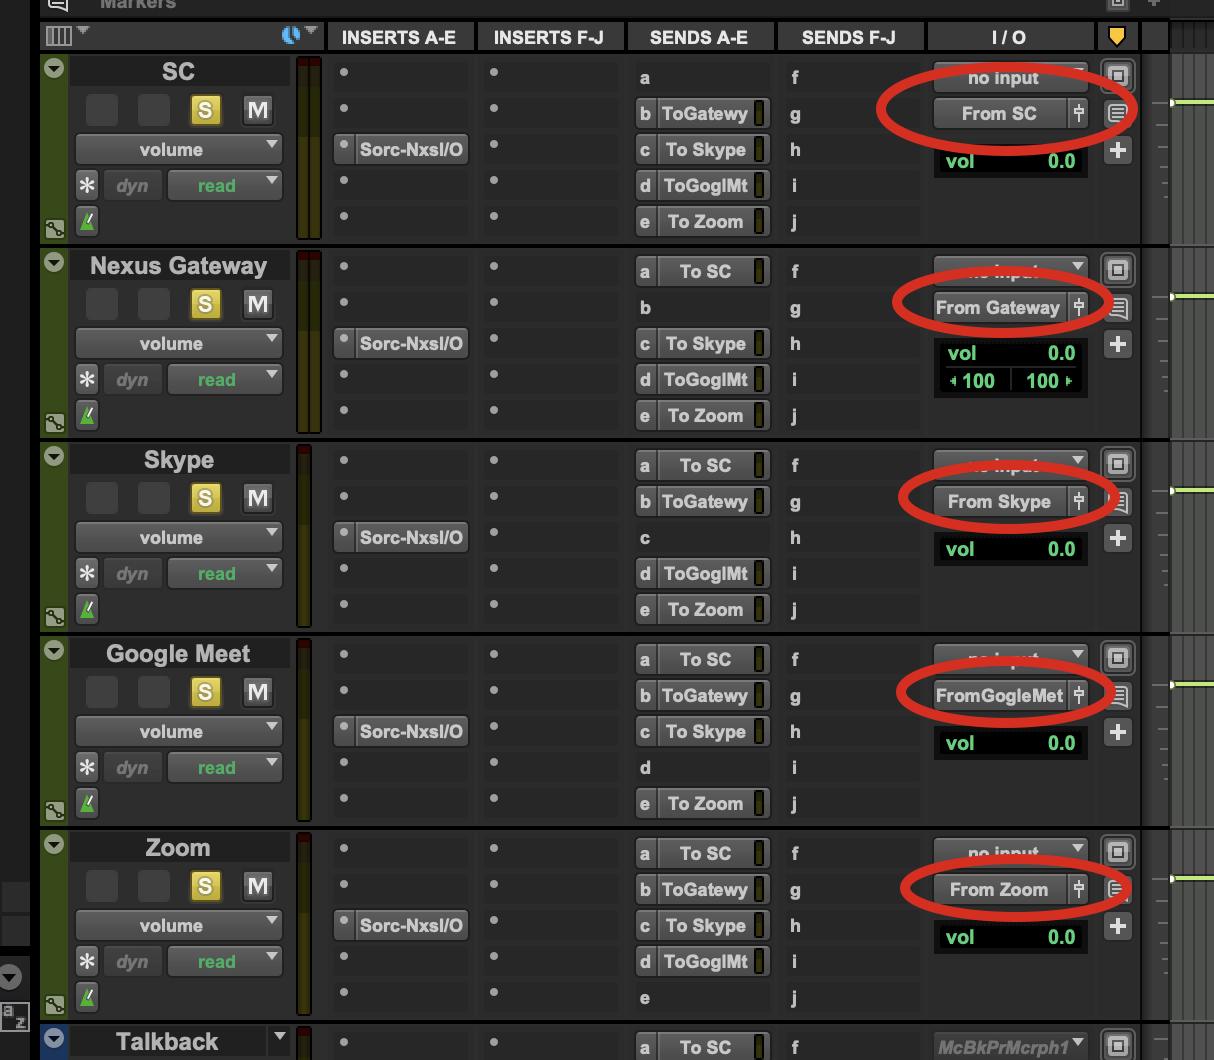
- SC track: add the following sends: “To Gateway” (fader up), “To Skype” (fader up), “To GoogleMeet” (fader up), “To Zoom” (fader up).
- Nexus Gateway track: add the following sends: “To SC” (fader up), “To Skype” (fader up), “To GoogleMeet” (fader up), “To Zoom” (fader up).
- Skype track: add the following sends: “To SC” (fader up), “To Gateway” (fader up), “To GoogleMeet” (fader up), “To Zoom” (fader up).
- Google Meet track: add the following sends: “To SC” (fader up), “To Gateway” (fader up), “To Skype” (fader up), “To Zoom” (fader up).
- To Zoom track: add the following sends: “To SC” (fader up), “To Gateway” (fader up), “To Skype” (fader up), “To GoogleMeet” (fader up).
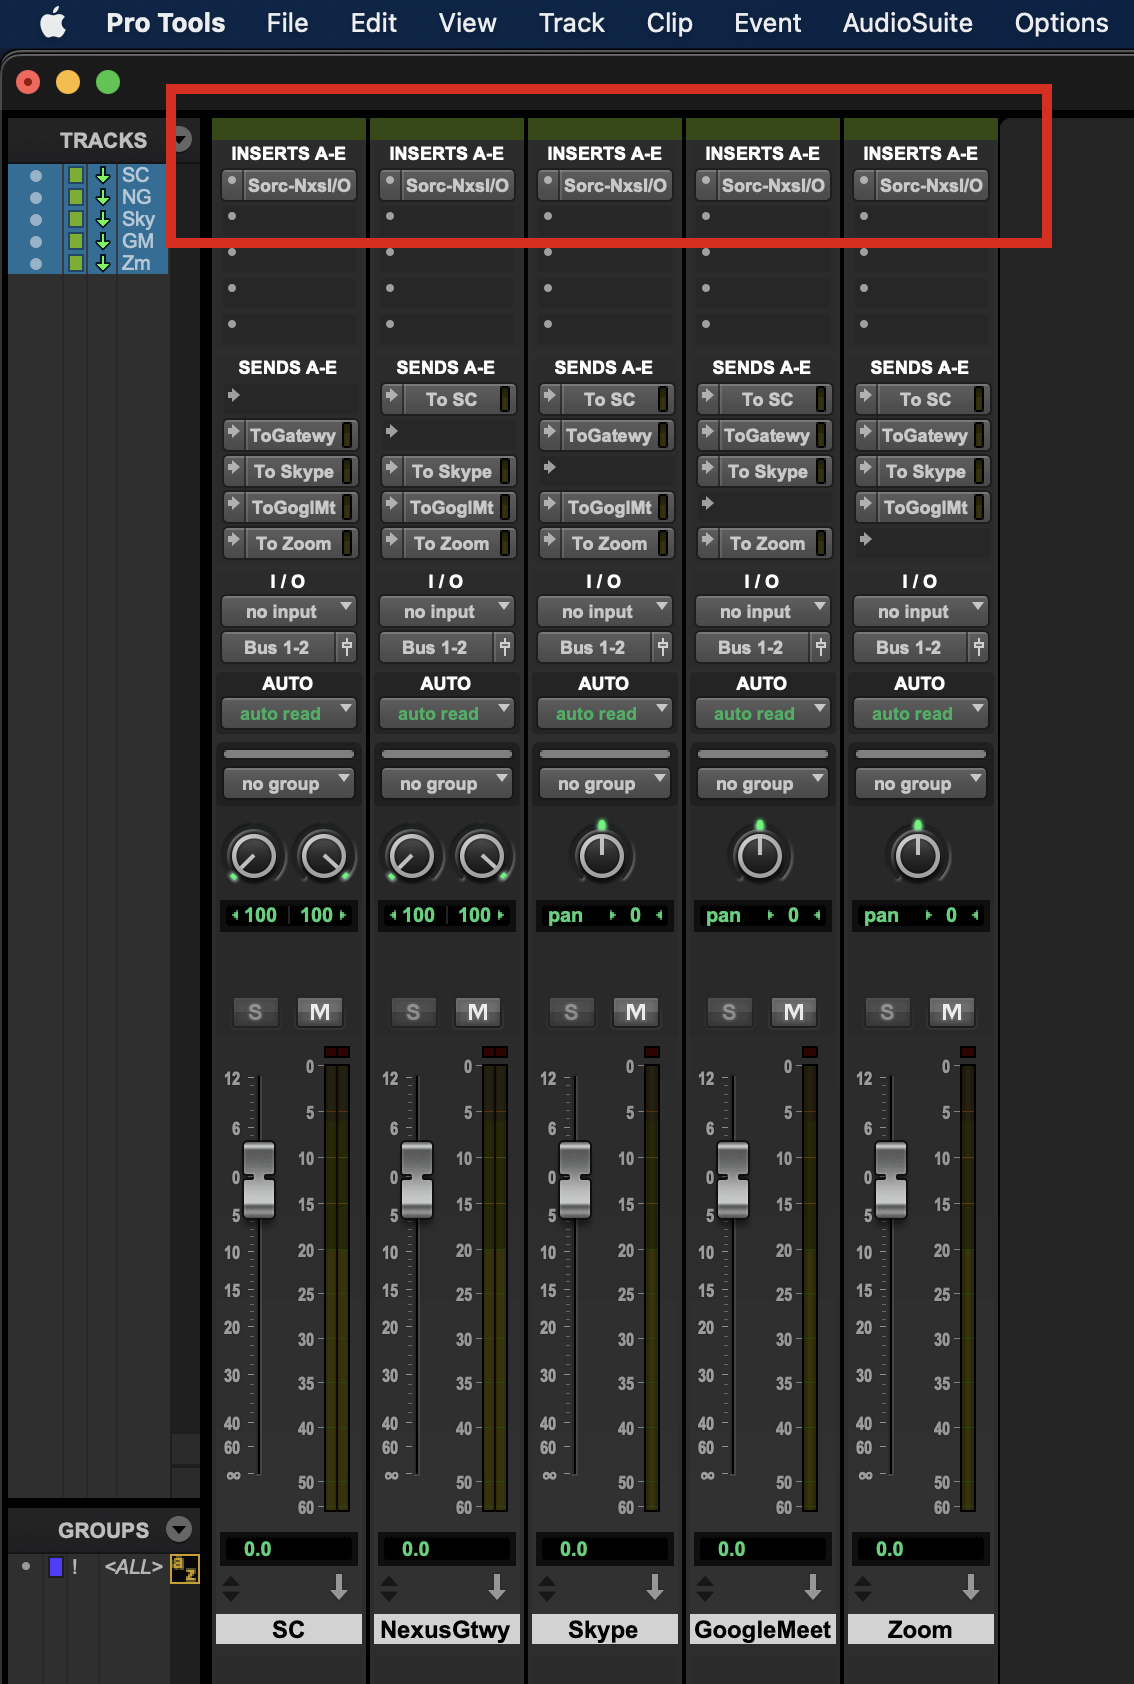
Next, let's add put the Source-Nexus I/O plugins on each track, and configure them accordingly:
-
SC track: add a multichannel Source-Nexus I/O plugin with the following configuration:
- SEND: “To SC”
- RECEIVE: “From SC”
-
Nexus Gateway track: add a multichannel Source-Nexus I/O plugin with the following configuration:
- SEND: “To Gateway”
- RECEIVE: “From Gateway”
-
Skype track: add a mono Source-Nexus I/O plugin with the following configuration:
- SEND: “To Skype”
- RECEIVE: “From Skype”
-
Google Meet track: add a mono Source-Nexus I/O plugin with the following configuration:
- SEND: “To GoogleMeet”
- RECEIVE: “From GoogleMeet”
-
Zoom track: add a mono Source-Nexus I/O plugin with the following configuration:
- SEND: “To Zoom”
- RECEIVE: “From Zoom”.
With all that done, let's make sure we create a talkback track. Let's create a Mono Auxiliary Track and name it “Talkback”. Configure it as follows:
- Input: the microphone that you will be using.
- Output: no output - because you will be sending everything out directly from the sends.
- Add the following SENDS in order to send your talkback to all of the communication endpoints: “To SC”, “To Gateway”, “To Skype”, “To GoogleMeet”, “To Zoom”. Ensure all faders are UP (option+click the fader on Mac, alt+click the fader on Windows).
- Add the “Source-Talkback (Aux mono)" plugin as an INSERT on the track. That way, you will be able to trigger the talkback with the “\” key (backslash). Make sure the talkback is open. At this point, if all is configured correctly, you will see all of the sends moving on the track.
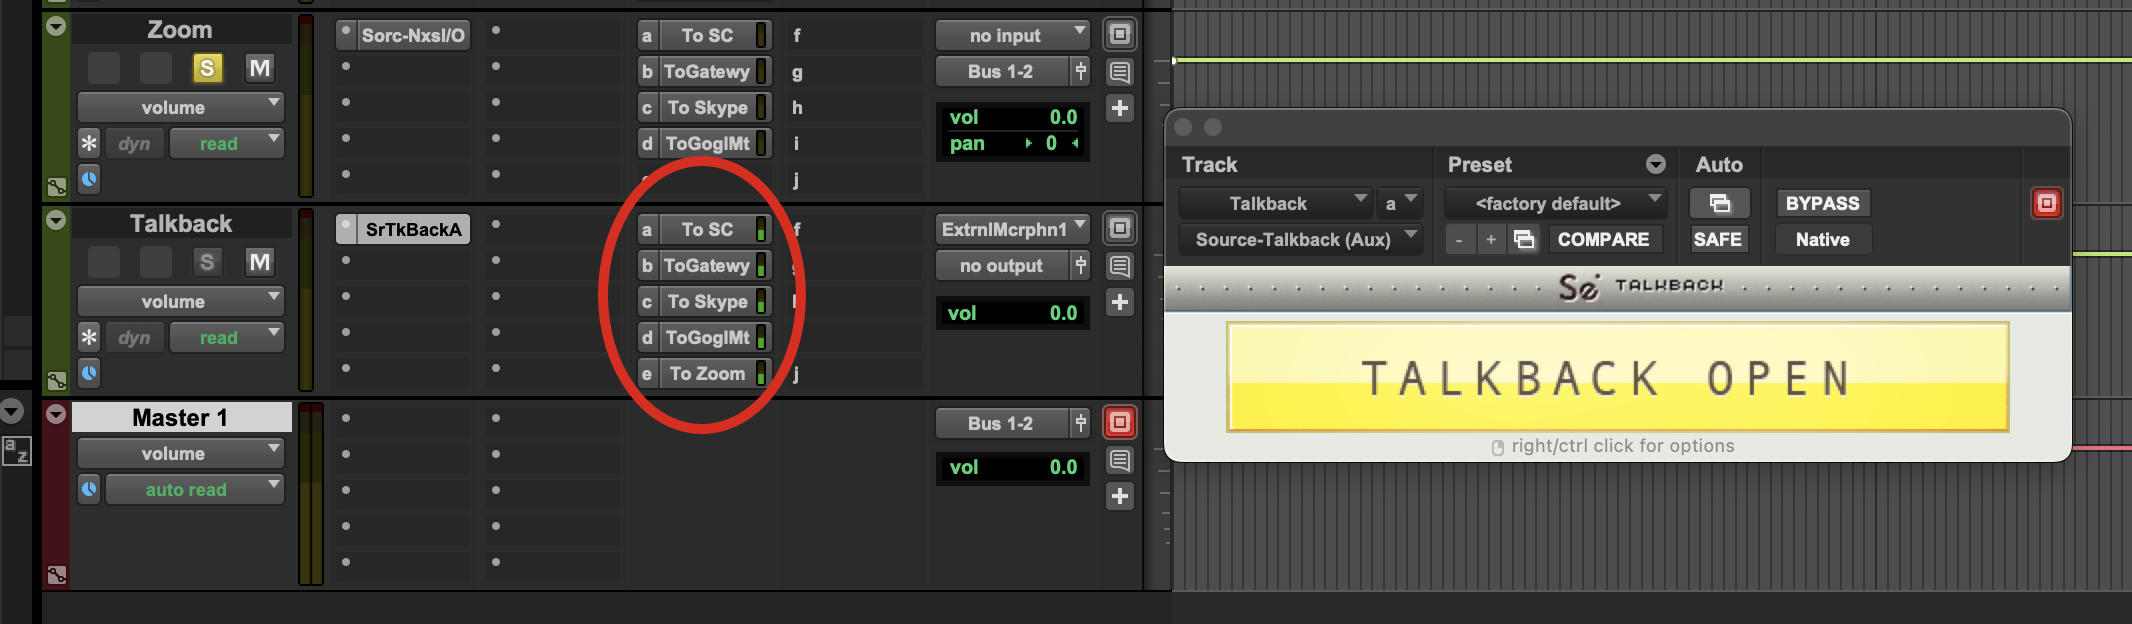
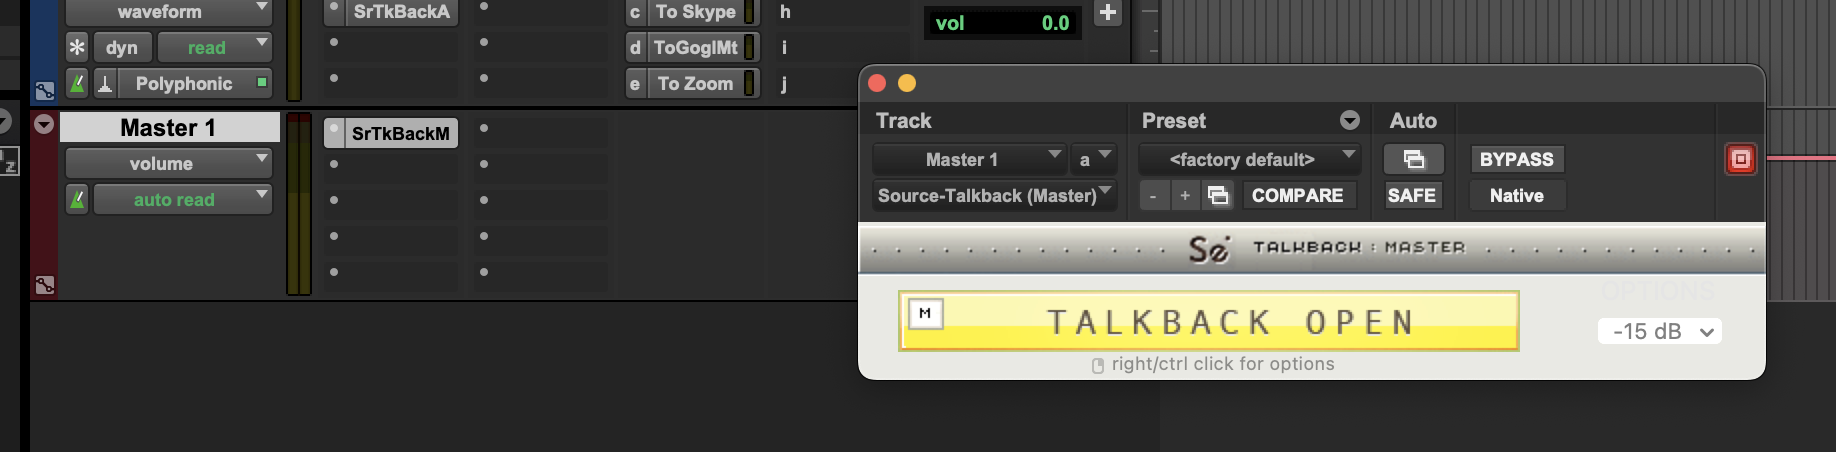
Then, let's create a Stereo Master Fader track for our master - that way, we can put our dim (and dim the control room) for the Source-Talkback plugin. Add a multichannel “Source-Talkback (Master)" plug-in as an INSERT on the track.
- SC track: set the output to “From SC”.
- Gateway track: set the output “From Gateway”.
- Skype track: set the output to “From Skype”.
- Google Meet track: set the output “From GoogleMeet”.
- Zoom track: set the output to “From Zoom”.
Next, create a mono auxiliary track called “Record” and place it at the top of the list. You will probably need to record under this track muted, because you're hearing it directly out of the aux track (that way, you don't have a double route). As an input, select any of the inputs that you want to record (From SC, From Skype, From GoogleMeet, etc.).
Now, create a mono Auxiliary track. You will use it to put any edits on it and send that to all endpoints. For this track, this would be the configuration:
- Output: configure the output to multi-route to both your headphones (output 1&2 - so you can hear the playback) and “To SourceLive”. This is in order for the people on Source-Live to see it with video sync.
- Add “To SC”, “To Gateway”, “To Skype”, “To GoogleMeet” and “To Zoom” as SENDS. All of them must be muted because the participants on those applications will hear them directly through the auxiliary sends.

Finally, let's handle the interaction with Source-Live.
i. First, create a mono Auxiliary track for Source-Live and call it “SeRewire”. This track will bypass the plugin and, therefore, you will have the ability to decide where the endpoints hear the voice talent during the recording process for latency or quality (Source-Live, or the customer endpoints like Skype, Google Meet and Zoom). Make sure to add the “Se Rewire” plugin to the track (Instruments > Se Rewire) - for the picture-lock with the talent (so they can read in sync with the picture) while also feeding that to the clients on Source-Live.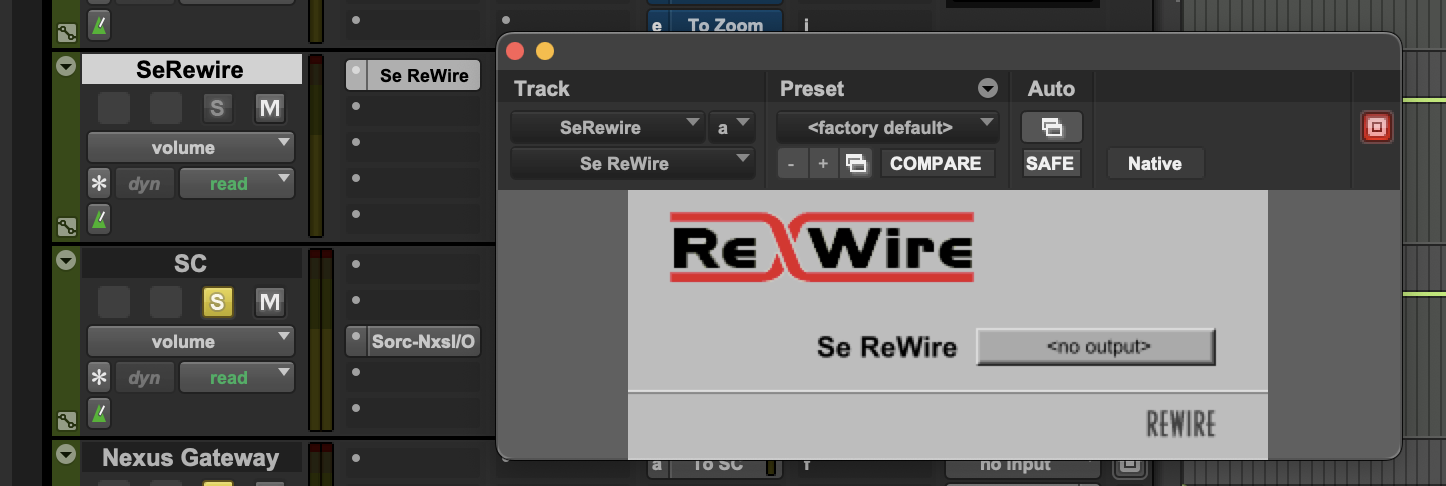
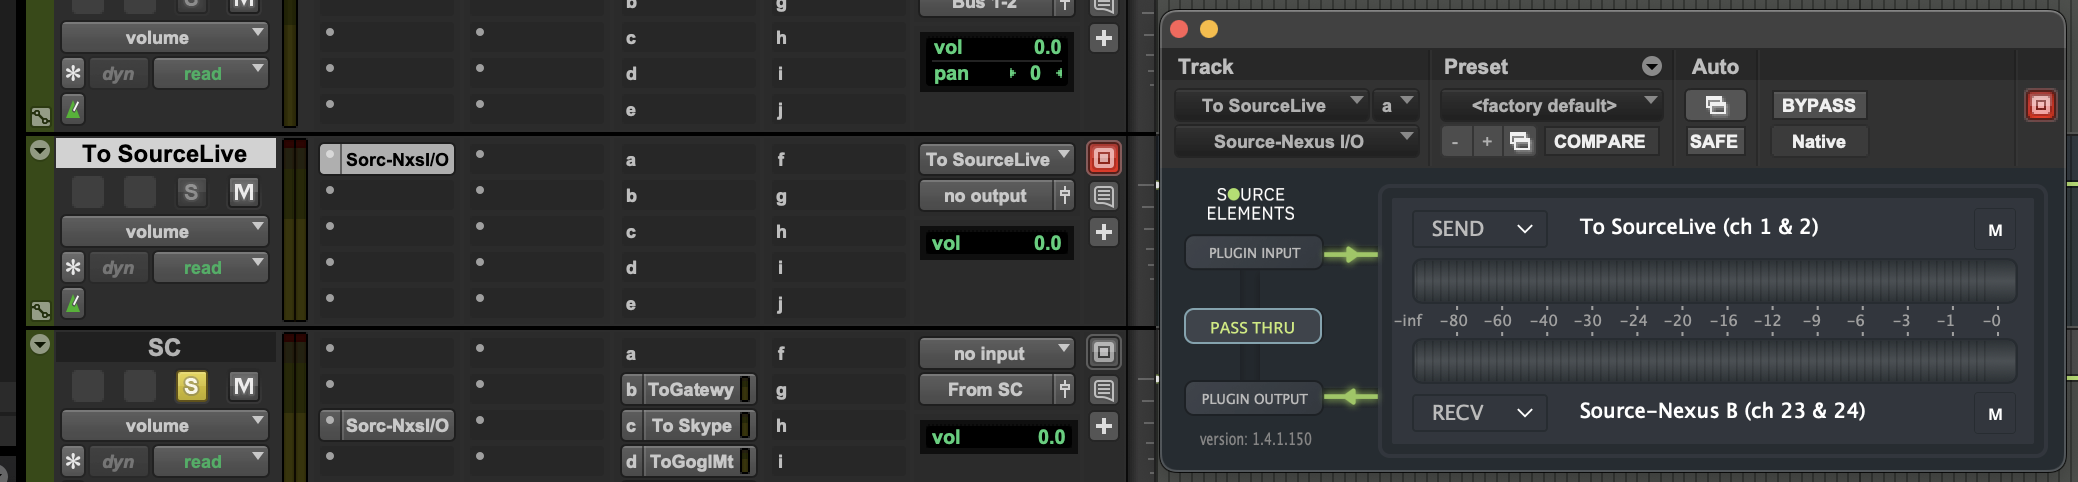
ii. Create a Stereo Aux track and call it “To SourceLive”.
- Input to “To SourceLive”
- No output
- Add a multi-channel Source-Nexus I/O plugin as an INSERT.
- Input: “To SourceLive”
- Output: send it anywhere, but make sure it is not on your way (of any of the above configurations). For example, set it to Source-Nexus B output 23-24 (so it doesn't get double routed anywhere).
Finally, make sure that, on your audio scratch track, you add “To SourceLive” as a SEND with the fader UP.
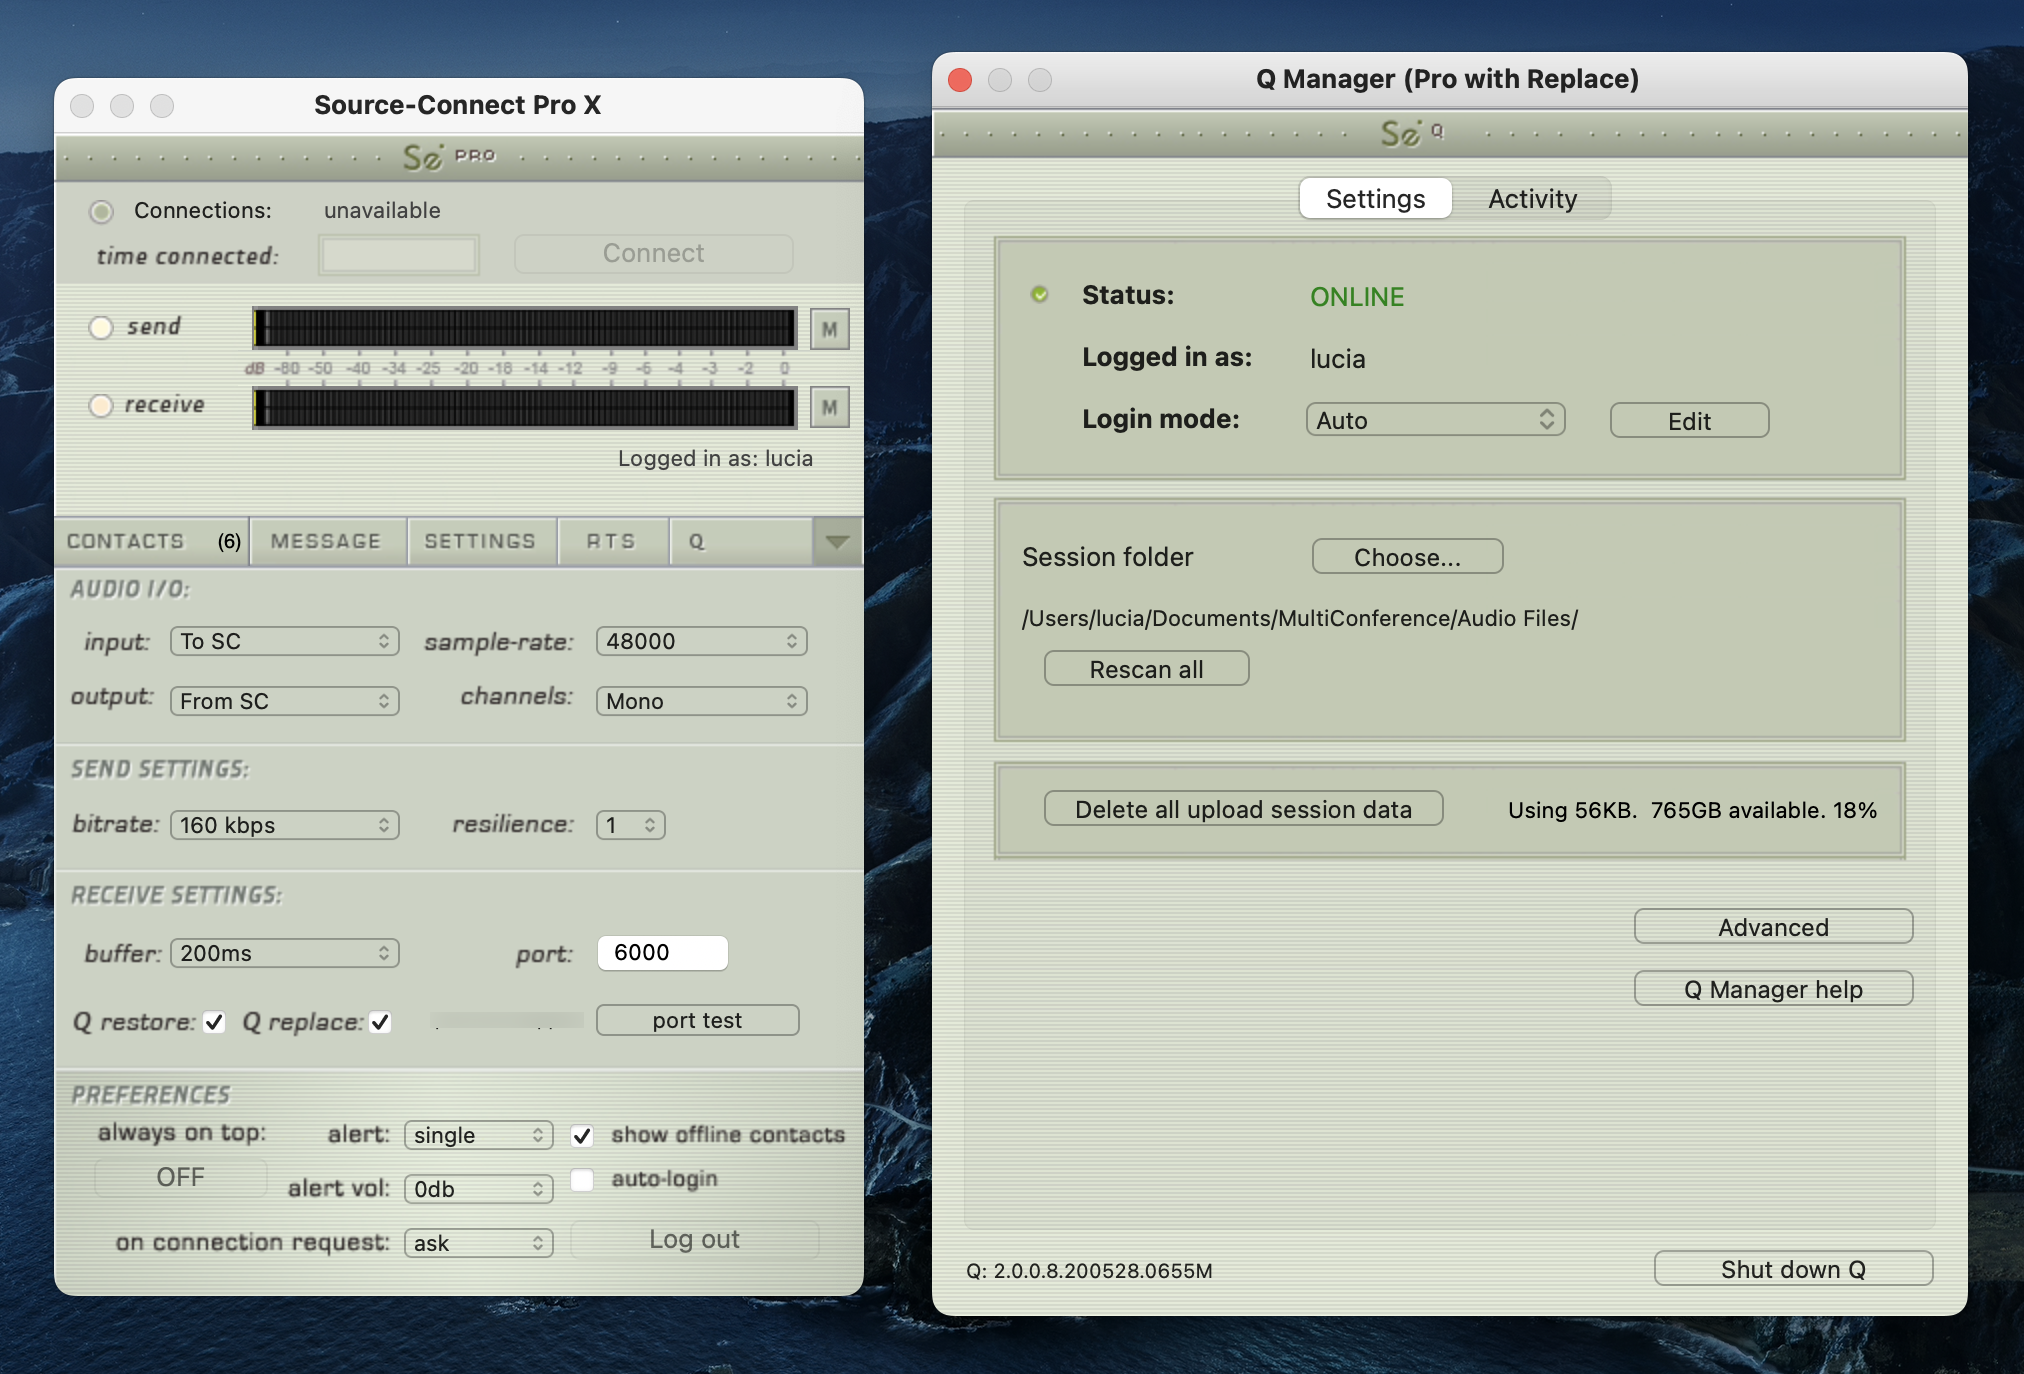
3. Setting up Source-Connect
Let's set up the routing on Source-Connect to send the audio into Pro Tools and tie in with the voiceover.
- Input: “To SC”.
- Output: “From SC”.
- Set back the buffer to a reasonable setting (for example, 200ms).
- Set the Q Manager folder correctly so the Q system can pick those up. For instructions on how to set up your Q Manager folder, take a look this article.
4. Setting up the Source-Nexus Gateway session
Let's open the session for all clients to tie in:
- Channels: Stereo
- Quality: Great / 256kbps
- Input: “To Gateway”
- Output: “From Gateway”
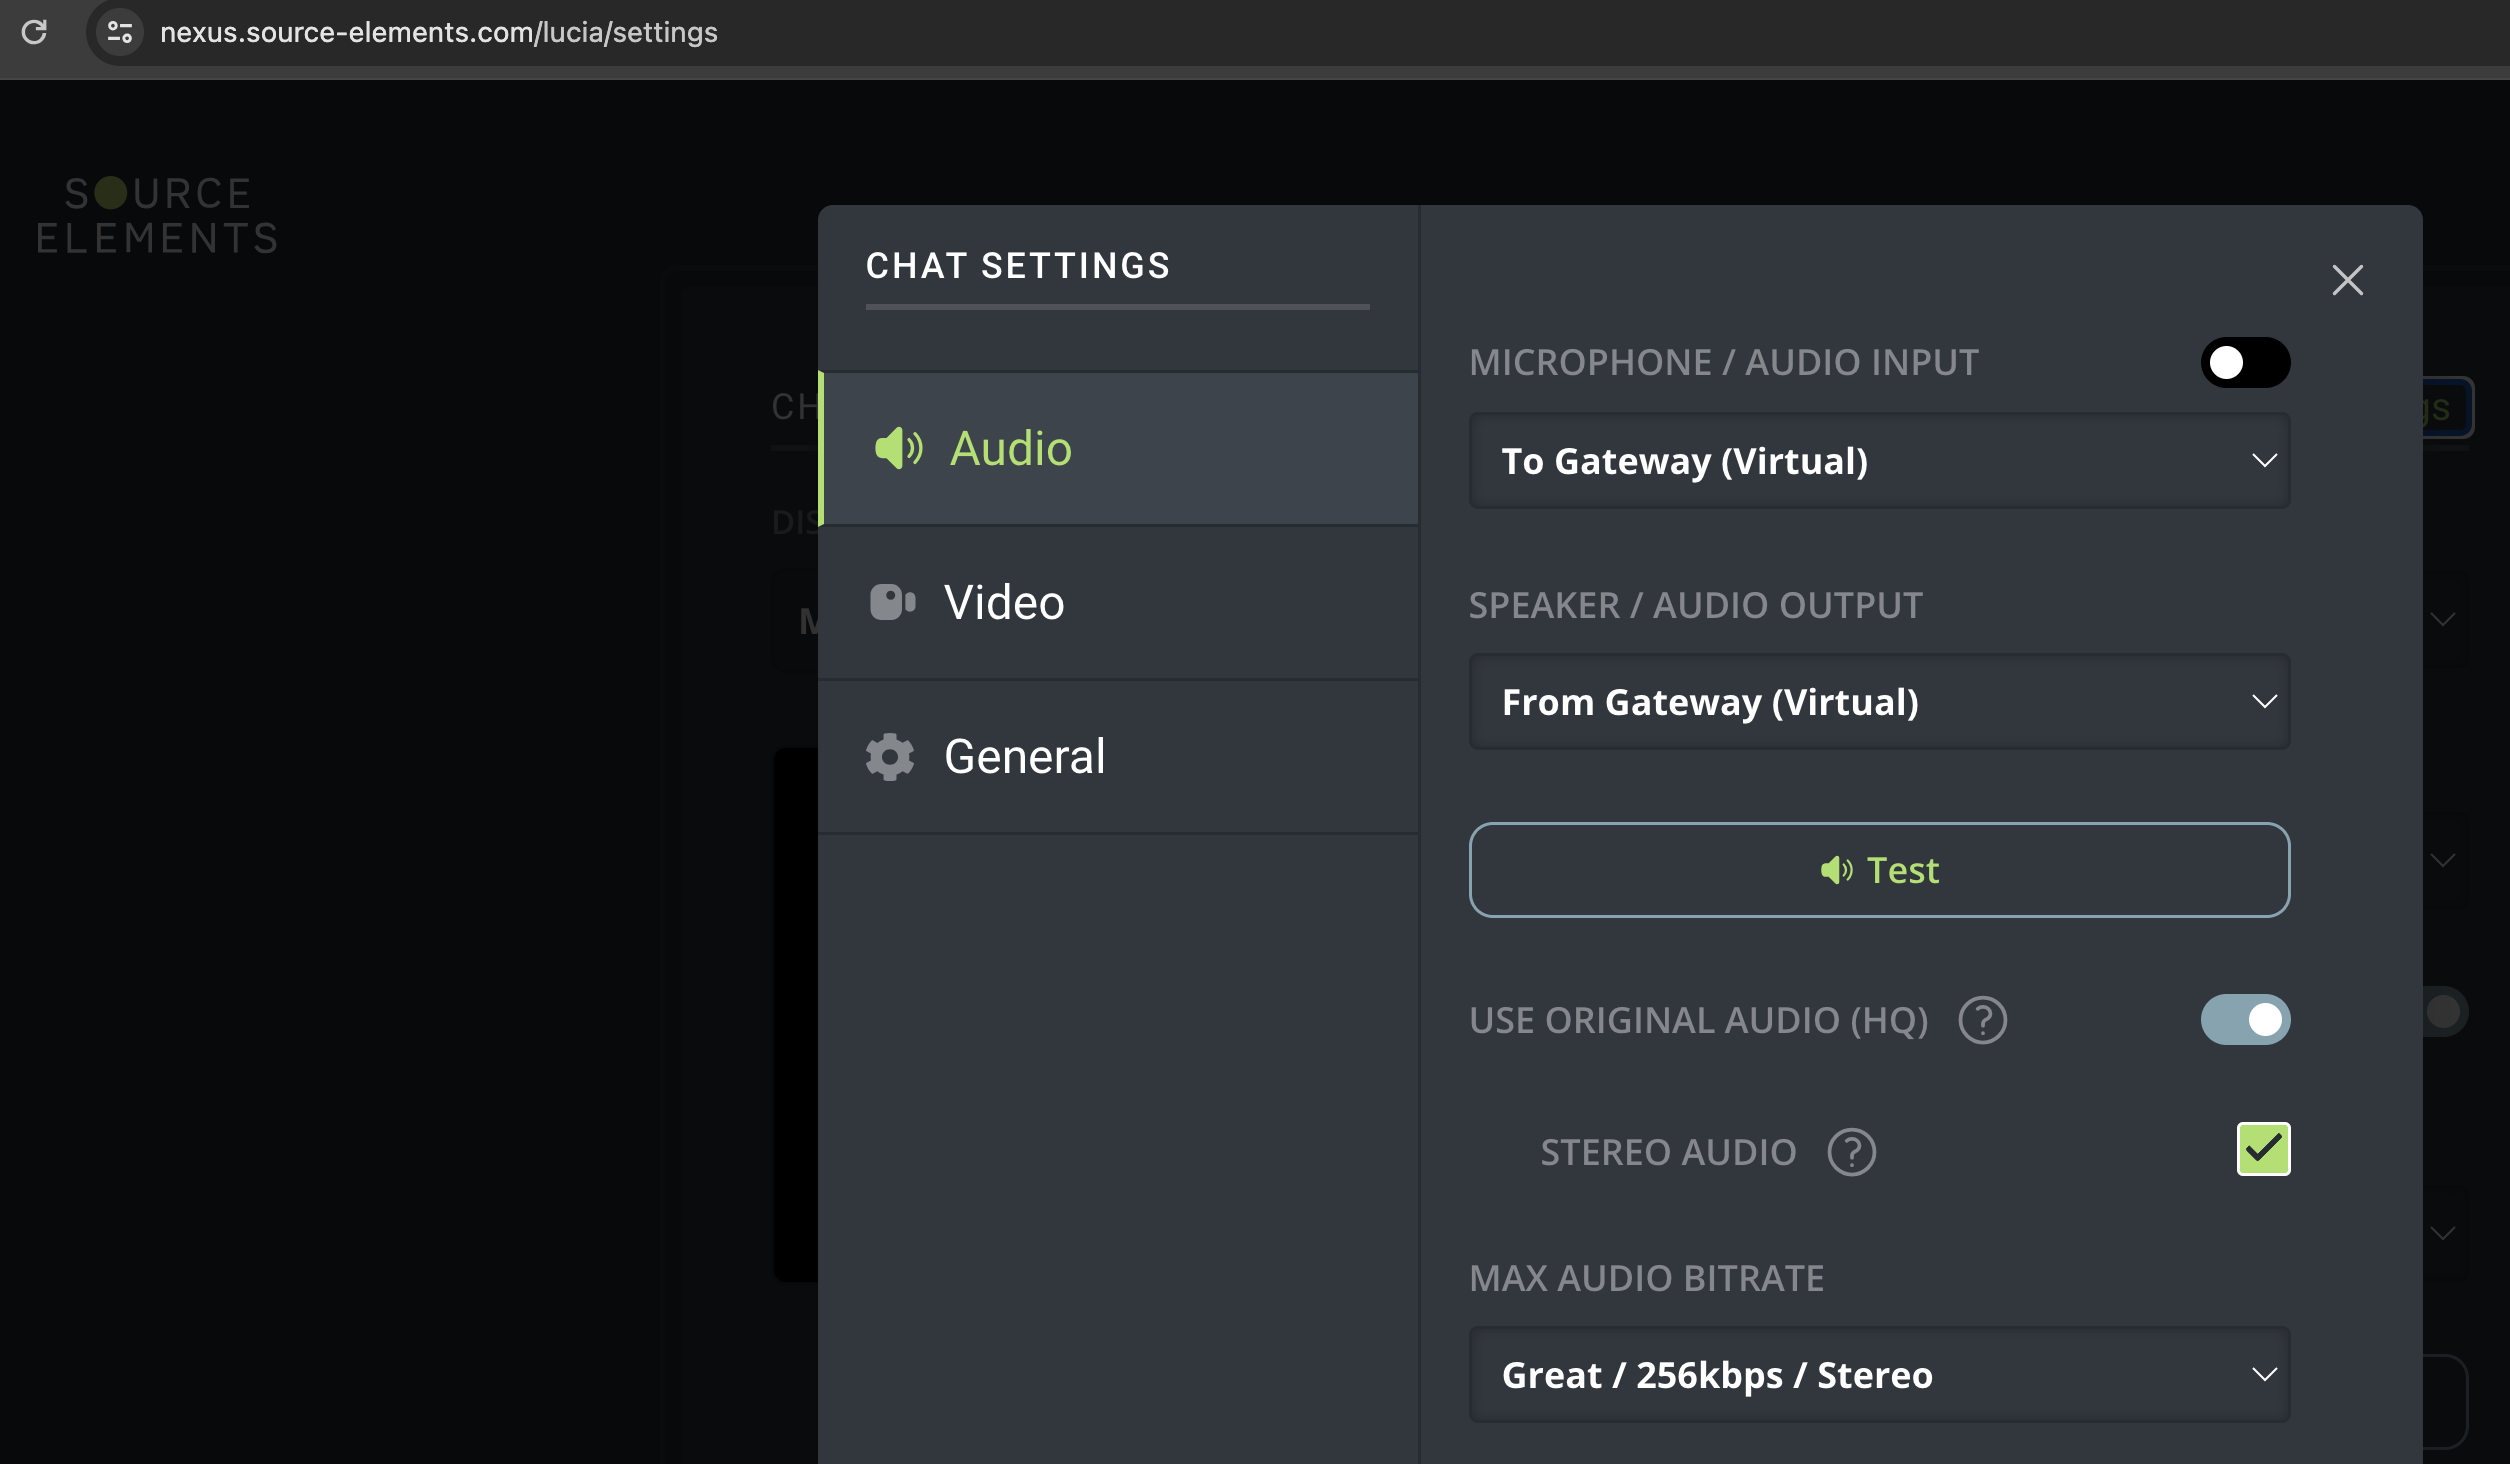
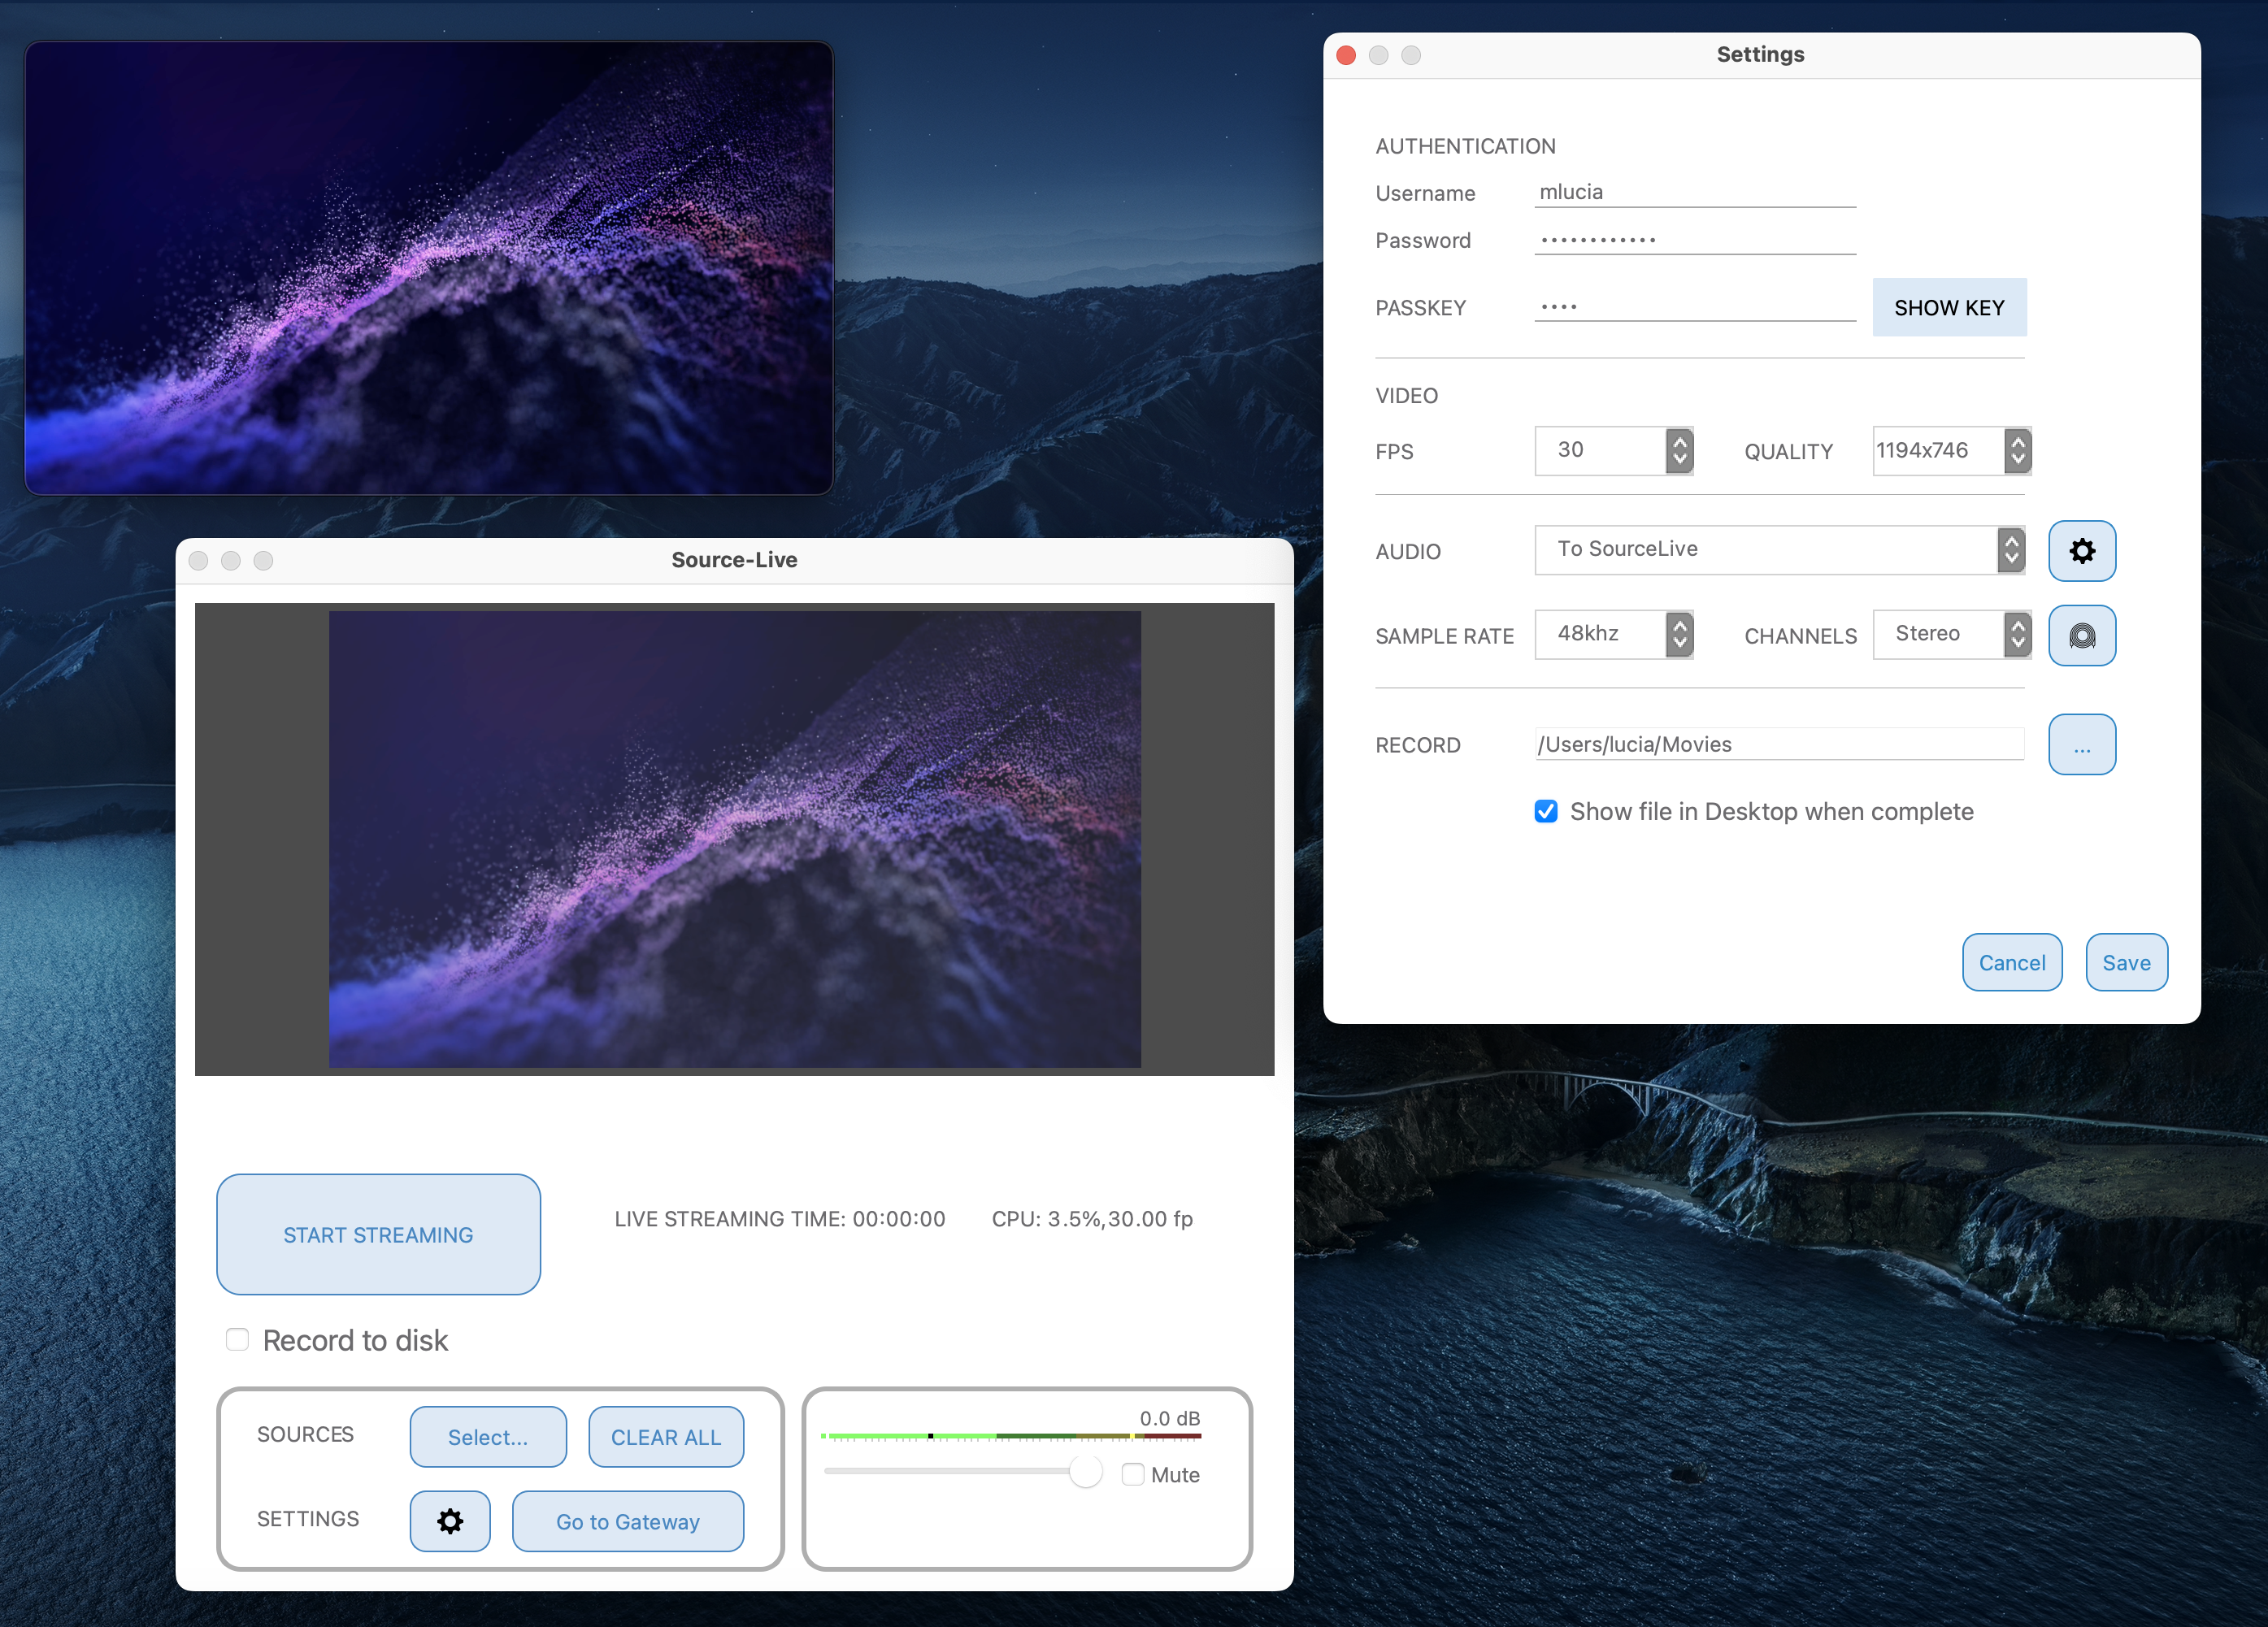
5. Setting up Source-Live
On Source-Live, you will configure the video you will send to clients in the Source-Nexus Gateway. Here's what you need to set up:
- Input: “To SourceLive”
- Source: select “Capture Screen” and crop the image to ensure you are only showing the video you want to show.
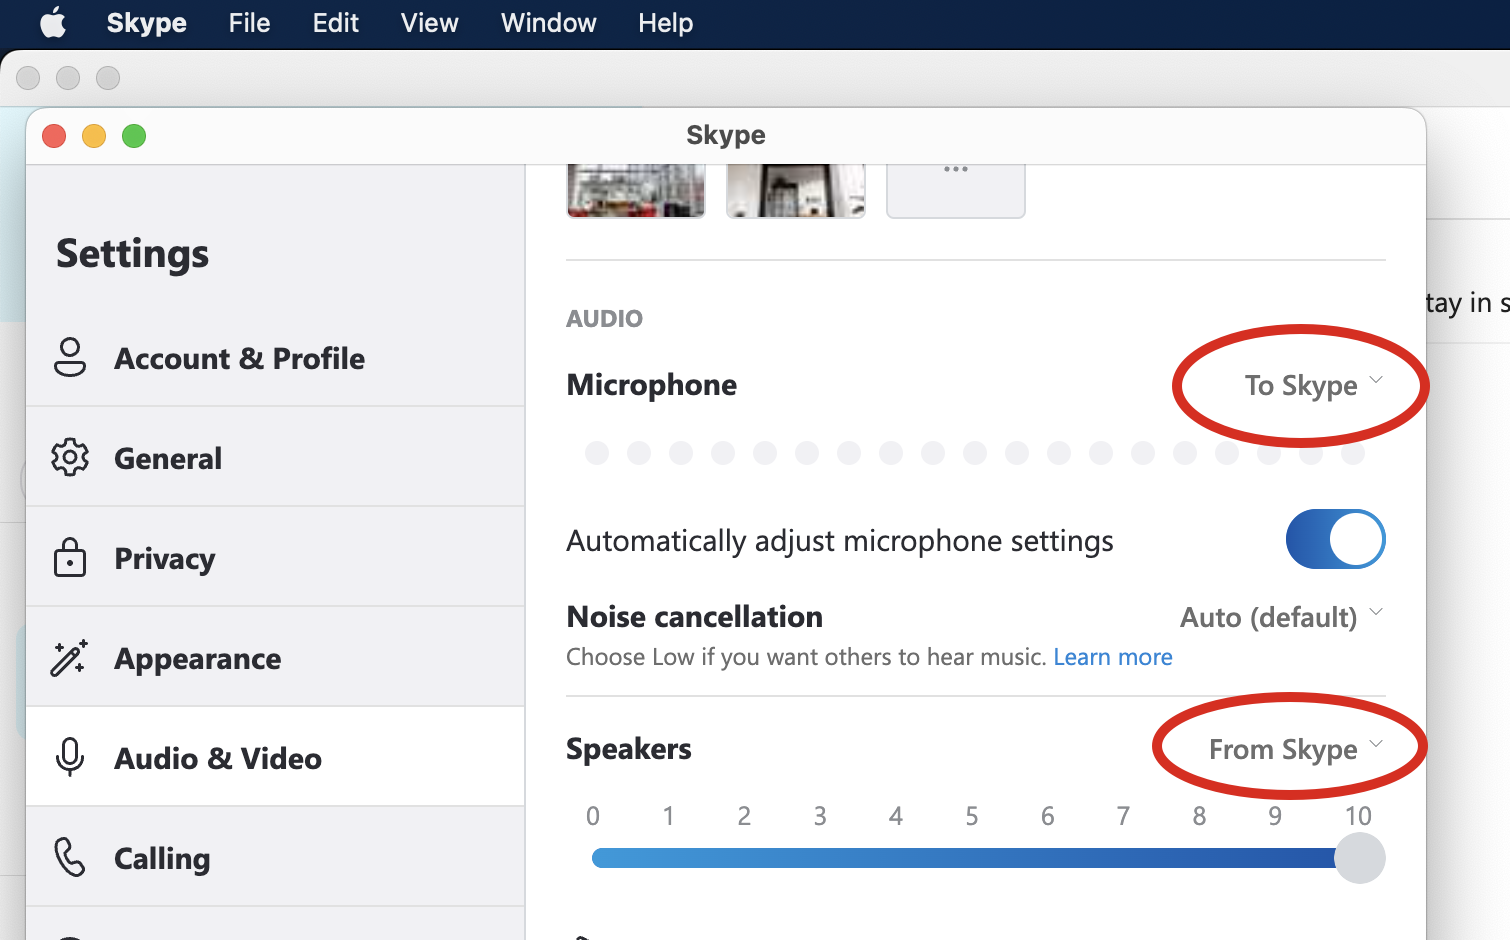
6. Setting up all conferencing applications
Configure the applications in the following way:
Skype (microphone “To Skype” and speakers “From Skype”)
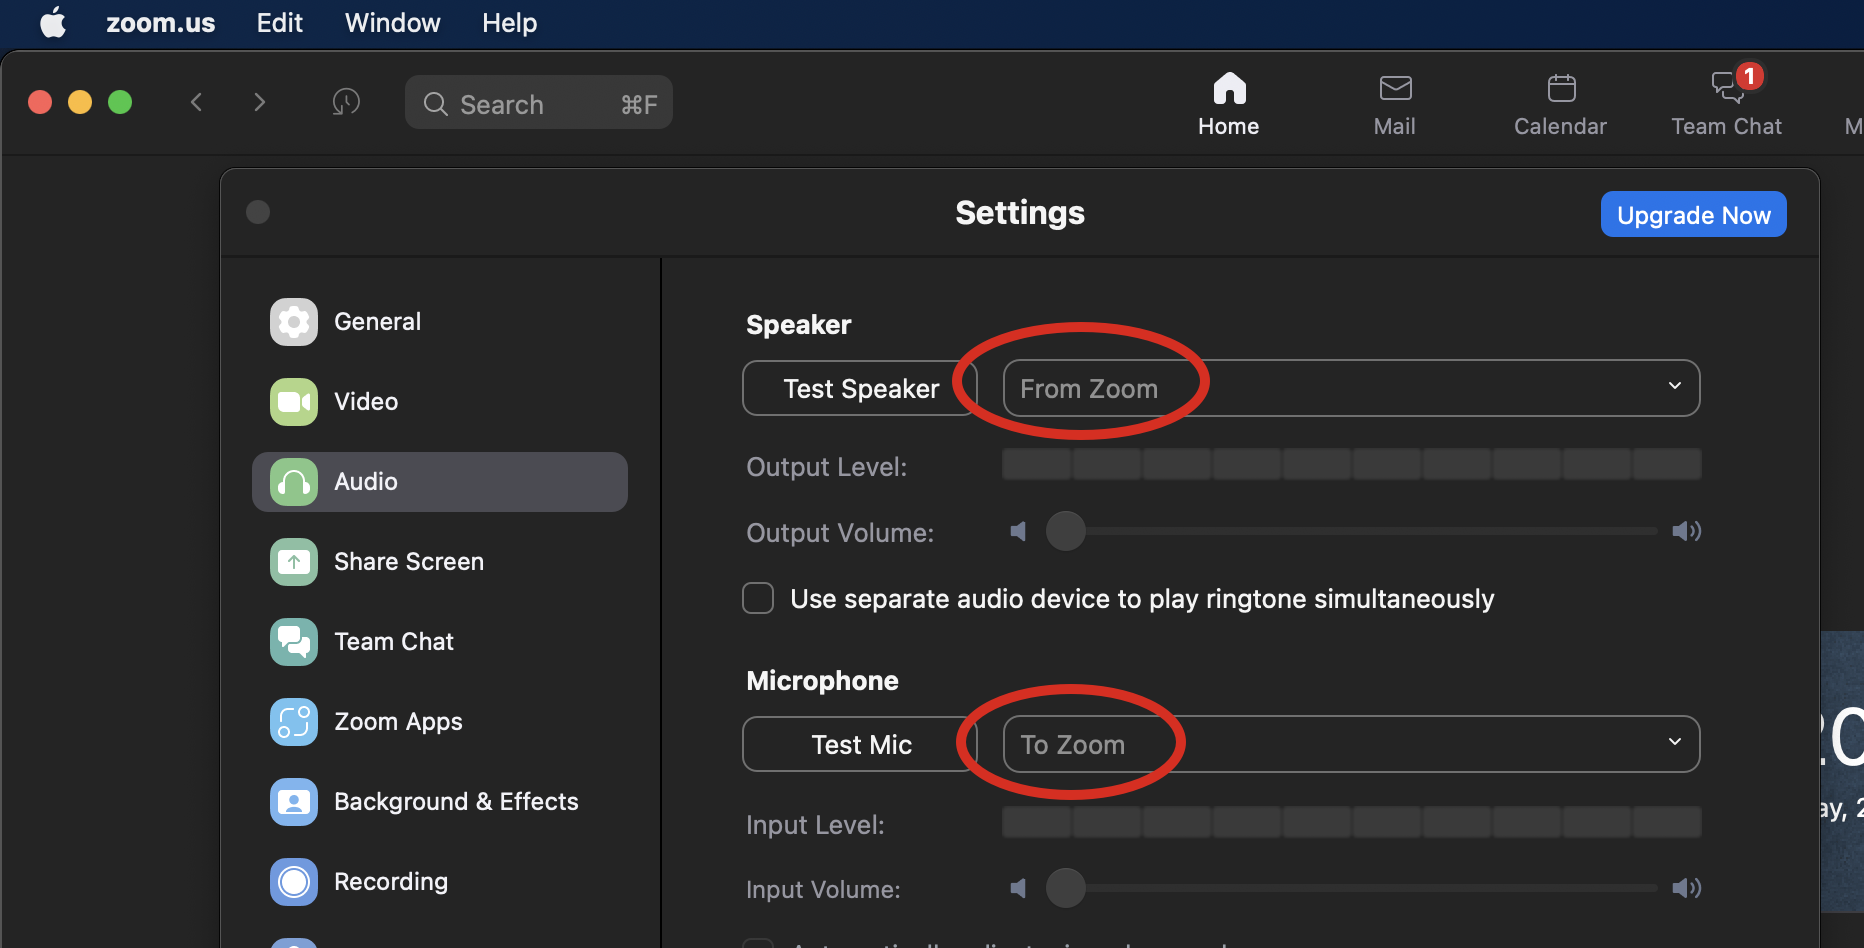
Zoom (microphone “To Zoom” and speakers “From Zoom”)
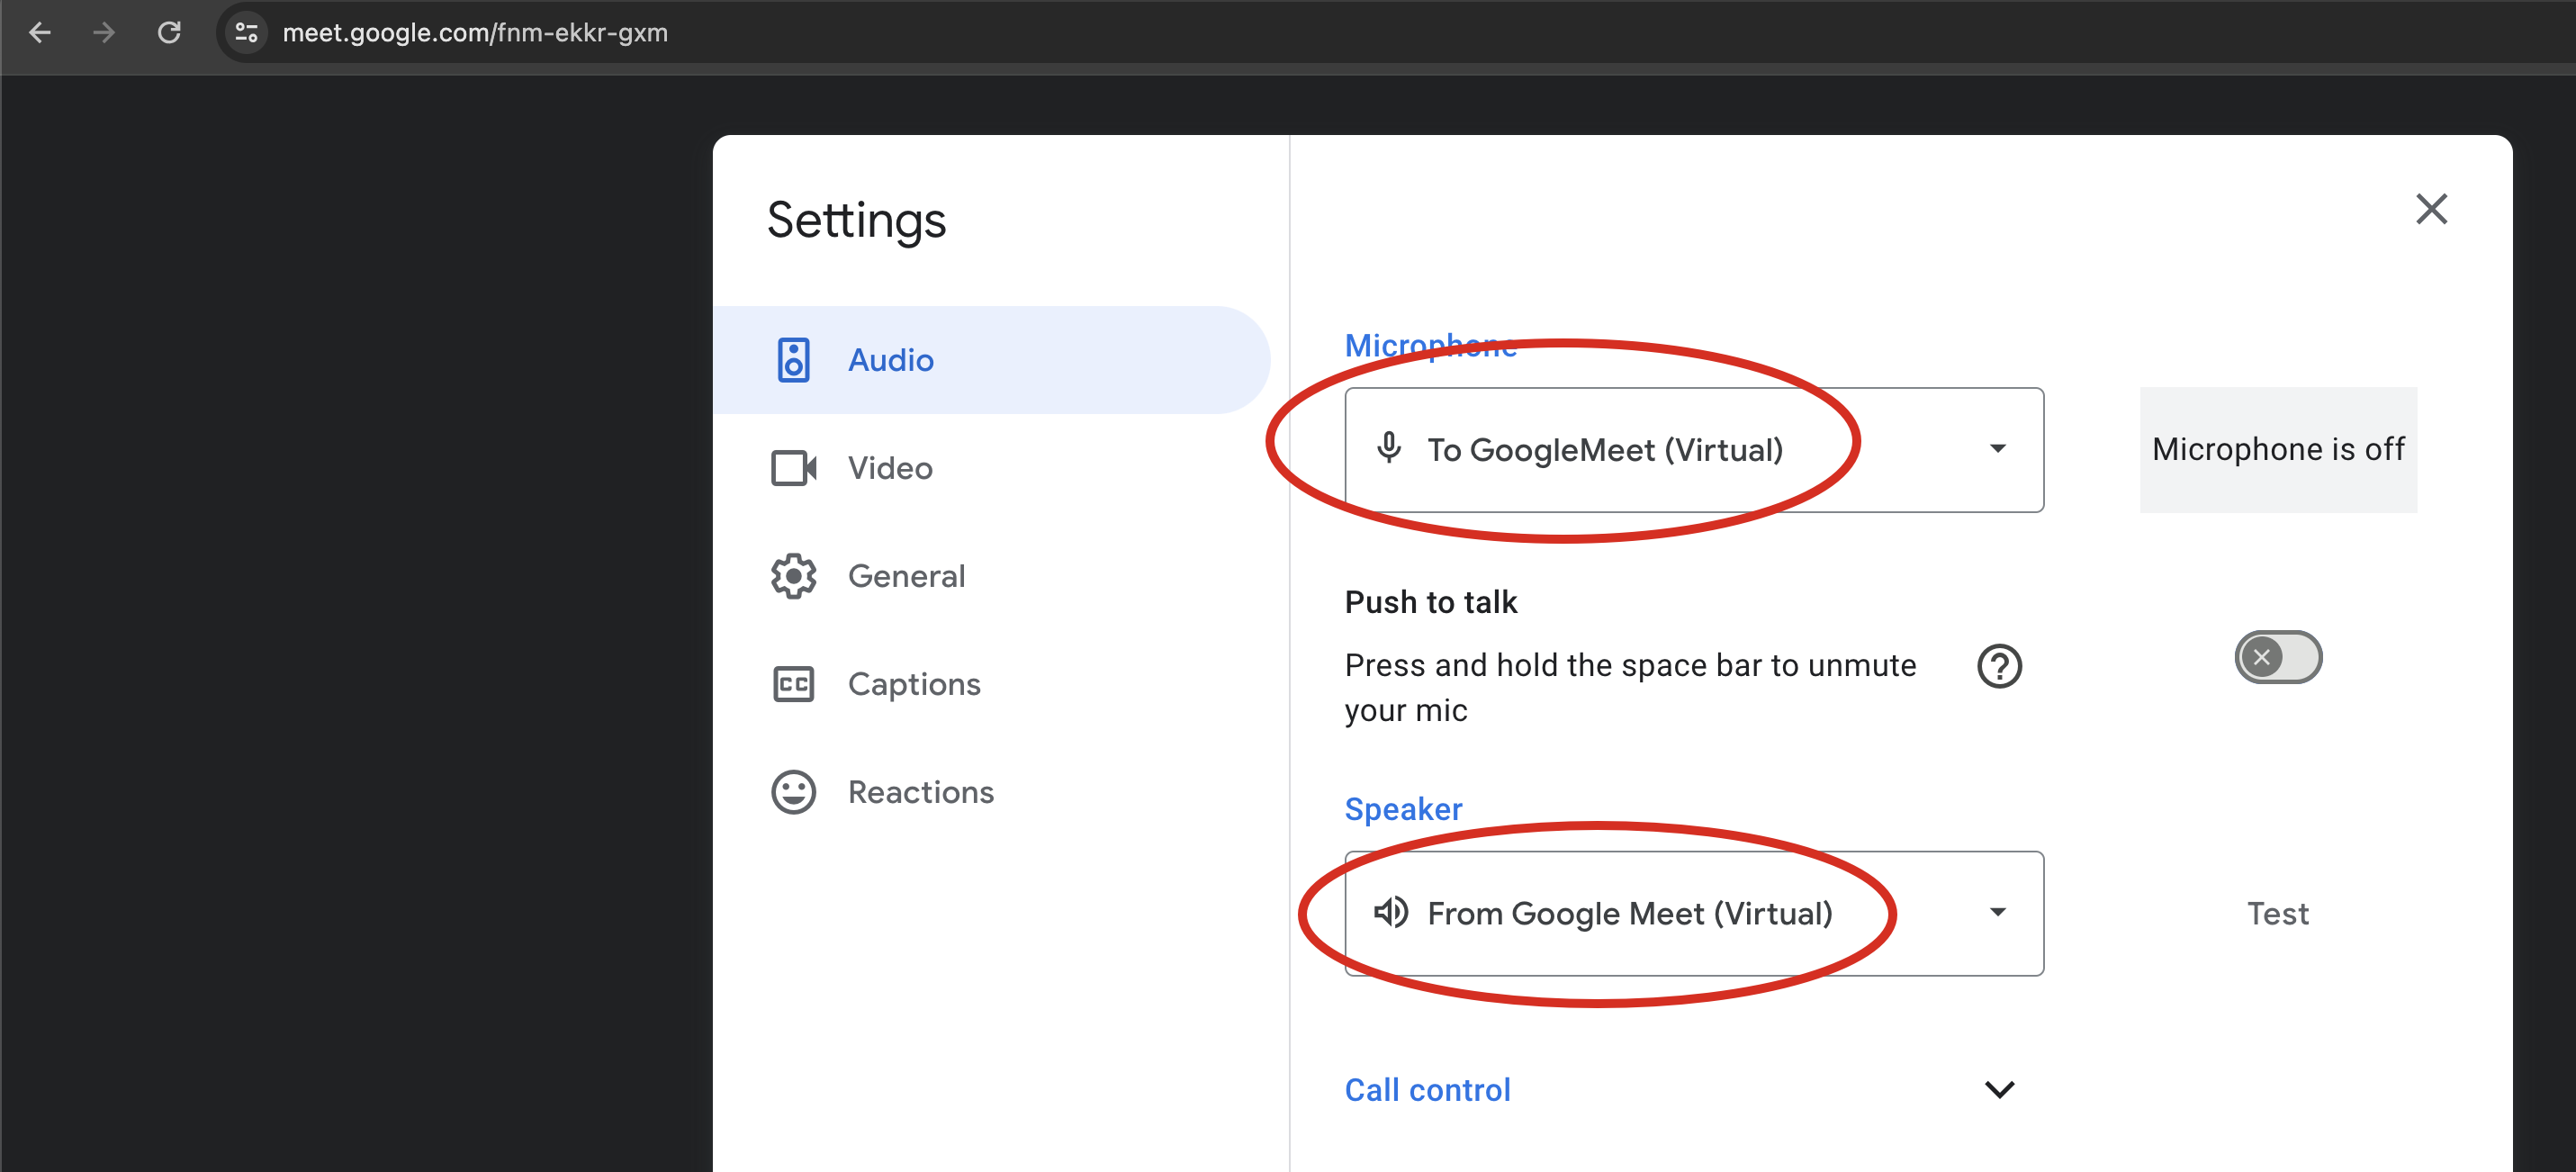
Google Meet (microphone “To GoogleMeet” and speakers “From GoogleMeet”)
7. Starting the conference
After connecting with your talent and clients, you can start the broadcast on Source-Live.
8. Final Thoughts
If you survived this tutorial, you now have a complete conference, with clients using any system they want to conference in, feeding them with high-quality video and audio and perfect sync over Source-Live. The talent will be connecting via Source-Connect using RTS for picture-lock if they are reading to picture sync.
Table of Contents